 51% off
- Physics
- Ready-made model
- Printed report included
Simple Electric Bell Using Copper Coils Physics Working Model Educational Investigatory Project
Code B0C3H3MG3W
- Paid for and delivered by Amazon or Flipkart. The current price and the delivery date for your PIN code are shown there.
- Sold by Gurukul Technicals Institute, Delhi.
- Need a different topic, a custom version or a school order? Ask on WhatsApp.
In this project guide
Ready-made model
About this model
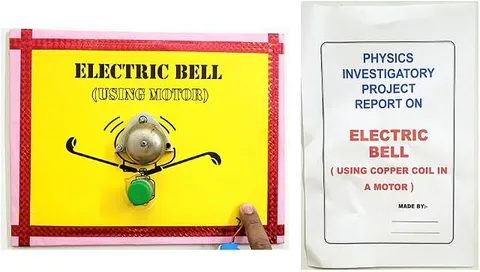
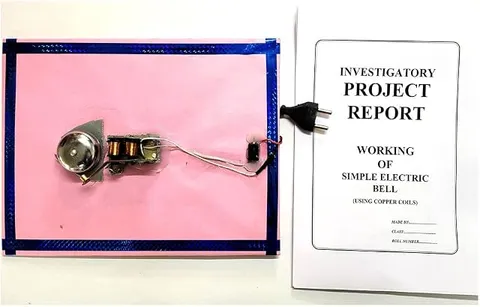
This physics working model shows how an electric bell works using an electromagnet. As shown in the photo, a mechanism with two copper coils, a hammer arm and a silver gong is fixed on a pink board with a blue border, and wires run to a small black switch and a cord ending in a two-pin plug. The listing gives the power type as AC and says a ready-to-submit printed report comes with it.
How it works
The science behind it
The idea the model demonstrates, in words you can use in your report and when you explain it.
An electric bell works on the magnetic effect of electric current. Its main part is an electromagnet: coils of insulated copper wire wound on a soft iron core. When current flows through the coils, the core becomes a magnet and pulls a soft iron strip called the armature, which carries a small hammer that strikes the gong. In the common make-and-break bell, the moving armature also pulls away from a contact screw, which breaks the circuit. The core then loses its magnetism, a spring pulls the armature back, the contact closes again and the cycle repeats many times a second, so the bell rings for as long as the switch is pressed. Soft iron is used because it becomes a magnet quickly and loses its magnetism as soon as the current stops; a steel core would stay magnetised and hold on to the armature. An electromagnet attracts iron whichever way the current flows, so a bell made for alternating current can work without a contact screw, pulling the armature on every half cycle.
Make it yourself
Make a battery-powered electric bell yourself
Build your own version from scratch, or use the steps to understand how the ready-made model is put together before you present it.
What you need 10
Step by step 9 steps
Wind the enamelled wire tightly over the iron core in several layers, leaving about 20 cm free at each end, and tape the coil so it cannot unwind.
Scrape the enamel off the last 2 cm of both wire ends with sandpaper until bare copper shows.
Fix the core flat on the base with clamps or U-nails, with its head pointing to where the armature will stand.
Screw one end of the iron strip to a wooden block so the strip stands upright a few millimetres in front of the core's head, and fix the small nut and bolt at its free end as the hammer.
Place the gong so the hammer is just clear of it at rest but strikes it when the strip is pulled towards the core.
Fix the contact screw on the far side of the strip, away from the core, so its tip just touches the strip when the strip is at rest.
- Wire everything in series
Cells to the push switch, the switch to one end of the coil, the other end of the coil to the screw holding the strip, and the contact screw back to the cells.
Press the switch. The strip should be pulled, break the contact, spring back and be pulled again, so the hammer strikes the gong repeatedly. Turn the contact screw a little at a time until the ringing is steady.
Label the electromagnet, armature, hammer, gong, contact screw and switch on the base.
Read this first
Safety first
Go through these points before you build or switch anything on. Younger students should do this with an adult.
- The ready-made model is listed as AC powered and has a two-pin plug: only an adult should plug it in and unplug it, with dry hands, and nobody should touch the coils, contacts or wires while it is plugged in.
- Unplug the ready-made model whenever it is not being shown, and do not use it if the cord, plug or switch is damaged or loose.
- Never connect a homemade bell to a wall socket; run it only from cells.
- File or tape the edges of the iron strip, which can be sharp, and use cutting tools only with an adult.
- Press the switch of the homemade bell only in short bursts, as the coil can warm up, and remove the cells when you finish.
Troubleshooting
If something does not work
The usual problems with this model and how to fix them. Open a problem to see the fix.
The homemade bell rings once and then stops
The contact screw is not touching the strip at rest, or the strip is sticking to the core. Turn the screw in until it just touches, and make sure the strip springs back freely.
Nothing happens when I press the switch
Check that the enamel is scraped off the wire ends, that the contact screw touches the strip, and that the cells are fresh and fitted the right way in the holder.
The strip buzzes but the hammer does not hit the gong
Move the gong a little closer to the hammer, or bend the strip slightly so the hammer reaches the gong when it is pulled.
The ready-made model does not ring when plugged in
Ask an adult to check that the socket is switched on and the plug is fully in. Never open or adjust the mechanism while it is plugged in; unplug it first and let an adult check the wires.
Exhibition day
How to present it
A running order for the exhibition table or the practical, step by step.
Ask an adult to plug in the model, then press the switch and let visitors hear the bell, keeping hands away from the coils.
Draw the circuit of a make-and-break bell on a chart and trace the path of the current step by step.
Explain why the core is made of soft iron and not steel, because examiners often ask this.
Show a separate battery demonstration: an iron nail wound with wire picks up pins while a cell is connected and drops them when it is removed.
Practice
Viva questions
Practice questions on this model, with short answers. Try each one aloud before you open the answer.
What is an electromagnet?
It is a coil of insulated wire wound on a soft iron core, which becomes a magnet only while current flows through the coil.
Why is the core of an electric bell made of soft iron?
Soft iron gains and loses magnetism quickly, so the armature is released as soon as the current stops.
How does a make-and-break bell keep ringing?
Each time the armature is pulled it breaks the contact, so the current switches off and on repeatedly and the hammer strikes the gong again and again.
What energy changes take place in an electric bell?
Electrical energy is changed into the mechanical energy of the moving hammer, and then into sound energy.
Project file
Project file outline
The headings of the project file, in order. Give each heading its own section and write it in your own words.
The listing includes a printed project report: use this outline to check that your own file covers every part.
Free ebook: Writing a Science Project FileContents
- Aim: to study the working of a simple electric bell
- Introduction: the magnetic effect of electric current
- Electromagnets, and why soft iron is used for the core
- Parts of an electric bell: electromagnet, armature, hammer, gong, contact screw and switch
- Working: how the make-and-break contact keeps the bell ringing
- Construction and circuit diagram
- Observations and precautions, including safety with mains power
- Uses of electric bells and other electromagnets
- Conclusion and bibliography
Buying checklist
Before you buy
What to check before you order the model, and what to do when it arrives.
1Before you order
- Ask your teacher whether a model that plugs into a wall socket is allowed at your exhibition; if not, build the battery version described above.
- Plan where an adult will plug it in at the venue, and keep the cord where nobody can trip over it.
- Keep the box, and carry the board flat so the hammer and gong stay lined up.
- Check the delivery date for your PIN code on the marketplace, and order well before the exhibition or practical.
- The project report is a learning aid. Read it, understand how the model works, and write your own observations; schools expect your own work.
- Practise explaining it. Judges ask what the model shows and why; knowing the science matters as much as the model. The viva questions above are a good place to start.
2When it arrives
- The listing says a ready-to-submit printed report comes with it; check that it is in the box when it arrives.
- Have an adult plug it in and test it as soon as it arrives.
Next steps
Take it further
Ways to turn this model into a bigger investigation or a stronger exhibition entry.
Build the battery version described above and compare it with the ready-made model.
Show the magnetic effect on its own: wind wire on an iron nail, connect a cell and pick up pins, then disconnect it and watch the pins drop.
Find out how a relay and an electromagnetic buzzer use the same principle.
Audience
Who it suits
Suits Class 7 to 10 science exhibitions and investigatory projects on the magnetic effect of electric current. The listing gives a minimum age of 12 and AC power, so an adult should handle the plug.
- SubjectPhysics
- TypeReady-made model
- Project reportPrinted report included
Free to read
Free ebooks for this topic
Free PDF ebooks from Gurukul Technicals Institute on the science, the making and the presenting of projects like this one.
- Free PDF ebook
Electricity and Magnetism Experiments
Hands-on experiments with cells, wires, bulbs and magnets
- Free PDF ebook
Physics Working Models Explained
Twenty classic models, how each works and how to make it
- Free PDF ebook
Your Science Exhibition Guide
Choose a project, build it, present it and answer the judges with confidence
- Free PDF ebook
Writing a Science Project File
How to write the report, from the cover page to the bibliography