- Physics
- Ready-made model
- Class 1 to 9
Basic Traffic Light Using Waste Material Physics Working Model and Project
Code B0C3H5NCB4
- Paid for and delivered by Amazon. The current price and the delivery date for your PIN code are shown there.
- Sold by Gurukul Technicals Institute, Delhi.
- Need a different topic, a custom version or a school order? Ask on WhatsApp.
In this project guide
Ready-made model
About this model
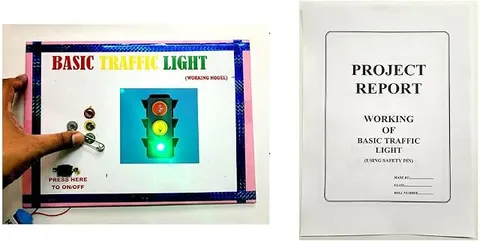
A working model of a basic traffic light made from waste material, showing how red, yellow and green signals control traffic at a crossing. It combines a simple electric circuit with lessons on road safety and on reusing waste.
How it works
The science behind it
The idea the model demonstrates, in words you can use in your report and when you explain it.
A traffic light uses three coloured lights switched in a fixed order. In a simple model, each light sits in its own branch of a parallel circuit, so each can be switched on without affecting the others, and a timer circuit can switch them automatically. Red means stop, yellow (amber) means get ready to stop, and green means go. Red is chosen for stop for a scientific reason: red light has the longest wavelength in the visible spectrum and is scattered the least by fog, dust and smoke, so it can be seen from the greatest distance. This is also why danger signals are red. Building a model from waste material applies the 3Rs: reduce, reuse and recycle. At busy crossings in Indian cities, signals often show a countdown timer so drivers know how long the light will stay on.
Make it yourself
Make a traffic light from waste material yourself
Build your own version from scratch, or use the steps to understand how the ready-made model is put together before you present it.
What you need 11
Step by step 8 steps
Wash and dry the carton, cover it in black, and mark three circles in a column: red at the top, yellow in the middle and green at the bottom.
Make a hole at each circle and glue a curved hood cut from the bottle above each one; real signals have hoods so sunlight does not make them hard to read.
Push an LED into each hole from inside and mark each long leg.
Wire each LED in its own branch: battery positive to its switch, switch to its resistor, resistor to the LED's long leg. Join all three short legs to battery negative.
Run the wires down inside the pole to the three switches on the base, and label the switches red, yellow and green.
Fix the pole and signal head firmly on the base, and make the road with a zebra crossing and a stop line.
- Test each switch
It should light only its own colour.
- Demonstrate the sequence
Red (stop), then green (go), then yellow (get ready to stop), then red again, using a timing chart.
Read this first
Safety first
Go through these points before you build or switch anything on. Younger students should do this with an adult.
- Cut cartons and bottles only with an adult nearby, and sand or tape any sharp plastic edges.
- Use hot glue only with an adult, and let it cool before touching.
- Wash all waste materials before use so nothing goes mouldy or smells.
- Keep a resistor in series with each LED, and unclip the battery when the model is not on show.
Troubleshooting
If something does not work
The usual problems with this model and how to fix them. Open a problem to see the fix.
Pressing one switch lights two LEDs
Two branches are joined where they should not be, or bare wires are touching. Separate the branches and tape each joint.
One LED does not light
It may be the wrong way round, or a joint may be loose. Check the long leg goes towards the resistor and switch.
The pole bends or the signal head falls over
Stiffen the pole with the skewer inside, and make the base heavier, for example with a small bottle of sand hidden under it.
The lights are hard to see in a bright hall
Make the hoods deeper, keep the carton face matt black, and use bright LEDs.
Exhibition day
How to present it
A running order for the exhibition table or the practical, step by step.
Run through the full sequence of red, yellow and green, and say what drivers and pedestrians should do at each colour.
Explain why red is used for stop, using scattering of light.
Name the waste materials used in the model and explain why reuse matters.
Add a small zebra crossing or road layout on the base to make the road safety message clear.
Practice
Viva questions
Practice questions on this model, with short answers. Try each one aloud before you open the answer.
Why is red used as a stop or danger signal?
Red light has the longest wavelength and is scattered the least by fog and smoke, so it can be seen from far away.
Why are the three lights usually connected in parallel?
In parallel, each light can be switched on or off independently, and if one fails the others still work.
What do the three colours of a traffic light mean?
Red means stop, yellow means get ready to stop, and green means go when it is safe.
What are the 3Rs?
Reduce, reuse and recycle, which are ways to cut down waste and save resources.
Project file
Project file outline
The headings of the project file, in order. Give each heading its own section and write it in your own words.
Free ebook: Writing a Science Project FileContents
- Aim: to make a working traffic light from waste materials and explain how signals control traffic
- Introduction: why traffic signals are needed at road crossings
- Meaning of red, yellow and green, and the order in which they change
- Why red is used for stop: it has the longest wavelength and is scattered least
- Circuit diagram: three LEDs in parallel branches, each with its own switch
- Waste materials used and how each was reused
- Road safety rules for pedestrians and drivers
- Improvements: an automatic timer and a pedestrian button
- Conclusion and bibliography
Buying checklist
Before you buy
What to check before you order the model, and what to do when it arrives.
1Before you order
- Some teachers ask for waste-material models to be made by the student; check whether a ready-made model is allowed for your project.
- Read the listing to see how the lights are powered and whether batteries are mentioned.
- Keep the box, as models made from light materials crush easily in a school bag.
- Check the delivery date for your PIN code on the marketplace, and order well before the exhibition or practical.
- Practise explaining it. Judges ask what the model shows and why; knowing the science matters as much as the model. The viva questions above are a good place to start.
2When it arrives
- Test the lights as soon as it arrives and again a few days before the exhibition.
Next steps
Take it further
Ways to turn this model into a bigger investigation or a stronger exhibition entry.
Make the lights change automatically using a 555 timer and a CD4017 counter, with diodes joining several counter outputs to one LED so red and green stay on longer than yellow.
Add a pedestrian push button and a buzzer that beeps while it is safe to cross, to help people who cannot see the lights.
Count the vehicles stopping at a nearby crossing during one red light and present the data in your report.
Audience
Who it suits
Suits Class 5 to 8 science exhibitions and best-out-of-waste or road safety activities.
- ClassClass 1 to 9
- SubjectPhysics
- TypeReady-made model
Free to read
Free ebooks for this topic
Free PDF ebooks from Gurukul Technicals Institute on the science, the making and the presenting of projects like this one.
- Free PDF ebook
Best Out of Waste Science Projects
Working models from bottles, cardboard, CDs and old parts
- Free PDF ebook
Physics Working Models Explained
Twenty classic models, how each works and how to make it
- Free PDF ebook
Your Science Exhibition Guide
Choose a project, build it, present it and answer the judges with confidence
- Free PDF ebook
Writing a Science Project File
How to write the report, from the cover page to the bibliography