- Physics
- Ready-made model
- Class 10 to 12
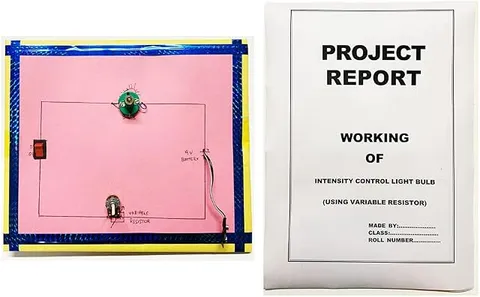
- Printed report included
Bulb Light Intensity Control Using Variable Resistor Readymade Physics Working Investigatory Project & Model for school & College with Classic Bulb (With Printed Report)
Code B099R1PDH7
- Paid for and delivered by Amazon. The current price and the delivery date for your PIN code are shown there.
- Sold by Gurukul Technicals Institute, Delhi.
- Need a different topic, a custom version or a school order? Ask on WhatsApp.
In this project guide
Ready-made model
About this model
A readymade physics working model that controls the brightness of a bulb with a variable resistor, so adjusting the resistor makes the light dimmer or brighter. The listing says it uses a classic bulb and includes a printed report, and it is an easy way to see Ohm's law at work.
How it works
The science behind it
The idea the model demonstrates, in words you can use in your report and when you explain it.
A variable resistor, also called a rheostat or potentiometer, lets you change the resistance in a circuit. When it is connected in series with a bulb, raising its resistance raises the total resistance, so by Ohm's law, I = V/R, the current falls. A filament bulb glows because current heats its thin tungsten filament until it gives off light, and the power it uses is P = I²R. With less current the filament is cooler and glows dimmer and more orange; with more current it glows brighter and whiter. Part of the energy is now turned into heat in the variable resistor itself, which is why this method wastes energy. The filament's resistance also rises as it heats, so a bulb does not obey Ohm's law exactly. The old resistor-type fan regulators in Indian homes worked this way and became warm; modern electronic regulators waste much less.
Make it yourself
Make a bulb brightness control with a variable resistor yourself
Build your own version from scratch, or use the steps to understand how the ready-made model is put together before you present it.
What you need 9
Step by step 9 steps
Fix the bulb holder, the potentiometer and the switch on the base, and label each part.
- Connect everything in series
Cells' positive to the switch, then to one end pin of the potentiometer; its middle pin to the bulb; the bulb back to the cells' negative.
Turn the knob fully towards the high-resistance end before switching on, so the bulb starts dim.
Switch on and turn the knob slowly: the bulb goes from a dull orange glow to bright white.
Put the multimeter in series on its current range (use the 10 A or 2 A socket, as the bulb can draw a few hundred milliamperes) and note the current at five knob positions.
Move the multimeter to its DC volts range, connect it across the bulb, and note the bulb's voltage at the same five positions.
Stick the paper scale round the knob and mark the five positions 1 to 5.
Work out the bulb's resistance, R = V/I, at each position. It rises as the bulb brightens, because a hotter tungsten filament has a higher resistance.
If you made the nichrome rheostat, slide the clip along the wire instead of turning a knob: a shorter length of wire in the circuit makes the bulb brighter.
Read this first
Safety first
Go through these points before you build or switch anything on. Younger students should do this with an adult.
- Use only cells or a battery; never use a household bulb or a household dimmer in this project.
- The bulb's glass, the potentiometer and the nichrome wire all get hot, so do not touch them while the circuit is on and let them cool afterwards.
- If the potentiometer smells or gets hot, switch off at once; it is under-rated for the current and should be replaced by a wire-wound type.
- Never connect the multimeter on its current range directly across the cells: that is a short circuit and can blow the meter's fuse.
Troubleshooting
If something does not work
The usual problems with this model and how to fix them. Open a problem to see the fix.
The bulb's brightness does not change at all
The potentiometer is probably connected across its two end pins, which gives a fixed resistance. Use the middle pin and one end pin.
The bulb only lights near one end of the knob's turn
The potentiometer's value is far too large, for example 10 kΩ. Over most of the turn the current is too small to light the bulb. Use one of about 50 to 100 Ω.
The bulb flickers when the knob is turned
The potentiometer's track is dirty or worn, or a wire is loose at its middle pin. Tighten the connections or replace the potentiometer.
The bulb does not light even at full brightness
Check that the bulb is screwed firmly into its holder, that its filament is not broken, and that the cells are the right way round.
Exhibition day
How to present it
A running order for the exhibition table or the practical, step by step.
Adjust the resistor slowly from one end to the other and describe how the brightness changes.
If you have a multimeter, measure the current at two settings to show that less current means a dimmer bulb.
Explain where the lost energy goes: some of it becomes heat in the variable resistor.
Do not try mains-powered dimmers yourself; keep the demonstration to the model's own supply.
Practice
Viva questions
Practice questions on this model, with short answers. Try each one aloud before you open the answer.
How does a variable resistor control the brightness of a bulb?
Increasing its resistance reduces the current through the bulb, so less power reaches the filament and it glows dimmer.
What is the relation between power, current and resistance?
Power P = I²R, so the power falls sharply as the current falls.
Why is a filament bulb called a non-ohmic device?
Its resistance increases as the filament heats up, so the current is not exactly proportional to the voltage.
Why are resistor-type regulators less efficient?
Part of the electrical energy is wasted as heat in the resistor instead of being used by the bulb or fan.
Project file
Project file outline
The headings of the project file, in order. Give each heading its own section and write it in your own words.
The listing includes a printed project report: use this outline to check that your own file covers every part.
Free ebook: Writing a Science Project FileContents
- Aim: to control the brightness of a bulb with a variable resistor and study how the current changes
- Theory: Ohm's law, resistances in series and power P = I²R
- Circuit diagram with the rheostat in series with the bulb
- Materials and construction
- Observation table: knob position, current, voltage across the bulb and brightness
- Graph of current against voltage for the bulb, and why a filament is non-ohmic
- Energy wasted as heat in the rheostat, and why modern dimmers use electronic switching instead
- Precautions and sources of error
- Conclusion and bibliography
Buying checklist
Before you buy
What to check before you order the model, and what to do when it arrives.
1Before you order
- Check that the topic matches your syllabus (electricity, Ohm's law and resistance) and your teacher's instructions.
- The listing mentions a classic bulb and a printed report; check what voltage the bulb needs and what battery or supply the listing says to use.
- Filament bulbs can blow, so find out where you could buy a bulb of the same voltage before the exhibition.
- Keep the box, and wrap the bulb when carrying the model.
- Check the delivery date for your PIN code on the marketplace, and order well before the exhibition or practical.
- The project report is a learning aid. Read it, understand how the model works, and write your own observations; schools expect your own work.
- Practise explaining it. Judges ask what the model shows and why; knowing the science matters as much as the model. The viva questions above are a good place to start.
2When it arrives
- Test it as soon as it arrives and again a few days before the exhibition.
Next steps
Take it further
Ways to turn this model into a bigger investigation or a stronger exhibition entry.
Plot current against voltage for the bulb and for a fixed resistor on the same graph, and compare the ohmic and non-ohmic curves.
Measure the brightness at each knob position with a light dependent resistor and a multimeter, and plot brightness against power.
Replace the bulb with an LED and its resistor, and explain why the LED's brightness changes differently.
Audience
Who it suits
Suits Class 8 to 10 physics exhibitions and practical projects on electricity and Ohm's law.
- ClassClass 10 to 12
- SubjectPhysics
- TypeReady-made model
- Project reportPrinted report included
Free to read
Free ebooks for this topic
Free PDF ebooks from Gurukul Technicals Institute on the science, the making and the presenting of projects like this one.
- Free PDF ebook
Electricity and Magnetism Experiments
Hands-on experiments with cells, wires, bulbs and magnets
- Free PDF ebook
Physics Working Models Explained
Twenty classic models, how each works and how to make it
- Free PDF ebook
Investigatory Projects for Class 11 and 12
Topics, method and report structure for physics, chemistry and biology
- Free PDF ebook
Your Science Exhibition Guide
Choose a project, build it, present it and answer the judges with confidence