- Physics
- Ready-made model
- Class 10 to 12
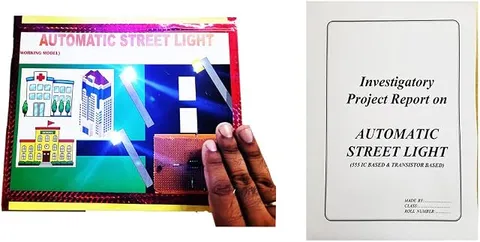
Automatic Street Light Physics Working Model Educational Investigatory Project, Multicolor
Code B0BN2DXDJJ
- Paid for and delivered by Amazon. The current price and the delivery date for your PIN code are shown there.
- Sold by Gurukul Technicals Institute, Delhi.
- Need a different topic, a custom version or a school order? Ask on WhatsApp.
In this project guide
Ready-made model
About this model
This working model is a street light that switches on by itself when it gets dark and off when it is bright, using a light sensor. It shows how simple automation can save electricity and remove the need for someone to switch lights on and off every day.
How it works
The science behind it
The idea the model demonstrates, in words you can use in your report and when you explain it.
The heart of an automatic street light is a light dependent resistor (LDR) placed in a voltage divider with a fixed resistor. The output of a divider is Vout = Vin × R2 / (R1 + R2), so when the LDR's resistance changes, its share of the voltage changes too. In daylight the LDR's resistance is low; at dusk it rises sharply, and the divider voltage at the transistor's base crosses the level needed to turn it on. The transistor then works as a switch, letting current flow through the lamp, or through a relay that controls a bigger lamp. Using a variable resistor in place of the fixed one lets you set how dark it must get before the light comes on. Many street lights and solar garden lamps follow this idea, so lights do not burn through the day and waste power.
Make it yourself
Make an automatic street light model yourself
Build your own version from scratch, or use the steps to understand how the ready-made model is put together before you present it.
What you need 9
Step by step 8 steps
Paint the base as a grey road with white lane markings and a footpath, leaving space at one end to hide the circuit.
- Make four lamps
Push an LED through each shade, run its two wires down a straw pole, and fix the poles along the footpath.
- Build the sensor stage
The LDR from positive to a sensor point, and the preset from the sensor point to negative. Feed the sensor point through the 1 kΩ resistor to the base of the first transistor.
Connect the first transistor's collector to positive through the 10 kΩ resistor, and also to the base of the second transistor. Connect both emitters to negative.
Connect each lamp LED with its own 470 Ω resistor between positive and the second transistor's collector, long legs towards positive.
- Switch on in daylight
The lamps should be off. Cover the LDR and they should all light. Adjust the preset so they come on at the darkness you want.
Fix the LDR on top of a pole or a small box facing the sky, where the lamps' own light cannot reach it.
Hide the circuit under a cardboard 'control room', label it, and draw the circuit diagram on a chart.
Read this first
Safety first
Go through these points before you build or switch anything on. Younger students should do this with an adult.
- Use only the 9 V battery; if you add a bigger lamp through a relay, keep that lamp on a low-voltage battery too, never mains.
- Do not add more lamps than the second transistor can handle; four LEDs with their resistors is a safe number.
- Soldering, cutting and hot glue need adult supervision.
- Disconnect the battery when you are not demonstrating.
Troubleshooting
If something does not work
The usual problems with this model and how to fix them. Open a problem to see the fix.
The lamps are on in daylight
Turn the preset. If that does not help, check that the LDR and the preset have not been swapped, because swapping them reverses the action.
The lamps flicker at dusk
The light is right at the switching point and the lamps' own glow is reaching the LDR. Shade the LDR from the lamps; real designs add hysteresis for the same reason.
Only some lamps light
Check the polarity and resistor joint of the dark LEDs, since each lamp has its own path.
All the lamps are dim
The battery may be weak, or the second transistor is not fully on. Fit a fresh battery and check the 10 kΩ resistor's value.
Exhibition day
How to present it
A running order for the exhibition table or the practical, step by step.
Place a cardboard box over the sensor, or dim the room, to imitate dusk, then lift it to show the lamp switching off at dawn.
Explain the voltage divider with the formula and a labelled circuit diagram.
Work out a rough saving: how many hours a lamp would waste in daylight if it were left on by hand.
Suggest an improvement, such as adding a motion sensor so the light dims when the road is empty.
Practice
Viva questions
Practice questions on this model, with short answers. Try each one aloud before you open the answer.
Which sensor is used in an automatic street light?
A light dependent resistor (LDR), whose resistance is high in darkness and low in bright light.
Why is a variable resistor used in such a circuit?
It changes the ratio in the voltage divider, which sets the light level at which the lamp turns on.
What is a voltage divider?
Two resistors in series across a supply, where the voltage at their junction depends on the ratio of their resistances.
What are the advantages of automatic street lights?
They save electricity and manpower, because the lights switch on and off by themselves exactly when needed.
Project file
Project file outline
The headings of the project file, in order. Give each heading its own section and write it in your own words.
Free ebook: Writing a Science Project FileContents
- Aim: to make a street light that switches on at dusk and off at dawn by itself
- Introduction: how automatic street lights save electricity and labour
- Materials and circuit diagram of the two-transistor switch
- Theory: the LDR, the voltage divider Vout = Vin × R2 / (R1 + R2), and the transistor as a switch
- How the second transistor inverts the signal so the lamps light in the dark
- Procedure: building the road and lamps, and setting the dusk level
- Observations: lamp state and LDR resistance in bright, dim and dark conditions (table)
- Benefits for cities and villages
- Conclusion, limitations and bibliography
Buying checklist
Before you buy
What to check before you order the model, and what to do when it arrives.
1Before you order
- Check the class level and topic (semiconductors, sensors or saving energy) before buying.
- Read the listing for the number of lamps, the power source and whether a report is included.
- Look for the adjusting knob, if there is one, so you can set it for the hall lighting.
- Keep the box and pack the poles carefully, as thin poles bend easily.
- Check the delivery date for your PIN code on the marketplace, and order well before the exhibition or practical.
- Practise explaining it. Judges ask what the model shows and why; knowing the science matters as much as the model. The viva questions above are a good place to start.
2When it arrives
- Test it by covering the sensor and with a torch on arrival, and again a few days before the exhibition.
Next steps
Take it further
Ways to turn this model into a bigger investigation or a stronger exhibition entry.
Add a relay and a 12 V low-voltage lamp to show how real street lights switch bigger loads.
Add a small solar panel and explain, with your teacher's help on the charging circuit, how solar street lights work.
Measure the LDR's resistance every ten minutes through an evening and plot the results.
Audience
Who it suits
Suits Class 8 to 12 physics exhibitions and investigatory projects on sensors, transistors and saving energy.
- ClassClass 10 to 12
- SubjectPhysics
- TypeReady-made model
Free to read
Free ebooks for this topic
Free PDF ebooks from Gurukul Technicals Institute on the science, the making and the presenting of projects like this one.
- Free PDF ebook
Physics Working Models Explained
Twenty classic models, how each works and how to make it
- Free PDF ebook
Investigatory Projects for Class 11 and 12
Topics, method and report structure for physics, chemistry and biology
- Free PDF ebook
Your Science Exhibition Guide
Choose a project, build it, present it and answer the judges with confidence
- Free PDF ebook
Writing a Science Project File
How to write the report, from the cover page to the bibliography