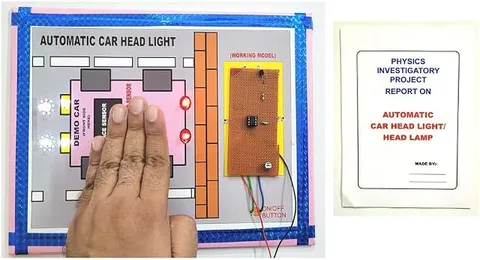
- Physics
- Ready-made model
- Class 10 to 12
- Printed report included
Automatic Car Headlight and Headlamp Circuit Working Physics Educational Investigatory Project with Printed Report
Code B0DK228V3G
- Paid for and delivered by Amazon. The current price and the delivery date for your PIN code are shown there.
- Sold by Gurukul Technicals Institute, Delhi.
- Need a different topic, a custom version or a school order? Ask on WhatsApp.
In this project guide
Ready-made model
About this model
This investigatory project demonstrates an automatic car headlight circuit that responds to the light conditions on the road. The listing says it includes a printed report. It is a practical example of how sensors and transistors make vehicles safer, and it suits Class 10 to 12 physics projects.
How it works
The science behind it
The idea the model demonstrates, in words you can use in your report and when you explain it.
Most school versions of this project use a light dependent resistor (LDR) as the sensor, whose resistance falls as the light on it increases. Placed in a voltage divider with a fixed resistor, it produces a voltage that depends on brightness: Vout = Vin × R2/(R1 + R2), where R2 is the resistor across which the output is taken. When the car enters a tunnel or the evening turns dark, the LDR's resistance rises, the voltage at the transistor's base crosses about 0.7 V, and the transistor switches the headlamp on; when light returns, it switches off. A variable resistor in the divider sets the darkness level at which it switches. The same idea can be turned around to dip the headlamp when bright light from an oncoming vehicle falls on the sensor, reducing glare for the other driver. Many newer cars on Indian roads have automatic headlamps that work on this principle of a light sensor controlling a switch.
Make it yourself
Make an automatic car headlight model yourself
Build your own version from scratch, or use the steps to understand how the ready-made model is put together before you present it.
What you need 8
Step by step 7 steps
Connect the potentiometer from the battery positive to a junction point, and the LDR from that junction to the battery negative, to make a voltage divider.
Connect the junction through the 1 kΩ resistor to the transistor's base, and the emitter to the battery negative.
Connect the two headlight LEDs, each with its 330 Ω resistor, from the battery positive to the collector.
Fit the LEDs at the front of the car and the LDR on the roof, facing upward and away from the headlights.
Switch on in a bright room; if the headlights are on, turn the potentiometer until they just go off.
Cover the LDR with your hand or drive the car into a cardboard 'tunnel': the headlights switch on, and off again when it comes out.
Test at dusk and under room lights, and set the potentiometer so the lights come on at the darkness you want.
Read this first
Safety first
Go through these points before you build or switch anything on. Younger students should do this with an adult.
- Use only the 9 V battery; never connect the model to a real vehicle's wiring.
- Do not shine the bright LEDs straight into anyone's eyes.
- Solder only with an adult, and let the joints cool before handling.
Troubleshooting
If something does not work
The usual problems with this model and how to fix them. Open a problem to see the fix.
The headlights flicker on and off at dusk
Light from the headlights is reaching the LDR and switching them back off. Point the LDR upward, shield it with a short tube, and keep it away from the LEDs.
The headlights never switch off
The LDR and potentiometer may be swapped, or the potentiometer is turned too far. Check the divider and turn the knob the other way.
The headlights never switch on, even in the dark
Check the transistor's pin order, the LED directions, and that the base resistor goes to the junction point.
The lights come on only in complete darkness
Turn the potentiometer to make the circuit more sensitive and test again.
Exhibition day
How to present it
A running order for the exhibition table or the practical, step by step.
Cover the sensor with your hand or a box to show the headlight turning on, as if the car were entering a tunnel.
Explain the voltage divider with a simple diagram and the formula.
If your board has a preset, adjust it to show how the switching level can be set.
Discuss road safety: why automatic headlights and dipping help drivers at night.
Practice
Viva questions
Practice questions on this model, with short answers. Try each one aloud before you open the answer.
How does the resistance of an LDR change with light?
It decreases as light intensity increases and increases in darkness.
What is the role of the transistor in this circuit?
It acts as a switch, turning the headlamp on or off when the voltage from the LDR divider crosses its switching level.
What is a voltage divider?
Two resistors in series across a supply; the voltage across one of them is a fixed fraction of the supply, Vout = Vin × R2/(R1 + R2).
Why should headlights be dipped for oncoming vehicles?
Bright high beams dazzle the other driver and can cause accidents; dipping lowers the beam and reduces glare.
Project file
Project file outline
The headings of the project file, in order. Give each heading its own section and write it in your own words.
The listing includes a printed project report: use this outline to check that your own file covers every part.
Free ebook: Writing a Science Project FileContents
- Aim: to make car headlights that switch on automatically when it gets dark
- The LDR and how its resistance changes with light
- The voltage divider and the transistor as a switch
- Circuit diagram of the headlight circuit and how it works
- Observations in sunlight, room light, shade and a tunnel
- Real automatic headlights and how they help road safety
- Limitations and possible improvements
- Precautions in placing the LDR, and conclusion
Buying checklist
Before you buy
What to check before you order the model.
1Check these first
- The listing says a printed report is included; still add your own observations and photos to it.
- Check whether the listing mentions a battery; keep a fresh 9 V battery ready if not.
- Exhibition halls are often brightly lit, so test the model in bright and dark spots beforehand and carry a box or cover to make darkness.
- Keep the box, and protect the LDR and LEDs from being bent.
- Check the delivery date for your PIN code on the marketplace, and order well before the exhibition or practical.
- Practise explaining it. Judges ask what the model shows and why; knowing the science matters as much as the model. The viva questions above are a good place to start.
Next steps
Take it further
Ways to turn this model into a bigger investigation or a stronger exhibition entry.
Add a second LDR at the front so the headlights dim when an oncoming car's lights shine on it.
Add a relay so the circuit can switch a brighter battery-powered lamp.
Measure the LDR's resistance at different light levels and plot a graph.
Audience
Who it suits
Class 10 to 12 physics investigatory projects and science exhibitions on sensors and road safety.
- ClassClass 10 to 12
- SubjectPhysics
- TypeReady-made model
- Project reportPrinted report included
Free to read
Free ebooks for this topic
Free PDF ebooks from Gurukul Technicals Institute on the science, the making and the presenting of projects like this one.
- Free PDF ebook
Electricity and Magnetism Experiments
Hands-on experiments with cells, wires, bulbs and magnets
- Free PDF ebook
Physics Working Models Explained
Twenty classic models, how each works and how to make it
- Free PDF ebook
Investigatory Projects for Class 11 and 12
Topics, method and report structure for physics, chemistry and biology
- Free PDF ebook
Your Science Exhibition Guide
Choose a project, build it, present it and answer the judges with confidence