- Physics
- Ready-made model
- Class 10 to 12
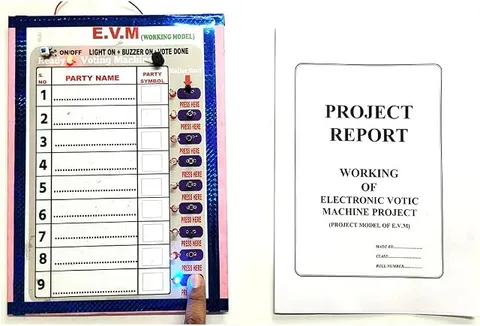
EVM Electronic Voting Box and Machine Physics Working Model and Educational Investigatory Project`, Multi,Collectible, Age:15+ years
Code B0C3H6PSBY
- Paid for and delivered by Amazon. The current price and the delivery date for your PIN code are shown there.
- Sold by Gurukul Technicals Institute, Delhi.
- Need a different topic, a custom version or a school order? Ask on WhatsApp.
In this project guide
Ready-made model
About this model
This working model of an electronic voting machine is about how pressing a button registers a vote electronically and how the votes are counted. It links digital electronics with civics, and the listing marks it for ages 15 and above.
How it works
The science behind it
The idea the model demonstrates, in words you can use in your report and when you explain it.
An electronic voting machine replaces paper ballots with switches, a counting circuit and memory. Each candidate's button is an input switch; pressing it closes a circuit and sends a pulse. A counter, built from logic gates or run by a microcontroller, adds one to that candidate's total, which is stored in binary as 0s and 1s and shown on a display when counting is done. A mechanical switch bounces, making and breaking contact several times within a few milliseconds, so the circuit debounces each press to count it only once. A lock-out stops a second vote until the next voter is allowed. In the real EVMs used by the Election Commission of India, the Control Unit with the polling officer enables one vote at a time on the Balloting Unit, and a VVPAT printer shows the voter a paper slip as a check. They run on batteries and are not connected to any network.
Make it yourself
Make an electronic voting machine model yourself
Build your own version from scratch, or use the steps to understand how the ready-made model is put together before you present it.
What you need 9
Step by step 8 steps
- Plan two units
A control unit with the ready and result buttons and the LCD, and a balloting unit with the candidate buttons and the green LED.
Wire each button between an input pin and ground, and turn on the board's internal pull-up resistors in your program so an unpressed button reads steadily.
Connect the LCD's I2C adapter to the board's SDA, SCL, 5 V and ground pins.
- Write the program
Wait for the ready button, accept exactly one candidate press, add one to that candidate's count, beep and light the LED, then lock all candidate buttons until ready is pressed again.
Make each press count only once by ignoring the button for a short time after it is pressed, because switch contacts bounce.
Program the result button to show each candidate's total on the LCD, ideally only after a separate 'close poll' step.
Fit the parts into the two boxes, label the candidate buttons with names and symbols, and join the units with a cable.
Hold a mock election in class and check that the machine's totals match a paper tally of the same votes.
Read this first
Safety first
Go through these points before you build or switch anything on. Younger students should do this with an adult.
- Power the board only from its USB cable, a power bank or a 9 V battery into its power input; never from any higher-voltage supply.
- Solder only with an adult, keep the hot iron on its stand and work in a ventilated room.
- Disconnect the battery before changing any wiring.
- Make sure no bare wires can touch the metal parts of the board and short it.
Troubleshooting
If something does not work
The usual problems with this model and how to fix them. Open a problem to see the fix.
One press counts as two or more votes
The button contacts bounce. Add a short delay after each press in the program, and lock the buttons until the next ready press.
The LCD lights up but shows no text
Turn the small contrast screw on the I2C adapter, and check the address in your program; many of these adapters use 0x27 or 0x3F.
A button seems to vote by itself
That input is floating. Make sure the internal pull-up is switched on for that pin or add a 10 kΩ pull-up resistor.
The board restarts when the buzzer sounds
The battery is weak and its voltage dips. Use a fresh battery or a USB power bank.
Exhibition day
How to present it
A running order for the exhibition table or the practical, step by step.
Cast a few votes for different candidates and show how the model responds to each press; if it displays totals, check that they match.
Explain how an EVM makes sure that one press gives exactly one vote.
Draw a block diagram: buttons as input, counter and memory as processing, display as output.
Keep politics out of it by using fruits, colours or school house names as dummy candidates.
Practice
Viva questions
Practice questions on this model, with short answers. Try each one aloud before you open the answer.
What are the two main units of an EVM used in Indian elections?
The Control Unit, kept with the polling officer, and the Balloting Unit, on which the voter presses the button.
What is switch debouncing?
A mechanical switch makes and breaks contact several times when pressed, so debouncing makes the circuit treat it as a single press.
What is VVPAT?
Voter Verifiable Paper Audit Trail, a printer attached to the EVM that shows the voter a slip with the chosen candidate's name and symbol.
In what form does the machine store the vote counts?
As binary numbers made of 0s and 1s in electronic memory.
Project file
Project file outline
The headings of the project file, in order. Give each heading its own section and write it in your own words.
Free ebook: Writing a Science Project FileContents
- Aim: to build a working model of an electronic voting machine
- Introduction: paper ballots and electronic voting
- The control unit, the balloting unit and the VVPAT
- Block diagram and circuit diagram
- Program logic: ready, vote, lock and count, shown as a flowchart
- Construction and testing with a mock election
- Observations: machine totals compared with a manual tally
- Advantages, limitations and security of electronic voting
- Conclusion
Buying checklist
Before you buy
What to check before you order the model, and what to do when it arrives.
1Before you order
- The listing marks this for ages 15 and above, so younger students should build and present it with an adult.
- Read the listing to see what is mentioned with the model, such as a battery or display, and plan for anything missing.
- Practise a full mock vote and result display before the exhibition, as visitors will want to vote.
- Keep the box to protect the buttons and display.
- Check the delivery date for your PIN code on the marketplace, and order well before the exhibition or practical.
2When it arrives
- Try it as soon as it arrives by casting a few test votes and checking the count.
Next steps
Take it further
Ways to turn this model into a bigger investigation or a stronger exhibition entry.
Store the counts in the board's non-volatile memory so they survive a power cut.
Add a VVPAT-style display that shows the chosen symbol for a few seconds after each vote.
Add a secret code that must be entered before results can be shown.
Build a second version with hardware counter chips and seven-segment displays, and compare the two designs.
Audience
Who it suits
Suits Class 9 to 12 physics and electronics investigatory projects and social science exhibitions on elections.
- ClassClass 10 to 12
- SubjectPhysics
- TypeReady-made model
Free to read
Free ebooks for this topic
Free PDF ebooks from Gurukul Technicals Institute on the science, the making and the presenting of projects like this one.
- Free PDF ebook
Physics Working Models Explained
Twenty classic models, how each works and how to make it
- Free PDF ebook
Investigatory Projects for Class 11 and 12
Topics, method and report structure for physics, chemistry and biology
- Free PDF ebook
Your Science Exhibition Guide
Choose a project, build it, present it and answer the judges with confidence
- Free PDF ebook
Writing a Science Project File
How to write the report, from the cover page to the bibliography