- Physics
- Ready-made model
- Class 10 to 12
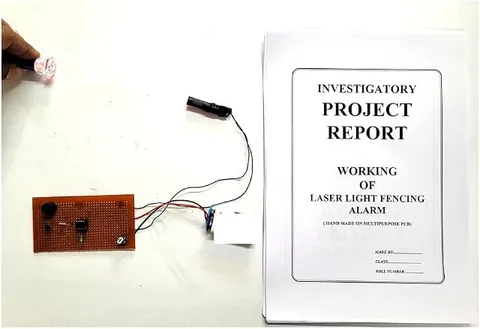
Laser Light Fencing Alarm Handmade Investigatory Minor Project on Multipurpose PCB
Code B0C3H42NVV
- Paid for and delivered by Amazon. The current price and the delivery date for your PIN code are shown there.
- Sold by Gurukul Technicals Institute, Delhi.
- Need a different topic, a custom version or a school order? Ask on WhatsApp.
In this project guide
Ready-made model
About this model
A handmade minor project that builds a laser fence alarm on a multipurpose PCB, raising an alarm when someone breaks a thin beam of laser light. It demonstrates light sensors and electronic switching, the same idea behind security beams in banks and museums.
How it works
The science behind it
The idea the model demonstrates, in words you can use in your report and when you explain it.
A laser gives monochromatic light, meaning light of a single colour, in a narrow beam that spreads very little, so it can be aimed at a sensor some distance away. In a common design the beam falls on a light dependent resistor, or LDR. An LDR is made of a semiconductor such as cadmium sulphide whose resistance is low in bright light and very high in darkness, because light frees more charge carriers inside it. While the beam falls on it, the LDR holds a transistor in the off state. When an intruder blocks the beam, the LDR's resistance rises sharply, the voltage at the transistor's base changes, and the transistor switches the buzzer on. Some versions use a photodiode instead, but the principle of turning a change in light into a change in current is the same. Jewellery showrooms and bank strongrooms use beam-break alarms built on this idea.
Make it yourself
Make a laser fence alarm on a zero PCB yourself
Build your own version from scratch, or use the steps to understand how the ready-made model is put together before you present it.
What you need 11
Step by step 8 steps
- Plan the board
The transistor, resistor, preset and buzzer go on the PCB, while the LDR is on long wires so it can sit on a fence post.
Solder the 10 kΩ resistor and the preset in series from positive to the transistor's base, and connect the LDR from the base to negative.
Connect the buzzer's positive lead to positive and its negative lead to the collector, and the emitter to negative. Check the transistor's legs in its datasheet before soldering.
Fix the LDR at the end of the black tube on one post, facing the laser.
Fix the laser module firmly on another post, powered from its own cells, and aim its dot right into the tube. Use mirrors at the corner posts to take the beam round the house.
Switch on with the beam on the LDR. Turn the preset until the buzzer just stops, then a little further.
Pass your hand through the beam: the buzzer sounds while the beam is blocked and stops when it reaches the LDR again.
Fix the posts and mirrors firmly so the beam stays aligned, and label the parts.
Read this first
Safety first
Go through these points before you build or switch anything on. Younger students should do this with an adult.
- Never look into the laser beam or point it at anyone, even by reflection from the mirrors, and keep the beam below eye level at the exhibition.
- Use only a low-power laser module of the kind sold for school projects, never a high-power or 'burning' laser.
- Solder only with an adult present, and keep the iron in its stand.
- Unclip the batteries when the model is not on show.
Troubleshooting
If something does not work
The usual problems with this model and how to fix them. Open a problem to see the fix.
The buzzer sounds even with the beam on the LDR
The dot is probably not landing exactly on the LDR, or the preset needs adjusting. Re-aim the laser into the tube and turn the preset slowly until the buzzer stops.
The buzzer never sounds when the beam is blocked
Bright room light may be reaching the LDR, so lengthen the tube. Also check the transistor's legs and that the buzzer's positive lead goes to positive.
The beam drifts off the LDR after a while
The laser or a mirror is moving. Fix them rigidly with hot glue or clamps and avoid posts that bend.
The laser dot is dim or flickers
Its cells are getting weak. Fit fresh cells and check the laser's wires are firmly joined.
Exhibition day
How to present it
A running order for the exhibition table or the practical, step by step.
Never point the laser at anyone's eyes, and state this safety rule to the judges before you begin.
Block the beam with your hand to trigger the alarm, then explain each step from light to alarm.
Use a small mirror to reflect the beam round a corner and show how a whole area can be guarded.
Show how an LDR's resistance changes with light, ideally with multimeter readings in light and in dark.
Practice
Viva questions
Practice questions on this model, with short answers. Try each one aloud before you open the answer.
What is an LDR?
A light dependent resistor is a component whose resistance falls when light falls on it and rises in darkness.
Why is a laser used instead of an ordinary torch?
A laser beam is narrow and spreads very little, so it can travel a long distance and still fall accurately on the sensor.
What does a transistor do in a beam-break alarm?
In the common LDR design it acts as an electronic switch, turning the alarm on when the change in the LDR's resistance changes its base voltage.
Why should you never look into a laser beam?
Its energy is concentrated in a narrow beam, and the eye's lens focuses it onto the retina, which can be permanently damaged.
Project file
Project file outline
The headings of the project file, in order. Give each heading its own section and write it in your own words.
Free ebook: Writing a Science Project FileContents
- Aim: to make a security alarm that sounds when a laser beam is interrupted
- Introduction: laser security systems in banks, museums and homes
- Properties of laser light: a single colour, a narrow beam that spreads very little
- Working of the LDR as a light sensor and the transistor as a switch
- Circuit diagram and construction on a zero PCB
- Observations: alarm response with the beam on, the beam blocked and in room light
- Using mirrors and the law of reflection to guard a larger area
- Precautions, limitations and improvements
- Conclusion and bibliography
Buying checklist
Before you buy
What to check before you order the model.
1Check these first
- Check that a handmade electronics project suits your class level and your teacher's instructions.
- Read the listing to see which battery the model needs and whether the laser runs from the same battery.
- Test it in a room as bright as the exhibition hall, because strong lights can affect the LDR, and practise lining up the beam.
- Protect the circuit board and the laser in transport and keep the box.
- Carry spare batteries on the exhibition day.
- Check the delivery date for your PIN code on the marketplace, and order well before the exhibition or practical.
Next steps
Take it further
Ways to turn this model into a bigger investigation or a stronger exhibition entry.
Make the alarm latch with an SCR (thyristor) or a relay so it keeps sounding after the intruder has passed, with a reset button.
Use mirrors to make a zigzag fence and find how many reflections the beam can take before the alarm stops working reliably.
Replace the buzzer with a relay that switches a low-voltage lamp, or with a microcontroller that counts how many times the beam is broken.
Audience
Who it suits
Suits Class 9 to 12 physics investigatory projects and minor projects for diploma students.
- ClassClass 10 to 12
- SubjectPhysics
- TypeReady-made model
Free to read
Free ebooks for this topic
Free PDF ebooks from Gurukul Technicals Institute on the science, the making and the presenting of projects like this one.
- Free PDF ebook
Physics Working Models Explained
Twenty classic models, how each works and how to make it
- Free PDF ebook
Investigatory Projects for Class 11 and 12
Topics, method and report structure for physics, chemistry and biology
- Free PDF ebook
Your Science Exhibition Guide
Choose a project, build it, present it and answer the judges with confidence
- Free PDF ebook
Writing a Science Project File
How to write the report, from the cover page to the bibliography