- Physics
- Ready-made model
- Class 1 to 9
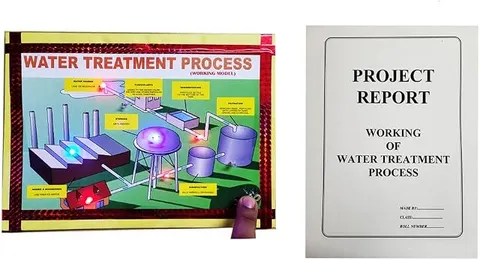
Water Treatment Process Working Model Educational Science Project
Code B0BN2DZB8B
- Paid for and delivered by Amazon. The current price and the delivery date for your PIN code are shown there.
- Sold by Gurukul Technicals Institute, Delhi.
- Need a different topic, a custom version or a school order? Ask on WhatsApp.
In this project guide
Ready-made model
About this model
This working model explains how a water treatment plant turns river or lake water into safe drinking water through a series of steps. It helps a student describe what each stage removes, from floating rubbish to invisible germs.
How it works
The science behind it
The idea the model demonstrates, in words you can use in your report and when you explain it.
Raw water from a river or lake contains floating objects, fine mud and clay, dissolved substances and microorganisms, so it is cleaned in stages. Screening removes large floating objects such as leaves and plastic. In coagulation, a chemical such as alum is mixed in; it makes tiny suspended particles stick together into larger clumps called flocs. In sedimentation, the water rests in large tanks and the heavy flocs settle at the bottom. The clearer water then passes through filter beds of sand and gravel, sometimes with activated carbon, which trap the remaining particles. Finally, disinfection, usually chlorination, kills disease-causing bacteria, and a small amount of chlorine stays in the water to protect it in the pipes. The clean water is then stored and supplied to homes. In many Indian homes and villages, a piece of alum (phitkari) is swirled in muddy water so that the mud settles, which is the same idea as coagulation.
Make it yourself
Make a water treatment plant model yourself
Build your own version from scratch, or use the steps to understand how the ready-made model is put together before you present it.
What you need 10
Step by step 8 steps
Arrange the tanks on the step stand from highest to lowest: intake, coagulation, sedimentation, filter and storage, and join each to the next with a tube near the top so water flows down by gravity.
Fit the mesh across the entry of the intake tank to catch leaves, paper and other floating rubbish.
Make the filter in a bottle with its bottom cut off by an adult, held upside down: cloth at the neck, then gravel, coarse sand, charcoal and fine sand on top, rinsing each layer before adding it.
Put the pump in a bucket of muddy water as the river and run its tube to the intake tank, so the flow starts at the press of a switch.
With an adult, stir a pinch of crushed alum into the coagulation tank and stir gently for a minute: the fine mud begins to clump into flocs.
Let the water rest in the sedimentation tank for 15 to 20 minutes before opening the flow onward, and point out the flocs settling at the bottom.
Pass the clearer water through the filter into the storage tank, and compare a glass of it with a glass of the muddy river water.
Mark the last stage 'disinfection by chlorine or UV' with a card, and a blue LED if you like, and explain it rather than adding any chemical.
Read this first
Safety first
Go through these points before you build or switch anything on. Younger students should do this with an adult.
- The water from this model is not safe to drink, however clear it looks, because it has not been disinfected. Never taste it.
- Handle alum only with an adult, keep it away from eyes and mouth, and wash your hands afterwards.
- Do not use bleach or chlorine tablets in the model; show disinfection with a label instead.
- Keep the pump's cell holder and switch on the dry side of the stand, away from splashes, and switch off before lifting the pump out.
Troubleshooting
If something does not work
The usual problems with this model and how to fix them. Open a problem to see the fix.
The water comes out of the filter still muddy
The sand was not rinsed or the layers have mixed. Rinse the sand and charcoal until the water runs clear, rebuild the layers, and let the first cupful run to waste.
The flocs do not form
There is too little alum or it was not stirred in. Add a tiny pinch more, stir gently for a minute, then let it stand; stirring too hard breaks the flocs up again.
The pump runs but no water moves
The pump must be fully under water with its inlet clear of leaves and paper, and the tube must not be kinked or lifted too high for it. Shorten the tube or lower the intake tank.
Tanks overflow during the demonstration
The pump is faster than the filter. Run it in short bursts, or fit a clip on the tube to slow the flow.
Exhibition day
How to present it
A running order for the exhibition table or the practical, step by step.
Follow the water through the model stage by stage and say what each stage removes.
Show two jars of muddy water side by side, one with a little alum stirred in, to demonstrate coagulation live.
Explain why clear water is not always safe water, because germs are invisible.
Link the topic to saving water and keeping rivers clean, since a treatment plant can only do so much.
Practice
Viva questions
Practice questions on this model, with short answers. Try each one aloud before you open the answer.
Why is alum added during water treatment?
Alum acts as a coagulant: it makes fine suspended particles stick together into heavier flocs that settle quickly.
What is the difference between sedimentation and decantation?
Sedimentation is the settling of heavy particles at the bottom, and decantation is pouring off the clear liquid above them.
Why is chlorine added to drinking water?
Chlorine kills disease-causing microorganisms, and the small amount left over keeps the water safe as it travels through the pipes.
Is clear water always safe to drink?
No. Clear water can still contain harmful germs and dissolved chemicals, so it must be disinfected or purified.
Project file
Project file outline
The headings of the project file, in order. Give each heading its own section and write it in your own words.
Free ebook: Writing a Science Project FileContents
- Aim: to show how river water is made safe to drink in a water treatment plant
- Introduction: impurities in raw water and why they matter for health
- Stages of treatment: screening, coagulation, sedimentation, filtration and disinfection
- How alum makes fine particles settle
- Construction of the model and the filter layers
- Observations: appearance of the water after each stage
- Water-borne diseases and how treatment prevents them
- Saving water and keeping rivers clean
- Conclusion and bibliography
Buying checklist
Before you buy
What to check before you order the model, and what to do when it arrives.
1Before you order
- Check that water purification matches your class chapter and the exhibition theme.
- Look at the listing photos to see which stages are shown, so you can add labels for any stage your textbook covers that the model leaves out.
- Empty and dry any water before packing it again, and keep the box for transport.
- Check the delivery date for your PIN code on the marketplace, and order well before the exhibition or practical.
- Practise explaining it. Judges ask what the model shows and why; knowing the science matters as much as the model. The viva questions above are a good place to start.
2When it arrives
- Check on arrival that tubes and tanks are not cracked, and if it runs with water, try it on a tray a few days early.
Next steps
Take it further
Ways to turn this model into a bigger investigation or a stronger exhibition entry.
Compare the water from each stage with a simple clarity test, such as how far down a glass of it you can still read a printed word.
Find out the stages used at your city's water treatment plant and compare them with your model.
Add a rainwater harvesting tank feeding into the model and explain how it reduces the demand on rivers.
Audience
Who it suits
Suits Class 6 to 9 science exhibitions and lessons on water, separation of substances and public health.
- ClassClass 1 to 9
- SubjectPhysics
- TypeReady-made model
Free to read
Free ebooks for this topic
Free PDF ebooks from Gurukul Technicals Institute on the science, the making and the presenting of projects like this one.
- Free PDF ebook
Physics Working Models Explained
Twenty classic models, how each works and how to make it
- Free PDF ebook
Your Science Exhibition Guide
Choose a project, build it, present it and answer the judges with confidence
- Free PDF ebook
Writing a Science Project File
How to write the report, from the cover page to the bibliography
- Free PDF ebook
Viva Questions for Science Projects
How to answer examiner questions, with sample questions for popular projects