- Physics
- Ready-made model
- Class 10 to 12
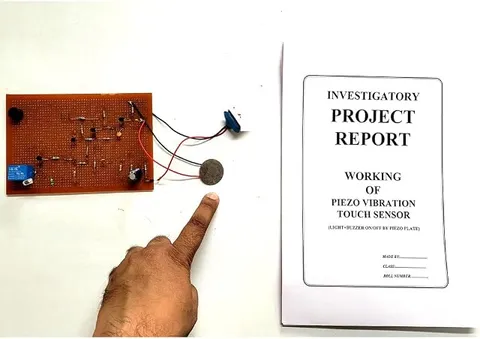
Piezo Vibration Touch Sensor Handmade Investigatory Minor Project on Multipurpose PCB
Code B0C3H5DFF8
- Paid for and delivered by Amazon. The current price and the delivery date for your PIN code are shown there.
- Sold by Gurukul Technicals Institute, Delhi.
- Need a different topic, a custom version or a school order? Ask on WhatsApp.
In this project guide
Ready-made model
About this model
This project uses a piezo element as a sensor that responds to a tap, touch or vibration. It demonstrates the piezoelectric effect, in which some materials produce a small voltage when they are pressed or bent. The listing describes it as hand-built on a multipurpose PCB.
How it works
The science behind it
The idea the model demonstrates, in words you can use in your report and when you explain it.
Certain crystals, such as quartz, and some ceramic materials have a special property: when they are squeezed, bent or tapped, the positive and negative charges inside them shift slightly and a voltage appears across their faces. This is the direct piezoelectric effect. The reverse also happens: apply a voltage and the material changes shape slightly, which is how a piezo buzzer makes sound. In a vibration sensor, a thin piezo disc turns a tap or knock into a short voltage pulse. The pulse is small and brief, so a transistor or IC stage amplifies it and uses it to switch on an LED, buzzer or other output. The click-type gas lighter used in many Indian kitchens is a good example: pressing it strikes a piezo crystal, which produces a voltage high enough to make a spark. Quartz watches use the same effect, with a vibrating quartz crystal keeping accurate time.
Make it yourself
Make a piezo vibration and touch sensor yourself
Build your own version from scratch, or use the steps to understand how the ready-made model is put together before you present it.
What you need 9
Step by step 8 steps
If the disc has no wires, solder short ones on with an adult, and fit the 1 MΩ resistor across its two wires to drain away stray charge.
Connect the disc's signal wire through the 10 kΩ resistor to the transistor's base and its other wire to negative, and fit the diode from emitter to base with its band towards the base, so reverse spikes are clamped.
Connect the transistor's emitter to negative and its collector to pin 2 of the 555, with the 10 kΩ pull-up from pin 2 to positive.
Wire the 555 as a monostable: pins 4 and 8 to positive, pin 1 to negative, the 100 kΩ resistor from positive to pins 6 and 7 joined, the 10 µF capacitor from pin 6 to negative, and the 10 nF capacitor from pin 5 to negative.
Connect the LED with its resistor, and the buzzer, from pin 3 to negative.
Tape the piezo disc face down on a table top or a thin board.
Switch on and tap near the disc: the pulse turns the transistor on for an instant, pulling pin 2 low, and the LED and buzzer come on for about a second.
Tap at different distances and with different strengths, and record where it stops responding.
Read this first
Safety first
Go through these points before you build or switch anything on. Younger students should do this with an adult.
- Use only the 9 V battery; the sensor never needs mains power.
- Tap the disc gently with a finger or a pencil; a hard blow can crack its thin ceramic layer.
- Solder the disc quickly and only with an adult, because too much heat lifts the wire or damages the ceramic.
- Keep the buzzer away from people's ears while testing.
Troubleshooting
If something does not work
The usual problems with this model and how to fix them. Open a problem to see the fix.
Nothing happens when I tap
Check the disc's wires and the transistor's pins, and press the disc firmly against the surface. A disc lying loose picks up very little vibration.
It triggers by itself
The circuit is picking up hum or footsteps. Check the 1 MΩ resistor across the disc, keep its wires short, and place the board away from people walking past.
The LED flashes too briefly to see
The short pulse is reaching the LED without being stretched. Check the 555's timing resistor and capacitor on pins 6 and 7 and the trigger connection to pin 2.
A wire has come off the disc
Re-solder it with an adult, quickly, with a hot clean tip, and tape the wire down so it does not pull on the joint.
Exhibition day
How to present it
A running order for the exhibition table or the practical, step by step.
Tap the sensor gently and then harder, and show how the response changes.
Explain the piezoelectric effect using the kitchen gas lighter as an example.
If it is sensitive enough, show it reacting to a tap on the table rather than on the sensor itself.
Mention real uses such as knock sensors, guitar pickups and vibration alarms.
Practice
Viva questions
Practice questions on this model, with short answers. Try each one aloud before you open the answer.
What is the piezoelectric effect?
The production of a voltage across certain materials when they are mechanically stressed, for example pressed or bent.
Name one natural piezoelectric material.
Quartz.
What is the reverse piezoelectric effect?
When a voltage is applied, the material changes shape slightly; piezo buzzers use this to make sound.
Why does the sensor's output need to be amplified?
The voltage pulse from a gentle tap is small and very short, so it must be amplified to work an LED or buzzer reliably.
Project file
Project file outline
The headings of the project file, in order. Give each heading its own section and write it in your own words.
Free ebook: Writing a Science Project FileContents
- Aim: to make a sensor that detects taps and vibrations using a piezo element
- The direct and reverse piezoelectric effects
- Why the piezo pulse needs amplifying and stretching
- Circuit diagram: the transistor stage and the 555 monostable
- Construction on the multipurpose PCB
- Observation table: distance and strength of tap against response
- Uses: knock sensors, security alarms, gas lighters and buzzers
- Conclusion and precautions
Buying checklist
Before you buy
What to check before you order the model, and what to do when it arrives.
1Before you order
- The title calls it a minor project; check with your teacher that it suits your class and syllabus.
- Read the listing for the battery it needs; do not assume one is supplied.
- Carry the board flat in its box, because the piezo disc's wires break easily.
- Try it on the kind of table you will have at the exhibition, as some surfaces carry vibrations better than others.
- Check the delivery date for your PIN code on the marketplace, and order well before the exhibition or practical.
- Practise explaining it. Judges ask what the model shows and why; knowing the science matters as much as the model. The viva questions above are a good place to start.
2When it arrives
- When it arrives, tap test it on a table and check that the disc's wires are firmly soldered.
Next steps
Take it further
Ways to turn this model into a bigger investigation or a stronger exhibition entry.
Connect the piezo disc to a 555 oscillator to show the reverse effect: the same disc now makes a sound.
Turn it into a door-knock detector or a 'do not touch' alarm for your exhibit.
Compare how well wood, glass and metal surfaces carry a tap to the sensor, and explain the results.
Audience
Who it suits
Class 9 to 12 students and hobbyists looking for a sensor-based project on vibration, touch or security.
- ClassClass 10 to 12
- SubjectPhysics
- TypeReady-made model
Free to read
Free ebooks for this topic
Free PDF ebooks from Gurukul Technicals Institute on the science, the making and the presenting of projects like this one.
- Free PDF ebook
Physics Working Models Explained
Twenty classic models, how each works and how to make it
- Free PDF ebook
Investigatory Projects for Class 11 and 12
Topics, method and report structure for physics, chemistry and biology
- Free PDF ebook
Your Science Exhibition Guide
Choose a project, build it, present it and answer the judges with confidence
- Free PDF ebook
Writing a Science Project File
How to write the report, from the cover page to the bibliography