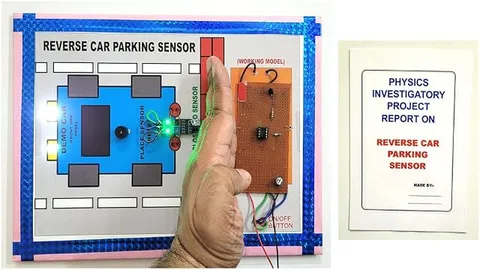
- Physics
- Ready-made model
- Class 10 to 12
- Printed report included
Reverse Car Parking Sensor Circuit Physics Educational Investigatory Science Working Project Model with Printed Report and PDF
Code B0DK25JFB5
- Paid for and delivered by Amazon. The current price and the delivery date for your PIN code are shown there.
- Sold by Gurukul Technicals Institute, Delhi.
- Need a different topic, a custom version or a school order? Ask on WhatsApp.
In this project guide
Ready-made model
About this model
A physics working model of a reverse parking sensor, the device that warns a driver as a car backs towards a wall or obstacle. It shows how a vehicle can sense an object behind it without touching it, and the listing says a printed report and a PDF are included.
How it works
The science behind it
The idea the model demonstrates, in words you can use in your report and when you explain it.
Parking sensors in real cars use ultrasound, sound with a frequency above 20 kHz that humans cannot hear. A transmitter sends out a short burst of ultrasound, it reflects off an obstacle, and a receiver picks up the echo. Since the pulse travels to the obstacle and back, distance = speed of sound × time ÷ 2. Sound travels at about 343 m/s in air at 20 °C, so an echo that returns after 2 milliseconds means the obstacle is about 34 cm away. The circuit then beeps faster or lights a warning as the distance shrinks. Some school models use infrared light instead: an infrared LED sends out light and a sensor detects the reflection, which grows stronger as the object comes closer. Both methods depend on reflection of waves. Bats use the same echo idea, called echolocation, to fly and hunt in the dark.
Make it yourself
Make a reverse parking sensor model yourself
Build your own version from scratch, or use the steps to understand how the ready-made model is put together before you present it.
What you need 10
Step by step 8 steps
Fix the sensor at the back of the car with its two round 'eyes' facing straight backwards and level with the floor.
Connect the sensor's VCC to the board's 5 V pin, GND to GND, and Trig and Echo to two digital pins.
Connect each LED through its 220 Ω resistor to its own digital pin, and the buzzer to another pin, with all the negative legs going to GND.
Write a program that sends a 10-microsecond pulse on Trig, measures how long Echo stays high, and works out distance in cm = time in microseconds × 0.0343 ÷ 2.
Set three zones in the program: green beyond 50 cm, yellow with slow beeps from 20 to 50 cm, and red with fast or continuous beeps under 20 cm.
Upload the program and print the distance on the computer screen. Check it against the ruler at 10, 20, 30 and 50 cm and adjust if needed.
Fit the board and breadboard inside the car and power it from the power bank or battery.
Mark the distance lines on the floor with masking tape and demonstrate by pushing the car slowly backwards towards the card wall.
Read this first
Safety first
Go through these points before you build or switch anything on. Younger students should do this with an adult.
- Use only USB power or a battery; this circuit should never be connected to anything else.
- Check the wiring before plugging into a computer, because a short between 5 V and GND can damage the computer's USB port.
- Use hot glue only with an adult, and let it cool before handling the car.
- Keep the buzzer away from people's ears when testing the fast beeps.
Troubleshooting
If something does not work
The usual problems with this model and how to fix them. Open a problem to see the fix.
The distance always reads 0 or a very large number
Trig and Echo may be swapped or on different pins from the ones in your program, GND may be loose, or the sensor is not getting 5 V. Check each wire against the program.
The readings jump around
Soft or angled surfaces absorb or deflect the ultrasound. Use a flat, hard card facing the sensor squarely, and average several readings in the program.
It warns even when nothing is behind the car
The sensor may be seeing the floor or part of the car body. Mount it a little higher and tilt it slightly upwards.
It works on the computer but not on the battery
The battery is weak: a 9 V battery runs down quickly with a microcontroller board. Use a fresh battery or a power bank.
Exhibition day
How to present it
A running order for the exhibition table or the practical, step by step.
Find out whether your model uses ultrasonic or infrared sensing, and explain the method it actually uses.
Move a book slowly towards the sensor so the judges can hear or see the warning change with distance.
Solve one distance example on a card using distance = speed × time ÷ 2.
Explain why the time is halved: the wave goes to the obstacle and comes back.
Practice
Viva questions
Practice questions on this model, with short answers. Try each one aloud before you open the answer.
What is ultrasound?
Ultrasound is sound with a frequency above 20,000 Hz, beyond the range of human hearing.
Why is the total echo time divided by two when finding distance?
The wave travels to the obstacle and back, so the measured time covers twice the distance.
If an echo returns in 2 milliseconds, how far away is the obstacle?
Using 343 m/s, distance = 343 × 0.002 ÷ 2, which is about 0.34 m or 34 cm.
Which animal uses the same principle?
Bats use echolocation, sending out ultrasound and listening for the echoes to find their way and catch insects.
Project file
Project file outline
The headings of the project file, in order. Give each heading its own section and write it in your own words.
The listing includes a printed project report: use this outline to check that your own file covers every part.
Free ebook: Writing a Science Project FileContents
- Aim: to measure the distance of an obstacle behind a vehicle using ultrasound and warn the driver
- Introduction: why reverse parking sensors are fitted to cars
- Principle: echoes of ultrasound and distance = speed of sound × time ÷ 2
- Block diagram: sensor, microcontroller, LEDs and buzzer
- Circuit diagram and program logic for the three warning zones
- Calibration table: actual distance against measured distance
- Factors affecting accuracy: air temperature, the obstacle's surface and its angle
- Related uses: robots, sonar, and how bats find their way
- Conclusion and bibliography
Buying checklist
Before you buy
What to check before you order the model.
1Check these first
- Check that the topic suits your class level and whether your teacher prefers a model with programming or a simpler circuit.
- The listing mentions a printed report and a PDF; read them and check that they describe the same sensor type as your model (ultrasonic or infrared).
- Find out from the listing what power the model needs, and keep fresh batteries ready.
- Test it a few days before the exhibition and measure the distance at which it starts to warn, so you can quote real figures.
- Keep the box, and protect the sensor's front from knocks on the way.
- Check the delivery date for your PIN code on the marketplace, and order well before the exhibition or practical.
- The project report is a learning aid. Read it, understand how the model works, and write your own observations; schools expect your own work.
- Practise explaining it. Judges ask what the model shows and why; knowing the science matters as much as the model. The viva questions above are a good place to start.
Next steps
Take it further
Ways to turn this model into a bigger investigation or a stronger exhibition entry.
Show that the speed of sound changes with temperature (v ≈ 331 + 0.6T m/s, with T in °C) and correct the distance reading using a temperature sensor.
Add a small display that shows the distance in centimetres.
Compare an ultrasonic sensor with an infrared sensor on dark, shiny and soft surfaces, and explain the differences.
Audience
Who it suits
Suits Class 8 to 12 physics exhibitions and investigatory projects on sound, light and sensors.
- ClassClass 10 to 12
- SubjectPhysics
- TypeReady-made model
- Project reportPrinted report included
Free to read
Free ebooks for this topic
Free PDF ebooks from Gurukul Technicals Institute on the science, the making and the presenting of projects like this one.
- Free PDF ebook
Electricity and Magnetism Experiments
Hands-on experiments with cells, wires, bulbs and magnets
- Free PDF ebook
Physics Working Models Explained
Twenty classic models, how each works and how to make it
- Free PDF ebook
Investigatory Projects for Class 11 and 12
Topics, method and report structure for physics, chemistry and biology
- Free PDF ebook
Your Science Exhibition Guide
Choose a project, build it, present it and answer the judges with confidence