- Physics
- Ready-made model
- Class 10 to 12
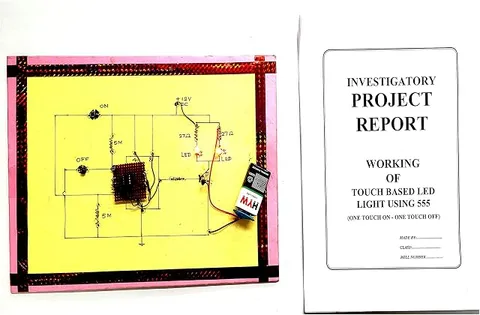
Touch Based LED Lights Physics Investigatory Minor Project and Model
Code B0C3H6LDJJ
- Paid for and delivered by Amazon. The current price and the delivery date for your PIN code are shown there.
- Sold by Gurukul Technicals Institute, Delhi.
- Need a different topic, a custom version or a school order? Ask on WhatsApp.
In this project guide
Ready-made model
About this model
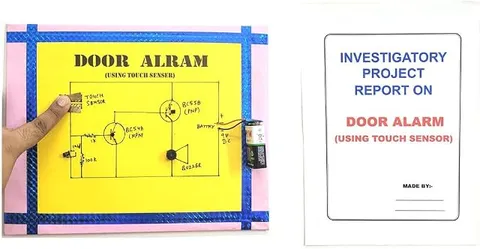
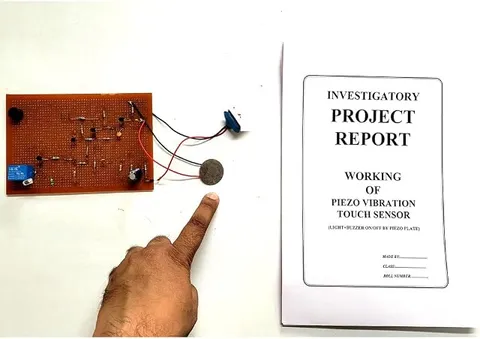
A physics minor project in which LEDs switch on when you touch a sensing point, with no mechanical switch to press. It shows how the tiny electrical effect of a human finger can be amplified to control a circuit, the idea behind touch switches and touch screens.
How it works
The science behind it
The idea the model demonstrates, in words you can use in your report and when you explain it.
The human body conducts electricity weakly because body fluids contain dissolved salts, and it also acts like one plate of a small capacitor. A touch circuit uses one of these effects. In the simplest designs, a finger bridges two metal contacts and lets a very small current flow; this is far too weak to light an LED, so it is fed to a transistor. Often two transistors are joined as a Darlington pair, where the current gain of the first is multiplied by that of the second, giving gains in the thousands. Other designs use a touch-sensing chip that detects the extra capacitance a finger adds. Either way, a tiny input controls a much larger output current, which lights the LEDs. An LED is a diode that gives out light only when forward biased, so it must be connected the right way round. Touch-sensitive switchboards in some modern Indian homes and the screen of a smartphone work on these ideas.
Make it yourself
Make a touch-controlled LED light yourself
Build your own version from scratch, or use the steps to understand how the ready-made model is put together before you present it.
What you need 9
Step by step 8 steps
Join the two transistors as a Darlington pair: the emitter of the first (T1) goes to the base of the second (T2), and both collectors are joined together.
Connect T2's emitter to battery negative.
Connect each LED with its 470 Ω resistor from battery positive to the joined collectors, long leg towards positive.
Connect one touch contact to battery positive, and the other through the 1 kΩ resistor to T1's base.
Connect the 1 MΩ resistor from T1's base to battery negative.
Mount the touch contacts on top of the box with a label saying 'Touch here', and put the circuit and battery inside.
Switch on and touch both contacts with one fingertip: the LEDs light. Lift your finger and they go out.
Try a dry finger, a slightly damp finger, a thick pencil line drawn between the contacts, and a plastic pen, and note what happens each time.
Read this first
Safety first
Go through these points before you build or switch anything on. Younger students should do this with an adult.
- Use only the 9 V battery. Never build a touch circuit that is connected to the mains: touching mains-connected contacts can kill.
- Solder only with an adult present, and keep the iron in its stand.
- Always keep a resistor in series with each LED.
- Do not let metal objects rest across the contacts, and unclip the battery when the lamp is not in use.
Troubleshooting
If something does not work
The usual problems with this model and how to fix them. Open a problem to see the fix.
The LEDs glow faintly without being touched
Moisture, dust or flux on the board is letting a tiny current reach the base. Clean the board, keep the 1 MΩ resistor in place, and keep the contacts dry.
Nothing happens when you touch the contacts
Very dry skin conducts poorly, so try a slightly damp fingertip. Also check the transistors' legs in the datasheet and that the contacts are close together.
The LEDs stay on after you lift your finger
There may be a solder bridge from the base to positive, or the contacts may be touching each other. Inspect the board and separate them.
The LEDs light only dimly when touched
One transistor may not be joined correctly, so you have the gain of one transistor instead of two. Check that T1's emitter goes to T2's base.
Exhibition day
How to present it
A running order for the exhibition table or the practical, step by step.
Touch the sensing point and show the LEDs respond, then explain why a finger is enough to trigger them.
Try touching it with a dry plastic pen and explain why that fails to trigger the circuit.
If your circuit uses transistors, explain the transistor as an amplifier: a small base current controls a much larger collector current.
Compare your circuit with a smartphone touch screen in two or three lines.
Practice
Viva questions
Practice questions on this model, with short answers. Try each one aloud before you open the answer.
How does a finger switch on the circuit?
The finger either lets a tiny current flow between two contacts or adds capacitance to a sensor, and the circuit amplifies this small change to switch on the LEDs.
What is a Darlington pair?
It is two transistors connected so that the current amplified by the first is amplified again by the second, giving a very high overall gain.
Why does a plastic pen not trigger the circuit?
Plastic is an insulator, so it neither carries current nor adds the capacitance that a finger does.
Why must an LED be connected the right way round?
An LED is a diode, so it conducts and glows only when forward biased, with its anode at a higher potential than its cathode.
Project file
Project file outline
The headings of the project file, in order. Give each heading its own section and write it in your own words.
Free ebook: Writing a Science Project FileContents
- Aim: to switch LEDs on with the touch of a finger using a transistor amplifier
- Introduction: touch switches in lifts, lamps and phones
- Why the human body conducts: salts in body fluids and the resistance of skin
- The transistor as a current amplifier and the Darlington pair, with overall gain β1 × β2
- Circuit diagram and construction
- Observations: response to a dry finger, a damp finger, a pencil line and plastic
- Resistive and capacitive touch sensing compared
- Precautions and conclusion
- Bibliography
Buying checklist
Before you buy
What to check before you order the model.
1Check these first
- Check that a transistor-based minor project suits your class level and your teacher's instructions.
- Read the listing to see which battery the model needs.
- Test it in conditions like the exhibition: in dry weather, fingers may need to be slightly damp for the touch to work every time.
- Keep the box and carry the model so the touch contacts are not bent.
- Keep a spare battery for the exhibition day.
- Check the delivery date for your PIN code on the marketplace, and order well before the exhibition or practical.
- Practise explaining it. Judges ask what the model shows and why; knowing the science matters as much as the model. The viva questions above are a good place to start.
Next steps
Take it further
Ways to turn this model into a bigger investigation or a stronger exhibition entry.
Add a touch-on, touch-off latch using a 555 timer or a flip-flop, with one contact to switch on and another to switch off.
Measure your skin resistance between two contacts with a multimeter, work out the base current, and estimate the transistors' gain from the LED current.
Build a capacitive version using a touch sensor module and compare how it responds through paper or plastic.
Audience
Who it suits
Suits Class 8 to 12 physics exhibitions and beginner electronics minor projects.
- ClassClass 10 to 12
- SubjectPhysics
- TypeReady-made model
Free to read
Free ebooks for this topic
Free PDF ebooks from Gurukul Technicals Institute on the science, the making and the presenting of projects like this one.
- Free PDF ebook
Electricity and Magnetism Experiments
Hands-on experiments with cells, wires, bulbs and magnets
- Free PDF ebook
Physics Working Models Explained
Twenty classic models, how each works and how to make it
- Free PDF ebook
Investigatory Projects for Class 11 and 12
Topics, method and report structure for physics, chemistry and biology
- Free PDF ebook
Your Science Exhibition Guide
Choose a project, build it, present it and answer the judges with confidence