 61% off
- Physics
- Ready-made model
- Class 10 to 12
- Report shown in the photo
Current Detector Bar Magnet Science Class 12 Physics Investigatory Project Model
Code B0HLY4NSD3
- Paid for and delivered by Amazon. The current price and the delivery date for your PIN code are shown there.
- Sold by Gurukul Technicals Institute, Delhi.
- Need a different topic, a custom version or a school order? Ask on WhatsApp.
In this project guide
Ready-made model
About this model
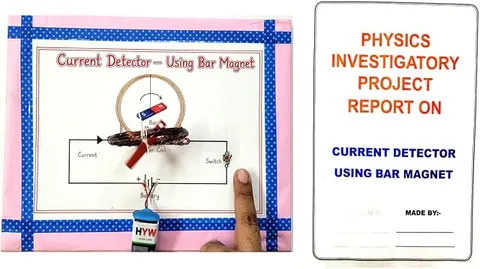
This physics investigatory model shows that an electric current produces a magnetic field. As shown in the photo, a copper coil, a push switch and a battery on a snap connector are joined in a circuit drawn on the board. A small red bar magnet is tied by a white thread at the copper coil. Above it, the chart shows a printed bar magnet marked N and S with a curved arrow showing it turning. A printed project report cover is also shown.
How it works
The science behind it
The idea the model demonstrates, in words you can use in your report and when you explain it.
In 1820 Hans Christian Oersted noticed that a compass needle near a wire turned whenever a current flowed through the wire. This showed that an electric current produces a magnetic field around it. When a current flows through a circular coil, the field near its centre runs along the axis of the coil, and the coil behaves like a short bar magnet. At the centre of a coil of N turns and radius R carrying a current I, the field is B = μ₀NI/2R, so more turns or more current give a stronger field. A bar magnet free to turn near the coil feels a torque and tries to line up with the combined field of the coil and the Earth, so it deflects when the switch is pressed and swings back when it is released. Reversing the current reverses the deflection, so the detector also shows the direction of the current; the right-hand thumb rule gives the direction of the field. Early instruments such as the tangent galvanometer worked on this principle.
Make it yourself
Make a current detector with a coil and a magnet yourself
Build your own version from scratch, or use the steps to understand how the ready-made model is put together before you present it.
What you need 10
Step by step 8 steps
Wind about 50 turns of enamelled wire neatly on the ring, leaving about 20 cm free at each end, and tape the turns together so they do not loosen.
Rub the last 2 cm of each free end with sandpaper until shiny copper shows, because the enamel coating does not conduct.
Stand the coil upright on the base and fix it with hot glue, with an adult's help.
Tie the magnet at its middle so it hangs level, and hang it from a straw across the top so it sits at the centre of the coil and turns freely. If you use a compass instead, lay it flat at the centre of the coil.
Keep the setup away from steel objects, then turn the base until the resting magnet lies in the plane of the coil, pointing north and south.
Connect the cell holder, the switch, the 22 Ω resistor and the coil in series.
Press the switch for a moment: the magnet should turn. Release it and watch it swing back.
Swap the cell holder's leads and press again to show the magnet turning the other way, and record the deflection on the paper scale each time.
Read this first
Safety first
Go through these points before you build or switch anything on. Younger students should do this with an adult.
- Press the switch only for a few seconds at a time; the coil, the resistor and the cells warm up if current flows for long.
- Never connect the coil straight across the cells without the resistor; the coil has very little resistance, so it would draw a large current and heat up.
- Use the hot glue gun only with an adult, and do not touch the nozzle or fresh glue.
- Remove the cells from the holder when you finish, and unsnap the battery of the ready-made model after use.
- Keep the magnet away from small children, who could swallow it.
Troubleshooting
If something does not work
The usual problems with this model and how to fix them. Open a problem to see the fix.
The magnet does not move when I press the switch
Check that the enamel is fully scraped off both wire ends, that every joint is tight and that the cells are fresh.
The magnet moves only a little
The plane of the coil may lie east and west, so the coil's field points along the magnet and hardly turns it. Turn the base so the resting magnet lies in the plane of the coil, keep the magnet at the centre, and add more turns.
The magnet keeps twisting by itself
The thread is twisted or a breeze is moving it. Let it hang until it settles, use a thin untwisted cotton thread, and keep fans away.
The coil gets warm
Current has flowed for too long. Release the switch, let it cool, and check that the resistor is in the circuit.
Exhibition day
How to present it
A running order for the exhibition table or the practical, step by step.
Press the switch briefly and let visitors watch the magnet turn, then release it and show the magnet swing back.
Bring a small magnetic compass near the coil and show that its needle also turns when the switch is pressed.
Write B = μ₀NI/2R on a chart and explain why more turns or more current would give a bigger deflection.
Keep steel objects, phones and other magnets away from the model, because they also pull on the magnet.
Practice
Viva questions
Practice questions on this model, with short answers. Try each one aloud before you open the answer.
What did Oersted's experiment show?
That a current-carrying wire produces a magnetic field around it, because a compass needle placed near the wire was deflected.
Why does the magnet turn when the switch is pressed?
The current in the coil sets up a magnetic field, which exerts a torque on the magnet and turns it towards the direction of the field.
What happens if the direction of the current is reversed?
The magnetic field of the coil reverses, so the magnet deflects the opposite way.
How can this detector be made more sensitive?
Use more turns on a smaller coil, place the magnet at its centre, and let the magnet turn freely on a fine thread.
Project file
Project file outline
The headings of the project file, in order. Give each heading its own section and write it in your own words.
The listing photo shows a printed project report: if it comes with your order, use this outline to check that your own file covers every part.
Free ebook: Writing a Science Project FileContents
- Aim: to detect an electric current by its magnetic effect on a bar magnet
- Introduction: Oersted's experiment
- Magnetic field due to a current in a circular coil, and the right-hand thumb rule
- Torque on a magnet placed in a magnetic field
- Materials and construction of the detector
- Procedure and observations with the current on, off and reversed
- Precautions and sources of error
- Applications: galvanometers and other current meters
- Conclusion and bibliography
Buying checklist
Before you buy
What to check before you order the model, and what to do when it arrives.
1Before you order
- Check with your teacher that a current detector based on Oersted's experiment suits your investigatory project topic.
- At the exhibition, set it on a table away from steel cupboards, iron stands and other magnets.
- Carry it flat and keep the box, so the thread holding the magnet does not tangle or snap.
- Check the delivery date for your PIN code on the marketplace, and order well before the exhibition or practical.
- Practise explaining it. Judges ask what the model shows and why; knowing the science matters as much as the model. The viva questions above are a good place to start.
2When it arrives
- The photo shows a battery on a snap connector and a report cover; check what arrives in the box and keep a spare battery for the exhibition.
- Test it as soon as it arrives by pressing the switch briefly and watching the magnet turn.
Next steps
Take it further
Ways to turn this model into a bigger investigation or a stronger exhibition entry.
Wind coils with different numbers of turns and record how the deflection changes with the same cells.
Set the coil in the north-south plane and compare your readings with the tangent law used in a tangent galvanometer.
Move a small compass to different points around the coil and sketch the pattern of the magnetic field.
Audience
Who it suits
Suits Class 12 physics investigatory projects on moving charges and magnetism, and Class 10 work on the magnetic effects of electric current.
- ClassClass 10 to 12
- SubjectPhysics
- TypeReady-made model
- Project reportShown in the listing photo
Free to read
Free ebooks for this topic
Free PDF ebooks from Gurukul Technicals Institute on the science, the making and the presenting of projects like this one.
- Free PDF ebook
Electricity and Magnetism Experiments
Hands-on experiments with cells, wires, bulbs and magnets
- Free PDF ebook
Physics Working Models Explained
Twenty classic models, how each works and how to make it
- Free PDF ebook
Investigatory Projects for Class 11 and 12
Topics, method and report structure for physics, chemistry and biology
- Free PDF ebook
Your Science Exhibition Guide
Choose a project, build it, present it and answer the judges with confidence