- Physics
- Ready-made model
- Class 1 to 9
Parts Of Computer Working Model And Educational Project-15 Months Up, Multicolor For Baby
Code B0C3H7NXLV
- Paid for and delivered by Amazon. The current price and the delivery date for your PIN code are shown there.
- Sold by Gurukul Technicals Institute, Delhi.
- Need a different topic, a custom version or a school order? Ask on WhatsApp.
In this project guide
Ready-made model
About this model
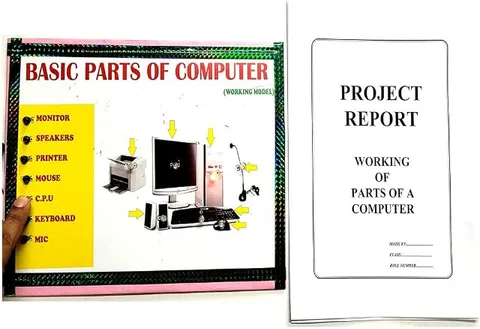
This model is about the main parts of a computer, such as input devices, the CPU, memory and output devices, and how they work together. It helps young learners understand what happens between pressing a key and seeing the result on the screen.
How it works
The science behind it
The idea the model demonstrates, in words you can use in your report and when you explain it.
A computer works in a cycle of input, processing, output and storage. Input devices such as the keyboard, mouse, microphone and scanner send data into the computer. The CPU (central processing unit) is its brain: the arithmetic logic unit (ALU) does calculations and comparisons, and the control unit directs the flow of data. Primary memory includes RAM, which holds the programs and data in use and is cleared when the power goes off, and ROM, which keeps start-up instructions permanently. Storage devices such as hard disks, SSDs and pen drives keep files saved for later. Output devices such as the monitor, printer and speakers present the results. Inside, everything is stored as binary digits, 0 and 1, and 8 bits make one byte. At a railway ticket counter, the clerk types in your details (input), the computer checks seat availability (processing) and the printer gives you a ticket (output).
Make it yourself
Make a parts of a computer model yourself
Build your own version from scratch, or use the steps to understand how the ready-made model is put together before you present it.
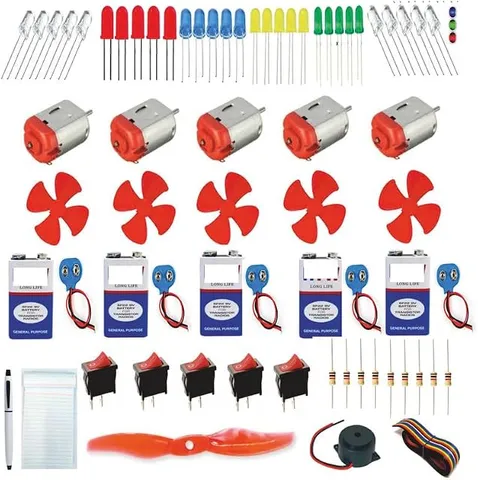
What you need 9
Step by step 8 steps
Cover the boxes with paper or paint. Cut a screen window in the monitor box and cover it with tracing paper, so a light behind it glows evenly.
Stick the keyboard layout on the thin box and make the mouse with its wool cable.
Arrange the parts on the base like a desk: monitor in the middle, CPU cabinet to one side, keyboard in front and mouse beside it.
Fix the coloured LEDs as arrows from the keyboard to the CPU and from the CPU to the monitor, and the white LED inside the monitor behind the tracing paper.
Wire the push button under one key: battery positive to the button, then from the button to each LED through its own resistor, with all the LEDs' short legs to the battery negative.
- Press the key
The arrows and the screen light together, showing input, then processing, then output.
- Colour-code the labels
Green for input devices, red for processing, blue for output and yellow for storage, with one line about what each part does.
Add a chart showing the block diagram of a computer, with the ALU, control unit and memory inside the CPU.
Read this first
Safety first
Go through these points before you build or switch anything on. Younger students should do this with an adult.
- The title mentions a very young age group, so an adult should keep small parts, batteries and wires out of reach of toddlers.
- Fix the battery inside a closed box so little hands cannot reach it.
- Use the cutter and glue only with an adult.
- Keep a resistor with every LED and switch off when the model is not in use.
Troubleshooting
If something does not work
The usual problems with this model and how to fix them. Open a problem to see the fix.
The screen shows a bright spot instead of an even glow
The LED is too close to the tracing paper. Move it further back inside the box, or add a second layer of tracing paper.
Nothing lights when the key is pressed
Check that the button is wired across two legs that connect only when pressed, that each LED's long leg faces the button side, and that the battery is not flat.
The lights stay on all the time
The button is wired across two of its legs that are always joined. Move one wire so the two wires sit on diagonally opposite legs, which connect only when the button is pressed.
Exhibition day
How to present it
A running order for the exhibition table or the practical, step by step.
Ask visitors to sort the parts into input, processing, output and storage before you explain.
Walk through the whole cycle with a simple example, such as typing your name and printing it.
Point out devices that do both input and output, such as a touchscreen.
Keep a short list of full forms (CPU, RAM, ROM, ALU, USB) ready for quick questions.
Practice
Viva questions
Practice questions on this model, with short answers. Try each one aloud before you open the answer.
What is the full form of CPU?
Central Processing Unit, the part that processes data and controls the computer.
What is the difference between RAM and ROM?
RAM is temporary memory that loses its data when the power goes off, while ROM keeps its instructions permanently.
Is a touchscreen an input or an output device?
Both: it shows output on its display and takes input when you touch it.
How many bits make one byte?
Eight bits make one byte.
Project file
Project file outline
The headings of the project file, in order. Give each heading its own section and write it in your own words.
Free ebook: Writing a Science Project FileContents
- Aim: to show the main parts of a computer and how they work together
- Introduction: what a computer is
- The cycle of input, processing, output and storage
- Input devices and their uses
- The CPU: arithmetic logic unit, control unit and memory (RAM and ROM)
- Output and storage devices
- Construction and working of the model
- Uses of computers in daily life and safe computer use
- Conclusion
Buying checklist
Before you buy
What to check before you order the model, and what to do when it arrives.
1Before you order
- The title mentions a very young age; check the listing details carefully to make sure it suits the child or class it is for.
- Read the listing to see what is mentioned with the model and whether a battery is needed.
- Practise naming each part and whether it is an input, output, processing or storage device.
- Keep the box to store the model and its small parts.
- Check the delivery date for your PIN code on the marketplace, and order well before the exhibition or practical.
2When it arrives
- Check the model for small loose parts as soon as it arrives, especially if young children will handle it.
Next steps
Take it further
Ways to turn this model into a bigger investigation or a stronger exhibition entry.
Show how a key press becomes binary: write the 0s and 1s code for a few letters on cards beside the keyboard.
Add a section comparing hardware and software, with examples of each.
Make a timeline of computers, from early calculating machines to today's phones.
Audience
Who it suits
Suits primary and middle school computer classes, roughly Class 2 to 6, and introductory computer-awareness lessons.
- ClassClass 1 to 9
- SubjectPhysics
- TypeReady-made model
Free to read
Free ebooks for this topic
Free PDF ebooks from Gurukul Technicals Institute on the science, the making and the presenting of projects like this one.
- Free PDF ebook
Physics Working Models Explained
Twenty classic models, how each works and how to make it
- Free PDF ebook
Your Science Exhibition Guide
Choose a project, build it, present it and answer the judges with confidence
- Free PDF ebook
Writing a Science Project File
How to write the report, from the cover page to the bibliography
- Free PDF ebook
Viva Questions for Science Projects
How to answer examiner questions, with sample questions for popular projects