- Physics
- DIY kit
- Class 1 to 9
60+ Electronics Parts
Code B0FGTZMB41
- Paid for and delivered by Amazon. The current price and the delivery date for your PIN code are shown there.
- Sold by Gurukul Technicals Institute, Delhi.
- Need a different topic, a custom version or a school order? Ask on WhatsApp.
In this project guide
DIY kit
About this kit
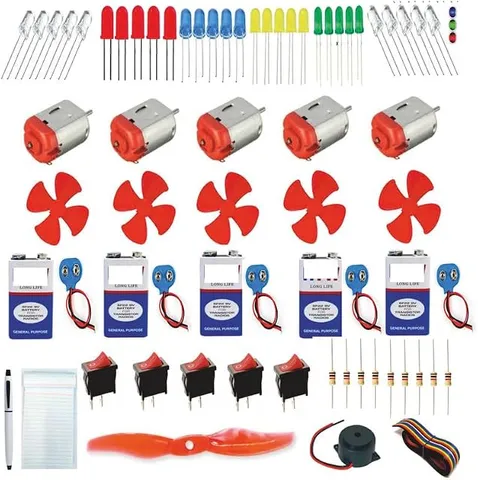
This DIY electronics parts kit is for students who want to build their own small projects instead of buying a readymade model. The listing title names a DC toy motor, switches, 2 and 4 blade fans, LEDs and a buzzer among 60+ parts, the kind of parts used for simple circuits such as a mini fan, an LED light or a buzzer alarm. The title does not mention a battery, so check the listing for the full parts list. It is a hands-on way to learn how a complete circuit works.
What the listing says
- DCToy Motor
- 2 & 4 Fan Blades
How it works
The science behind it
The idea the kit demonstrates, in words you can use in your report and when you explain it.
Every project in this kit rests on one idea: current flows only through a closed circuit, from the positive terminal of the cell, through the device and back to the negative terminal. A switch simply opens or closes this path. Each device converts electrical energy into another form: the motor into motion, the LED into light and the buzzer into sound. Ohm's law, V = IR, explains why an LED needs a resistor in series, because without one the current can rise too high and burn it. An LED is also a diode, so it glows only when its longer leg (the anode) goes to the positive side. A useful experiment is to fit the 2-blade and then the 4-blade fan on the same motor and compare the speed and the air you feel; the extra blades load the motor more. A table fan at home shows the same chain of switch, motor and blades.
Make it yourself
Make a switch board with a mini fan, LED light and buzzer yourself
Everything you need and the order to do it in. Tick off the materials as you collect them.
What you need 8
Step by step 8 steps
Sort the parts, identify each one against the listing, and keep the small ones in a box.
Fix the cell holder at the back of the board and run a positive and a negative wire along the board as two supply lines.
Mount the motor on its raised block, push a fan blade onto its shaft, and connect it between the supply lines through the first switch.
Connect an LED and its resistor in series through the second switch, with the LED's longer leg towards the positive line.
Connect the buzzer through the third switch, with its red or marked lead towards the positive line.
Check that no bare wires touch each other, then fit the cells.
Switch each device on one at a time and then all together; each works on its own because they are connected in parallel.
Label the board with each device's energy change: motion, light and sound.
Read this first
Safety first
Go through these points before you build or switch anything on. Younger students should do this with an adult.
- Keep fingers and hair away from the spinning fan blade, and make sure it cannot hit the board.
- Never connect an LED to the cells without its resistor.
- Do not join the cell holder's two wires directly; a short circuit makes the cells hot.
- Small parts can be swallowed by younger children, so keep them boxed.
Troubleshooting
If something does not work
The usual problems with this kit and how to fix them. Open a problem to see the fix.
The LED does not light
It may be the wrong way round; turn it so the longer leg goes to positive. Also check the resistor is in series with it, not beside it.
The motor buzzes but the fan does not spin
The blade may be touching the board or be too heavy. Raise the motor, and try the smaller blade.
Everything is dim when all three are on
The cells are weak. Replace them and make sure all joints are tight.
The buzzer is silent
Many buzzers work only one way round, so swap its leads. Also check that its voltage rating suits your cells.
Exhibition day
How to present it
A running order for the exhibition table or the practical, step by step.
Choose one finished project, such as a mini fan or a buzzer alarm, and draw its circuit diagram using standard symbols.
Show what happens when the LED is connected the wrong way round and explain why it does not glow.
Run the 2-blade and 4-blade fans on the same motor and ask the judges which one moves more air.
Keep spare parts in a labelled box so you can quickly fix a loose wire during the exhibition.
Practice
Viva questions
Practice questions on this kit, with short answers. Try each one aloud before you open the answer.
What is a closed circuit?
A closed circuit is a complete path from one terminal of the source to the other, through which current can flow.
Why does an LED need a resistor?
The resistor limits the current. Without it, too much current flows and the LED can overheat and fail.
What energy change takes place in a buzzer?
A buzzer converts electrical energy into sound energy by making a thin plate vibrate.
Why does an LED glow only when connected one way?
An LED is a diode, which conducts only when forward biased, with the anode at a higher potential than the cathode.
Project file
Project file outline
The headings of the project file, in order. Give each heading its own section and write it in your own words.
Free ebook: Writing a Science Project FileContents
- Aim: to build a board on which a fan, a light and a buzzer are each controlled by its own switch
- Open and closed circuits, and how a switch works
- Circuit diagram showing the three devices in parallel
- Energy changes in a motor, an LED and a buzzer
- Why an LED needs a resistor: Ohm's law
- Observations: each device alone and all three together
- What changes if the devices are joined in series
- Precautions with LEDs and the fan blade, and conclusion
Buying checklist
Before you buy
What to check before you order the kit, and what to do when it arrives.
1Before you order
- The title names a motor, switches, fan blades, LEDs and a buzzer among 60+ parts; read the listing for the full parts list before planning a project.
- The title does not mention a battery, so check the listing and buy cells if needed.
- Check the motor's and buzzer's voltage in the listing and match your cells to them.
- Keep the parts sorted in a box with compartments so nothing goes missing.
- Check the delivery date for your PIN code on the marketplace, and order well before the exhibition or practical.
- Building it yourself: younger students should build with an adult, especially with motors, batteries and small parts.
2When it arrives
- When it arrives, test each part on its own with the cells before you build.
Next steps
Take it further
Ways to turn this kit into a bigger investigation or a stronger exhibition entry.
Replace the LED's switch with an LDR circuit so the light comes on by itself in the dark.
Join the three devices in series and explain why they behave so differently.
Measure the current each device draws with a multimeter and work out its power with P = VI.
Audience
Who it suits
Class 6 to 8 students starting with electricity and circuits, and beginners who want to build their own science fair project from parts.
- ClassClass 1 to 9
- SubjectPhysics
- TypeDIY kit
Free to read
Free ebooks for this topic
Free PDF ebooks from Gurukul Technicals Institute on the science, the making and the presenting of projects like this one.
- Free PDF ebook
Electricity and Magnetism Experiments
Hands-on experiments with cells, wires, bulbs and magnets
- Free PDF ebook
Physics Working Models Explained
Twenty classic models, how each works and how to make it
- Free PDF ebook
Your Science Exhibition Guide
Choose a project, build it, present it and answer the judges with confidence
- Free PDF ebook
Writing a Science Project File
How to write the report, from the cover page to the bibliography