- Components and Spares
- Component
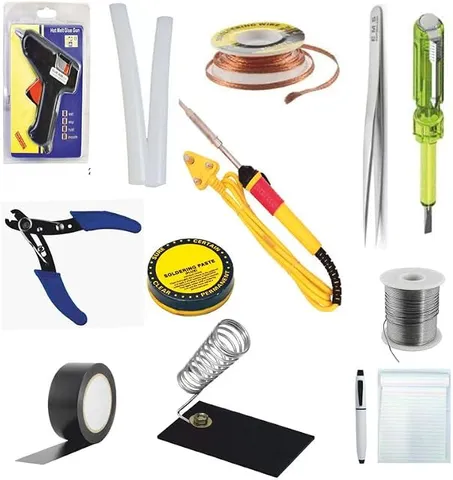
PackOf14 Soldering Iron Kit with Glue Gun Cutter Stand Tester Sticks Paste
Code B0FGV35DFN
- Paid for and delivered by Amazon. The current price and the delivery date for your PIN code are shown there.
- Sold by Gurukul Technicals Institute, Delhi.
- Need a different topic, a custom version or a school order? Ask on WhatsApp.
Component
About this part
This is a tool kit rather than a model: the listing title describes a pack of 14 with a soldering iron, glue gun, cutter, stand, tester, sticks and paste (most likely glue sticks and soldering paste); check the listing for exactly what each item is. It is meant for students who build their own circuits and projects and need permanent, reliable joints. Learning to solder neatly is a real skill that shows in the quality of any electronics project.
How it works
The science behind it
The idea the part demonstrates, in words you can use in your report and when you explain it.
Soldering joins metal parts using a filler metal, solder, that melts at a much lower temperature than the parts themselves. Common tin-lead solder melts at about 183 to 190 °C, and lead-free solder at about 217 °C or more. The iron's heating element gets hot by Joule heating: when current flows through its resistance, heat H = I²Rt is produced, and its power is P = V²/R. Heat then reaches the joint by conduction from the tip. Flux in the paste removes the thin oxide layer on the metals so that molten solder wets and bonds to them instead of forming a dull ball. A glue gun also uses an electric heater, but it melts a thermoplastic stick that sets again on cooling. A neon line tester glows when touched to a live wire because a tiny, safe current flows through its high resistance and your body. Mobile repair shops in Indian markets use exactly these tools every day.
Using it in your projects
Using the soldering iron and glue gun kit in your projects
What this part is good for, what else you need with it and how to connect it.
Projects you can build with it 6
- A permanent LED torch soldered on perfboard
- Wires soldered to motors for a robot car
- A battery-powered night lamp with an LDR
- A touch alarm or buzzer circuit built on a board
- A solar light model with a soldered circuit
- Motors, holders and labels fixed with hot glue on exhibition models
What else you need 8
How to connect it 8 steps
Set up on the heat-proof surface near a window, with the stand placed so the hot tip points away from you.
Ask an adult to plug in the iron, then leave it in its stand for a few minutes to heat up.
- Tin the tip
Wipe it on the damp sponge and melt a little solder onto it so it shines.
- Practise on the perfboard
Push a resistor through, bend its legs, and hold the tip against both the pad and the leg for two or three seconds.
Feed solder into the joint, not onto the tip, then take away the solder and the iron; a good joint is shiny and shaped like a small cone.
Trim the extra leg with the cutter, holding the cut end so it does not fly off.
Use the glue gun only for holding parts in place, such as fixing a motor or a battery holder to a base, never instead of an electrical joint.
When you finish, tin the tip again, put the iron in its stand and let an adult switch off and unplug it; let everything cool before packing.
Read this first
Safety first
Go through these points before you build or switch anything on. Younger students should do this with an adult.
- The tip burns skin instantly; always return the iron to its stand and never test it with your fingers.
- An adult should plug in and unplug the iron and the glue gun, and check that the cords and plugs are undamaged.
- Do not breathe solder fumes; work with good ventilation and wash your hands after handling solder.
- Wear safety glasses while soldering and trimming legs.
- If the kit's tester is a mains line-tester screwdriver, students should use it only as a screwdriver; checking mains is a job for an adult or an electrician.
Troubleshooting
If something does not work
The usual problems with this part and how to fix them. Open a problem to see the fix.
The solder forms a dull ball and does not stick
The joint is not hot enough or the metal is dirty. Clean the tip, apply a little paste, and heat the pad and leg together before adding solder.
The tip turns black and solder will not melt onto it
The tip has oxidised. Clean it on the sponge or brass wool while hot and tin it straight away, and switch the iron off when not in use.
Solder joins two neighbouring pads
Too much solder was used. Remove the extra with a desoldering pump or wick and redo the joints with less.
The glue gun drips or leaves strings
It is running hot or the trigger is held too long. Rest it on its stand and use short presses.
Exhibition day
How to present it
A running order for the exhibition table or the practical, step by step.
In a practical exam, show a few clean, shiny solder joints; a smooth cone-shaped joint is the sign of good work.
Always keep the hot iron in its stand and mention this safety step to the examiner.
Explain that you heat the joint, not the solder, so that the solder flows into it properly.
If the tester in the kit is a line tester, explain how it identifies the live wire and why it glows, and use it only under a teacher's supervision.
Practice
Viva questions
Practice questions on this part, with short answers. Try each one aloud before you open the answer.
Why is flux used while soldering?
Flux removes the oxide layer from the metal surfaces and prevents fresh oxidation, so the molten solder can wet and bond to them.
On which effect of electric current does a soldering iron work?
On the heating effect of current, also called Joule heating, where H = I²Rt.
Why should solder have a low melting point?
So that it can join the parts without melting or damaging the wires, components or circuit board.
What is a dry joint?
A poor joint where the solder has not bonded properly, usually because of too little heat or dirty surfaces. It can cause loose, intermittent connections.
Buying checklist
Before you buy
What to check before you order the part, and what to do when it arrives.
1Before you order
- The title says a pack of 14 and lists the items briefly; read the listing to see exactly what each item is.
- Check the iron's power rating and plug type in the listing to be sure it suits your socket; an adult should handle the plug.
- Buy a perfboard and some practice parts so your first joints are not on your real project.
- Store the kit in its box, out of reach of younger children.
- Check the delivery date for your PIN code on the marketplace, and order well before the exhibition or practical.
2When it arrives
- When it arrives, have an adult check the cords, plugs and stand before first use.
Next steps
Take it further
Ways to turn this part into a bigger investigation or a stronger exhibition entry.
Desolder parts from an old battery-powered toy to collect reusable components.
Build the same circuit on a breadboard and on soldered stripboard, and compare how neat and reliable each is.
Learn to solder tiny surface-mount parts on a practice board under supervision.
Audience
Who it suits
Class 8 to 12 students, hobbyists and ITI or diploma learners who build their own circuits, with adult supervision for younger students.
- CategoryComponents and Spares
- TypeComponent
Free to read
Free ebooks for this topic
Free PDF ebooks from Gurukul Technicals Institute on the science, the making and the presenting of projects like this one.
- Free PDF ebook
Electronic Components Handbook
Resistors, capacitors, LEDs, diodes, transistors and more, with how to use each
- Free PDF ebook
Your Science Exhibition Guide
Choose a project, build it, present it and answer the judges with confidence
- Free PDF ebook
Writing a Science Project File
How to write the report, from the cover page to the bibliography
- Free PDF ebook
Viva Questions for Science Projects
How to answer examiner questions, with sample questions for popular projects