- Maths
- Ready-made model
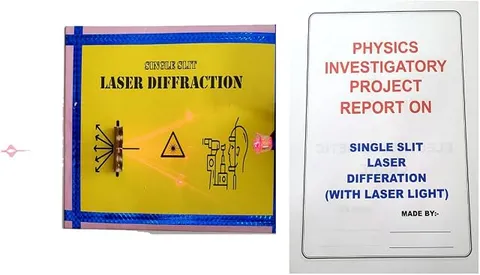
Laser Diffraction Single Slit
Code B0G2T5DJ9C
- Paid for and delivered by Amazon. The current price and the delivery date for your PIN code are shown there.
- Sold by Gurukul Technicals Institute, Delhi.
- Need a different topic, a custom version or a school order? Ask on WhatsApp.
In this project guide
Ready-made model
About this model
This physics project demonstrates the diffraction of laser light through a single narrow slit, which produces a bright central band with fainter bands on either side. It is a striking way to show that light behaves as a wave, a key idea in wave optics.
What the listing says
- Wave Optics & Light Interference Physics Project
How it works
The science behind it
The idea the model demonstrates, in words you can use in your report and when you explain it.
Diffraction is the bending and spreading of a wave when it passes through an opening or around an edge whose size is comparable to its wavelength. When light of a single wavelength λ passes through a slit of width a, every point in the slit acts as a source of secondary wavelets, as Huygens' principle says. These wavelets interfere on the screen, producing a broad bright central maximum with weaker bright and dark bands on both sides. The dark bands occur where a sin θ = nλ (n = 1, 2, 3 …). The central maximum is twice as wide as each of the other bright bands. For a red laser with λ = 650 nm, a slit 0.1 mm wide and a screen 1 m away, the first dark band is about λD ÷ a = 6.5 mm from the centre, so the central band is about 13 mm wide.
Make it yourself
Make a single slit laser diffraction setup yourself
Build your own version from scratch, or use the steps to understand how the ready-made model is put together before you present it.
What you need 9
Step by step 8 steps
Ask an adult to tape the two blades onto the slide with their sharp edges facing each other, parallel and almost touching, leaving a gap about as thin as a sheet of paper. Or set the vernier caliper's jaws to about 0.1 mm.
Fix the laser on its stand so the beam is level, and place the slit in the beam about 5 cm in front of it.
Put the screen 1.5 to 2 m from the slit and darken the room. A bright central band appears with fainter bands and dark gaps on both sides, spread out at right angles to the slit.
Measure D, the distance from slit to screen.
Mark the centres of the first dark band on each side of the central band and measure the distance between them; half of it is y, the distance to the first minimum.
Work out the slit width from a sin θ = λ: for small angles, a = λD ÷ y. With a 650 nm laser, D = 2 m and y = 13 mm, the slit is about 0.1 mm wide. Use the wavelength printed on your laser.
Make the slit narrower, then wider, and note that a narrower slit spreads the pattern wider, the opposite of what most people expect.
Mount the setup on a board with a labelled diagram, the formula and a photo of your pattern, keeping the laser fixed and pointed at the screen.
Read this first
Safety first
Go through these points before you build or switch anything on. Younger students should do this with an adult.
- Never look into the laser beam or point it at anyone's face; even a low-power laser can harm the eye.
- Use only a low-power pointer marked Class 2; do not buy high-power lasers sold as 'burning' lasers.
- Keep the beam at table height and fixed in its stand, and watch for shiny objects such as watches and mirrors that can reflect it.
- Razor blades must be handled and taped only by an adult, with their edges covered when not in use.
Troubleshooting
If something does not work
The usual problems with this model and how to fix them. Open a problem to see the fix.
Only a bright spot appears, with no bands
The slit is too wide. Close the blades or caliper jaws until the spot begins to stretch out into a line of bands.
The pattern is faint
The room is too bright or the screen is too far away. Darken the room, put fresh cells in the laser, and bring the screen to about 1 m.
The bands are uneven or blurred
The blade edges are not parallel or are dirty. Re-tape them parallel, wipe them clean, and aim the beam through the middle of the slit.
The calculated slit width seems wrong
Check that y runs from the centre of the pattern to the middle of the first dark band, and that every length is in metres before you calculate.
Exhibition day
How to present it
A running order for the exhibition table or the practical, step by step.
Never look into the laser or point it at anyone's eyes, and keep the beam below eye level throughout the demonstration.
Measure the width of the central band on the screen and use it to estimate the slit width or the wavelength.
If you can change the slit width, show that a narrower slit makes the pattern spread out, which surprises most visitors.
Explain the difference between interference from two slits and diffraction from a single slit.
Practice
Viva questions
Practice questions on this model, with short answers. Try each one aloud before you open the answer.
What is diffraction of light?
Diffraction is the bending and spreading of light around the edges of an obstacle or opening whose size is comparable to its wavelength.
What is the condition for the first dark band in single-slit diffraction?
a sin θ = λ, where a is the slit width and λ is the wavelength of the light.
What happens to the central maximum if the slit is made narrower?
The central maximum becomes wider, because its angular width, 2λ ÷ a, increases as a decreases.
Why is a laser used for this experiment?
A laser gives monochromatic, coherent and narrow light, which produces a sharp and clear diffraction pattern.
Project file
Project file outline
The headings of the project file, in order. Give each heading its own section and write it in your own words.
Free ebook: Writing a Science Project FileContents
- Aim: to observe the diffraction of laser light at a single slit and to find the slit width
- Introduction: diffraction and the wave nature of light
- Huygens' principle and the condition for dark bands, a sin θ = nλ
- Apparatus and setting up the slit
- Observations: D, y and the pattern for different slit widths
- Calculation of the slit width
- Difference between interference and diffraction
- Laser safety and sources of error
- Conclusion and bibliography
Buying checklist
Before you buy
What to check before you order the model, and what to do when it arrives.
1Before you order
- Check that wave optics and diffraction are in your syllabus (Class 12 physics), even though this project is listed under a lower-class category.
- Read the listing to see whether it uses a laser pointer and what cells it needs, and make sure any laser is a low-power type.
- Practise explaining why the central band is twice as wide as the others.
- Store the laser out of reach of younger children, and keep the box for transport.
- Check the delivery date for your PIN code on the marketplace, and order well before the exhibition or practical.
2When it arrives
- Test it in a darkened room on arrival, and find out how dark you can make your spot at the exhibition.
Next steps
Take it further
Ways to turn this model into a bigger investigation or a stronger exhibition entry.
Tape a single hair across a card window and work out its thickness from its pattern; a thin obstacle diffracts like a slit of the same width.
Compare low-power red and green laser pointers and show that the longer red wavelength spreads more.
Replace the single slit with a double slit slide from the school lab and compare the two patterns.
Audience
Who it suits
Suits Class 12 physics investigatory projects on wave optics and first-year college physics demonstrations.
- SubjectMaths
- TypeReady-made model
Free to read
Free ebooks for this topic
Free PDF ebooks from Gurukul Technicals Institute on the science, the making and the presenting of projects like this one.
- Free PDF ebook
Maths Working Models and Activities
Make maths visible: models for number, geometry, algebra and data
- Free PDF ebook
Physics Working Models Explained
Twenty classic models, how each works and how to make it
- Free PDF ebook
Your Science Exhibition Guide
Choose a project, build it, present it and answer the judges with confidence
- Free PDF ebook
Writing a Science Project File
How to write the report, from the cover page to the bibliography