- Maths
- Ready-made model
- Class 1 to 9
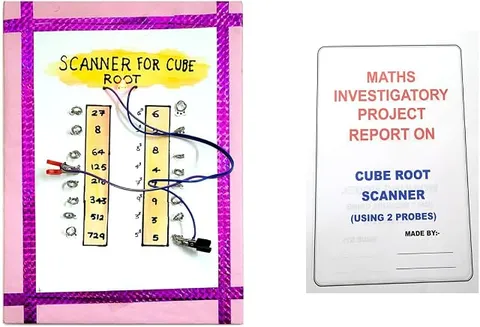
Cube Root Working Model
Code B0G2TD3D4Y
- Paid for and delivered by Amazon. The current price and the delivery date for your PIN code are shown there.
- Sold by Gurukul Technicals Institute, Delhi.
- Need a different topic, a custom version or a school order? Ask on WhatsApp.
In this project guide
Ready-made model
About this model
This working model is built around the cube root topic and links numbers with solid shapes, showing how the volume of a cube and the length of its side are connected. It helps a student explain perfect cubes and find cube roots by grouping prime factors, which makes it a good choice for a maths exhibition or class activity.
What the listing says
- Number System & Geometry Concept Demonstration Educational Electronic Hobby Kit
How it works
The science behind it
The idea the model demonstrates, in words you can use in your report and when you explain it.
The cube root of a number is the value that, multiplied by itself three times, gives that number. Since 4 × 4 × 4 = 64, we write ∛64 = 4. In geometry, a cube of side a has volume a³, so the side is the cube root of the volume: a cube built from 27 unit cubes has a side of 3 units. To find the cube root of a perfect cube, split it into prime factors and make groups of three equal factors. For example, 1728 = (2 × 2 × 2) × (2 × 2 × 2) × (3 × 3 × 3), so ∛1728 = 2 × 2 × 3 = 12. The cube root of a negative number is negative, for example ∛(−27) = −3. A cube-shaped water tank that holds 1000 litres has a volume of 1 m³, so each side is 1 metre.
Make it yourself
Make a cube root working model yourself
Build your own version from scratch, or use the steps to understand how the ready-made model is put together before you present it.
What you need 9
Step by step 8 steps
Divide the base into three zones with a pencil: a cube zone, a prime-factor zone and a quiz zone, and write the heading and the rule ∛(a³) = a at the top.
Glue the small cubes into solid cubes of side 1, 2, 3 and 4 units, building one square layer at a time and letting each layer dry before adding the next.
Fix the four cubes in a row and label each with the number of small cubes in it (1, 8, 27, 64) and its side (1, 2, 3, 4), so viewers can see that the side is the cube root of the count.
In the factor zone, draw prime-factor trees for two numbers such as 216 and 3375, and circle each group of three equal factors in its own colour.
Make flip cards with a perfect cube on the front of each flap and its cube root hidden underneath, hinged with tape so a visitor lifts the flap to check.
For the quiz, push a paper fastener through the board beside each question and each answer, and on the back join every question fastener to its correct answer with wire.
- Make the tester
Battery positive to the 470 Ω resistor, then to the LED's long leg; the LED's short leg goes to a probe wire, and the battery negative goes to a second probe wire.
Touch one probe to a question and the other to an answer: the LED should light only for the correct pair. Test every pair, then cover the back wiring with a sheet of card.
Read this first
Safety first
Go through these points before you build or switch anything on. Younger students should do this with an adult.
- Use the cutter or sharp scissors only with an adult nearby, cutting away from your fingers on a cutting mat or old board.
- Always keep the resistor in series with the LED; an LED connected straight to a 9 V battery burns out almost at once.
- Bend the legs of every paper fastener flat and tape over them so no sharp points stick out at the back.
- Keep the loose small cubes away from very young children at the exhibition, as they can be swallowed.
Troubleshooting
If something does not work
The usual problems with this model and how to fix them. Open a problem to see the fix.
The LED does not light even for the correct answer
The LED may be the wrong way round (the long leg must face the battery positive), a wire may be loose under a fastener, or the battery may be weak. Touch the two probes together: if the LED still stays dark, the fault is in the tester, not the board.
The LED lights for a wrong answer as well
Two back wires or two fastener legs are touching each other. Spread the legs apart, wrap each joint in insulating tape and test every pair again.
The glued cubes lean or the layers are uneven
The small cubes are not all the same size, or too much glue was used. Build each layer against a ruler on a flat table, use a thin coat of glue and let it dry before stacking.
Visitors ask why the cube of 64 small cubes has a side of 4 and not 8
Show them the 4 × 4 face and count the 4 layers: 4 × 4 × 4 = 64. Eight is the square root of 64, which is a different question, so this is a good moment to compare squares and cubes.
Exhibition day
How to present it
A running order for the exhibition table or the practical, step by step.
Show how 8 and 27 small unit cubes (paper cubes or dice work well) arrange into bigger cubes of side 2 and side 3.
Work out one cube root live by prime factorisation, such as 1728, writing each group of three factors in a different colour.
Keep a small chart of the first ten perfect cubes, from 1 to 1000, beside the model for quick reference.
Mention the unit-digit pattern of cubes so you can answer quick mental-maths questions with confidence.
Practice
Viva questions
Practice questions on this model, with short answers. Try each one aloud before you open the answer.
What is a perfect cube?
A perfect cube is a number that is the cube of a whole number, such as 8 (2³), 125 (5³) or 343 (7³).
Is 500 a perfect cube?
No. Its prime factors are 2 × 2 × 5 × 5 × 5, and the two 2s do not make a group of three; it lies between 7³ = 343 and 8³ = 512.
If a perfect cube ends in 8, what is the last digit of its cube root?
It must be 2, because 2³ = 8 and no other digit from 0 to 9 gives a cube ending in 8.
How can a cube root give the side of a cube-shaped box?
The volume of a cube is side × side × side, so the side is the cube root of the volume; a box of 216 cm³ has a side of 6 cm.
Project file
Project file outline
The headings of the project file, in order. Give each heading its own section and write it in your own words.
Free ebook: Writing a Science Project FileContents
- Aim: to show that the side of a cube is the cube root of its volume
- Introduction: perfect cubes and the cube root symbol
- Materials used for the cube model and the answer-checker
- Construction: building cubes of side 1, 2, 3 and 4 units
- Finding cube roots by prime factorisation, with worked examples
- Working of the LED answer-checker circuit
- Observations: table of numbers, their cubes and cube roots
- Real-life use: finding the side of a cube-shaped box or tank from its volume
- Conclusion and bibliography
Buying checklist
Before you buy
What to check before you order the model, and what to do when it arrives.
1Before you order
- Check that cubes and cube roots are in your class syllabus and that a working model is what your teacher has asked for.
- Read the listing carefully to see what comes with it, so you know whether you still need a report, a battery or a chart.
- Practise explaining the prime-factor method with two or three numbers of your own, because examiners often ask for a fresh example.
- Keep the box and some packing material to carry the model safely to school.
- Check the delivery date for your PIN code on the marketplace, and order well before the exhibition or practical.
2When it arrives
- Open it as soon as it arrives, check for loose or broken parts, and try any lights or switches well before the exhibition day.
Next steps
Take it further
Ways to turn this model into a bigger investigation or a stronger exhibition entry.
Show how to estimate the cube root of a number that is not a perfect cube, for example that ∛100 lies between 4 and 5.
Add a card on negative numbers and explain why ∛(−27) has a real answer while √(−9) does not.
Draw a table of cubes from 1 to 10 and point out the pattern in their last digits, which lets you guess the last digit of a cube root at a glance.
Turn the quiz into a timed game and record visitors' scores as data for your report.
Audience
Who it suits
Suits Class 8 maths exhibitions and classroom demonstrations of cubes and cube roots, and works as a quick revision aid in Class 9.
- ClassClass 1 to 9
- SubjectMaths
- TypeReady-made model
Free to read
Free ebooks for this topic
Free PDF ebooks from Gurukul Technicals Institute on the science, the making and the presenting of projects like this one.
- Free PDF ebook
Maths Working Models and Activities
Make maths visible: models for number, geometry, algebra and data
- Free PDF ebook
Your Science Exhibition Guide
Choose a project, build it, present it and answer the judges with confidence
- Free PDF ebook
Writing a Science Project File
How to write the report, from the cover page to the bibliography
- Free PDF ebook
Viva Questions for Science Projects
How to answer examiner questions, with sample questions for popular projects