- Maths
- Ready-made model
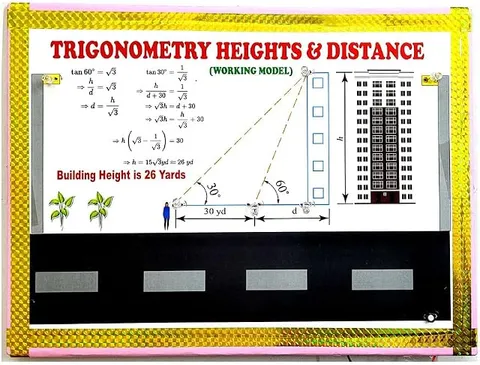
Trigonometry Building Height and Distance Working Model and Science Teaching Aid Educational Electronic Hobby Kit
Code B0DTYD451V
- Paid for and delivered by Amazon. The current price and the delivery date for your PIN code are shown there.
- Sold by Gurukul Technicals Institute, Delhi.
- Need a different topic, a custom version or a school order? Ask on WhatsApp.
In this project guide
Ready-made model
About this model
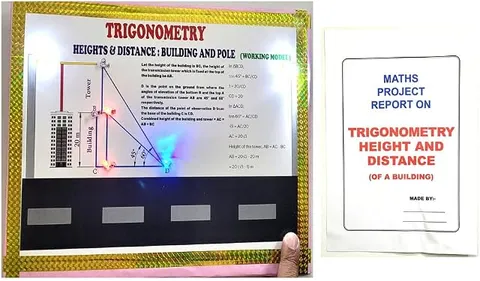
This working model covers the heights and distances topic, showing how the height of a building can be found from the angle of elevation and the distance from its base. It turns a textbook right-angled-triangle problem into something a student can measure, calculate and explain.
How it works
The science behind it
The idea the model demonstrates, in words you can use in your report and when you explain it.
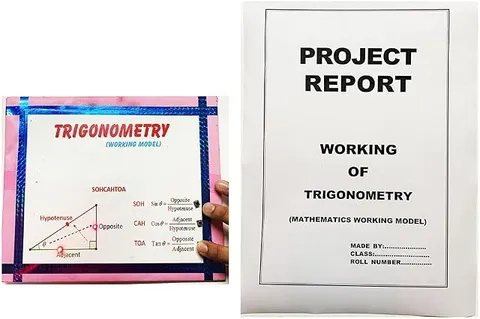
When you look up at the top of a building, the angle between your horizontal line of sight and the line to the top is the angle of elevation, θ. The building, the ground and your line of sight form a right-angled triangle, so tan θ = height ÷ distance from the base, and height = distance × tan θ. If you stand 30 m from a building and the angle of elevation is 60°, the height is 30 × tan 60° = 30 × √3 ≈ 51.96 m. At an angle of 45° the height equals your distance from the base, because tan 45° = 1. For accuracy, add the height of your eyes above the ground, since the angle is measured from eye level. Surveyors use the same method with an instrument called a theodolite, and you could use it to estimate the height of a monument such as the Qutub Minar from a measured distance.
Make it yourself
Make a heights and distances trigonometry model yourself
Build your own version from scratch, or use the steps to understand how the ready-made model is put together before you present it.
What you need 9
Step by step 8 steps
Draw a ground line on the base with a scale starting from the foot of the building, for example 1 cm on the model standing for 1 m.
Fix the building at one end of the scale and make a small movable stand for the observer that can slide along it.
Fix the protractor upright on the observer's stand with its 0° line exactly horizontal, and pivot the straw at the protractor's centre.
Stretch the coloured thread from the pivot to the top of the building and line the straw up with it; read the angle of elevation on the protractor.
Read the distance from the observer to the foot of the building on the scale, and work out the height as distance × tan θ.
Compare your answer with the real height of the model measured with a ruler, and note the difference.
Repeat from three positions, for example where the angle is close to 30°, 45° and 60°, and record the results in a table.
Wire the LED on top of the building through the resistor and switch, so the point being sighted is easy to see while presenting.
Read this first
Safety first
Go through these points before you build or switch anything on. Younger students should do this with an adult.
- Push the pivot pin in carefully and cover its sharp point at the back with tape or an eraser.
- Use a cutter only with an adult when making the building and stand.
- If you take a homemade sighting tube outdoors to measure a real building, never look towards the Sun through it.
- Switch the LED off when not presenting, and keep its resistor in place.
Troubleshooting
If something does not work
The usual problems with this model and how to fix them. Open a problem to see the fix.
The calculated height does not match the real height
The protractor's 0° line may not be horizontal, the pivot may be higher than the ground line, or the angle may have been read on the wrong scale of the protractor. Level the protractor and add the pivot's height above the ground to your answer.
The angle reading comes out as 90° minus the right answer
You are reading from the vertical instead of the horizontal. Use the protractor scale that reads 0° along the ground line.
The straw slips and will not stay at one angle
The pivot is too loose. Put a small piece of eraser or a washer on the pin behind the straw so it holds by friction.
The LED on the building does not light
Check that the long leg goes towards the battery positive, that the resistor and switch are connected, and that the battery is fresh.
Exhibition day
How to present it
A running order for the exhibition table or the practical, step by step.
Solve one example on a chart beside the model, writing tan θ = height ÷ distance and putting in the numbers step by step.
Show how the angle of elevation grows as the observer walks closer to the building.
Bring a homemade clinometer (a protractor, a straw and a thread with a small weight) to measure an angle live.
Remind the examiner that the observer's eye height must be added to the calculated height.
Practice
Viva questions
Practice questions on this model, with short answers. Try each one aloud before you open the answer.
What is the angle of elevation?
It is the angle between the horizontal line from the observer's eye and the line of sight to an object above eye level.
Which trigonometric ratio links height and distance?
Tangent, because tan θ = opposite side ÷ adjacent side = height ÷ horizontal distance.
What happens to the angle of elevation as you move closer to the building?
It increases, because the same height is now seen across a shorter horizontal distance.
What are the values of tan 30°, tan 45° and tan 60°?
tan 30° = 1/√3, tan 45° = 1 and tan 60° = √3.
Project file
Project file outline
The headings of the project file, in order. Give each heading its own section and write it in your own words.
Free ebook: Writing a Science Project FileContents
- Aim: to find the height of a building using the angle of elevation and the distance from its base
- Introduction: trigonometric ratios and tan θ
- Angle of elevation and angle of depression
- Materials and construction of the model and its sighting arm
- Procedure for measuring the angle and the distance
- Observations: distance, angle, calculated height and actual height
- Sources of error and how to reduce them
- Real-life uses in surveying, navigation and building
- Conclusion
Buying checklist
Before you buy
What to check before you order the model, and what to do when it arrives.
1Before you order
- Check that heights and distances is part of your class syllabus and that your teacher wants a working model on it.
- Read the listing to see what is mentioned with the model, such as a battery or a report, and plan for anything missing.
- Practise one full calculation out loud before the exhibition, since visitors often ask you to work one out.
- Keep the box so the tall building part does not bend on the way to school.
- Check the delivery date for your PIN code on the marketplace, and order well before the exhibition or practical.
2When it arrives
- Check the model as soon as it arrives and try the light and any moving parts.
Next steps
Take it further
Ways to turn this model into a bigger investigation or a stronger exhibition entry.
Make a simple clinometer from a protractor, a straw and a thread with a small weight, and use it with a teacher to measure the school flagpole or building, adding your eye height.
Show the angle of depression by looking down from the top of the building to an object on the ground.
Solve a two-position problem, finding the height from two angles measured a known distance apart without knowing the distance to the base.
Compare the trigonometry answer with the shadow method at the same time of day.
Audience
Who it suits
Suits Class 10 maths exhibitions and practical work on applications of trigonometry, and quick revision in Class 11.
- SubjectMaths
- TypeReady-made model
Free to read
Free ebooks for this topic
Free PDF ebooks from Gurukul Technicals Institute on the science, the making and the presenting of projects like this one.
- Free PDF ebook
Maths Working Models and Activities
Make maths visible: models for number, geometry, algebra and data
- Free PDF ebook
Your Science Exhibition Guide
Choose a project, build it, present it and answer the judges with confidence
- Free PDF ebook
Writing a Science Project File
How to write the report, from the cover page to the bibliography
- Free PDF ebook
Viva Questions for Science Projects
How to answer examiner questions, with sample questions for popular projects