- Physics
- Ready-made model
- Class 1 to 9
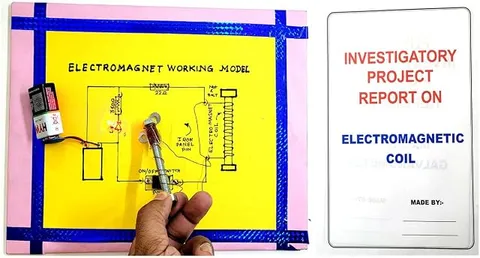
Electromagnet Coil Science Working Model
Code B0G2T8BYFZ
- Paid for and delivered by Amazon. The current price and the delivery date for your PIN code are shown there.
- Sold by Gurukul Technicals Institute, Delhi.
- Need a different topic, a custom version or a school order? Ask on WhatsApp.
In this project guide
Ready-made model
About this model
This working model is an electromagnet coil that shows how an electric current creates a magnetic field. Students can use it to explore the field pattern around a coil, find its north and south poles and see how the field depends on the current, which makes the magnetic effects of current easy to demonstrate.
What the listing says
- Magnetic Field Demonstration CBSE
How it works
The science behind it
The idea the model demonstrates, in words you can use in your report and when you explain it.
When current flows through a long coil of wire, called a solenoid, the magnetic fields of all its turns add up. Inside the coil the field lines are nearly straight and parallel, meaning the field is strong and almost uniform, and outside, the pattern looks just like that of a bar magnet. The right-hand thumb rule gives the direction: curl the fingers of your right hand along the current and your thumb points to the north pole. The field inside a long solenoid is B = μ₀nI, where n is the number of turns per metre and I the current, so more turns or more current give a stronger field. Placing a soft iron core inside makes the field many times stronger. Relays use exactly this: in a home inverter, the click you hear when the power goes is an electromagnet pulling a switch contact.
Make it yourself
Make an electromagnet coil field model yourself
Build your own version from scratch, or use the steps to understand how the ready-made model is put together before you present it.
What you need 8
Step by step 8 steps
Wind the wire in neat, tight turns along the tube, all in the same direction, in two or three layers. Leave about 20 cm free at each end and tape the coil.
Scrape the enamel off the wire ends and connect them through the push switch to the cells.
Cut a slot in the card so the coil fits through it with the card level with the coil's axis, and support the card flat on blocks over the tray.
Press the switch, sprinkle a thin layer of iron filings on the card and tap it gently. The filings line up like a bar magnet's pattern, with straight lines inside the coil.
Place compasses at both ends and around the coil to find its north and south poles, and check them with the right-hand thumb rule.
Reverse the cells and watch the compass needles turn round, showing the poles have swapped.
Count the clips the coil lifts with the tube empty, then with the iron rod inside; the core makes it much stronger.
Fix the coil on the base, label its poles, and photograph the filing pattern for your chart, since loose filings will spill.
Read this first
Safety first
Go through these points before you build or switch anything on. Younger students should do this with an adult.
- Press the switch only while observing; the coil draws a large current and warms up.
- Iron filings are sharp and messy: keep them on a tray, keep your hands away from your eyes, and wash your hands afterwards.
- Keep filings away from the cells' terminals and from phones and magnets, which are hard to clean.
- Use cells only (3 V); never a charger or mains supply.
Troubleshooting
If something does not work
The usual problems with this model and how to fix them. Open a problem to see the fix.
The filings do not form a pattern
The field may be weak or the layer too thick. Sprinkle a thin layer, tap gently, and use fresh cells or more turns.
The compass shows the opposite pole from what I expected
Check the direction of winding and the direction of current (positive to negative through the coil), then apply the right-hand thumb rule again.
The coil lifts no clips without the core
An air-core coil is weak; that is the point of the comparison. Use small pins to see its effect, then compare with the core in place.
The cells run down quickly
The coil draws a heavy current. Press only briefly, and use D cells, which last longer.
Exhibition day
How to present it
A running order for the exhibition table or the practical, step by step.
Sprinkle iron filings on a sheet over the coil, or move a small compass around it, to show the field pattern.
Use the right-hand thumb rule to predict the north pole, then confirm it with a compass.
Reverse the current and show that the poles swap.
Explain how the field can be made stronger and link it to relays and electric bells.
Practice
Viva questions
Practice questions on this model, with short answers. Try each one aloud before you open the answer.
What is a solenoid?
A long coil of many turns of insulated wire, which behaves like a bar magnet when current flows through it.
What is the magnetic field like inside a long solenoid?
It is strong and nearly uniform, which is shown by straight, parallel field lines.
How can you find the polarity of a solenoid?
By the right-hand thumb rule: if the fingers curl in the direction of the current, the thumb points to the north pole.
Give the formula for the magnetic field inside a long solenoid.
B = μ₀nI, where n is the number of turns per unit length and I is the current.
Project file
Project file outline
The headings of the project file, in order. Give each heading its own section and write it in your own words.
Free ebook: Writing a Science Project FileContents
- Aim: to show the magnetic field produced by a current-carrying coil (solenoid)
- Introduction: magnetic effects of electric current
- Materials and labelled diagram of the solenoid
- Theory: the field inside a solenoid, B = μ₀nI, and the right-hand thumb rule
- Procedure: winding the coil and mapping its field
- Observations: filing pattern, poles found with compasses, and clips lifted with and without the core (table)
- A solenoid compared with a bar magnet
- Uses: electric bells, relays, loudspeakers and MRI machines
- Conclusion: how a coil becomes a magnet, and precautions
Buying checklist
Before you buy
What to check before you order the model, and what to do when it arrives.
1Before you order
- Check that it fits your chapter on magnetic effects of current and what your teacher wants to see.
- Read the listing for the power source and whether cells and iron filings are included.
- Carry a compass and some paper clips for the demonstration.
- Keep the box, and keep the model away from phones and bank cards in your bag.
- Check the delivery date for your PIN code on the marketplace, and order well before the exhibition or practical.
- Practise explaining it. Judges ask what the model shows and why; knowing the science matters as much as the model. The viva questions above are a good place to start.
2When it arrives
- Test it with a compass as soon as it arrives and a few days before the event.
Next steps
Take it further
Ways to turn this model into a bigger investigation or a stronger exhibition entry.
Plot the number of clips lifted against the number of turns or cells.
Wind two coils from the same length of wire with different numbers of turns and compare their strength.
Use a phone's magnetometer app to measure the field at different distances from the end of the coil.
Audience
Who it suits
Suits Class 8 to 10 science exhibitions on magnetism, and Class 12 projects on the magnetic field of a solenoid.
- ClassClass 1 to 9
- SubjectPhysics
- TypeReady-made model
Free to read
Free ebooks for this topic
Free PDF ebooks from Gurukul Technicals Institute on the science, the making and the presenting of projects like this one.
- Free PDF ebook
Electricity and Magnetism Experiments
Hands-on experiments with cells, wires, bulbs and magnets
- Free PDF ebook
Physics Working Models Explained
Twenty classic models, how each works and how to make it
- Free PDF ebook
Your Science Exhibition Guide
Choose a project, build it, present it and answer the judges with confidence
- Free PDF ebook
Writing a Science Project File
How to write the report, from the cover page to the bibliography