- Science
- Ready-made model
- Class 1 to 9
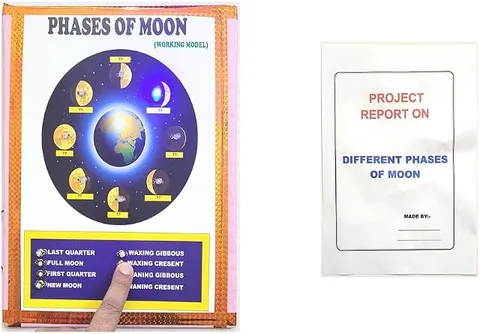
Different Phases of Moon Working Model and Science Teaching Aid Educational Electronic Hobby Kit
Code B0DTYFCVMP
- Paid for and delivered by Amazon. The current price and the delivery date for your PIN code are shown there.
- Sold by Gurukul Technicals Institute, Delhi.
- Need a different topic, a custom version or a school order? Ask on WhatsApp.
In this project guide
Ready-made model
About this model
This teaching model explains why the Moon seems to change shape through the month, from new moon to full moon and back again. It helps students see that the Moon is always half lit by the Sun and that we simply see different parts of that lit half.
How it works
The science behind it
The idea the model demonstrates, in words you can use in your report and when you explain it.
The Moon does not make its own light; it reflects sunlight. At any time, the half facing the Sun is lit, but as the Moon revolves around the Earth, we see different amounts of that lit half. When the Moon is between the Earth and the Sun, its dark side faces us: this is the new moon, or Amavasya. Over the next two weeks the lit part grows (waxing) through crescent, first quarter and gibbous to the full moon, Purnima, when the Earth is between the Sun and the Moon. Then it shrinks (waning) through gibbous, last quarter and crescent. One full cycle takes about 29.5 days. Indian calendars follow this cycle: the waxing fortnight is Shukla Paksha and the waning fortnight is Krishna Paksha, and Diwali falls on an Amavasya. The phases are not caused by the Earth's shadow; that happens only in a lunar eclipse.
Make it yourself
Make a phases of the Moon box model yourself
Build your own version from scratch, or use the steps to understand how the ready-made model is put together before you present it.
What you need 8
Step by step 8 steps
Paint the inside of the box and lid matt black so light does not bounce around inside.
Hang the Moon ball from the lid with two threads so it sits in the middle of the box and does not spin.
Ask an adult to cut a small hole in the centre of one wall for the light, and fix the LED or torch there pointing at the ball.
Cut eight viewing holes around the box at the ball's height: one in the middle of each wall and one near each corner. On the light's wall, put the viewing hole just beside the light.
- Label the holes
The hole beside the light shows the full moon, the hole on the opposite wall shows the new moon, and the holes in between show crescents, quarters and gibbous phases.
Close the lid, switch on in a dim room, and look through each hole in order, sketching what you see.
On the outside of the box, stick a diagram of the Sun, Earth and Moon for each phase, with arrows for waxing and waning.
Add a card explaining that the Moon itself never changes; only the part of its lit half that faces us changes.
Read this first
Safety first
Go through these points before you build or switch anything on. Younger students should do this with an adult.
- An adult should cut all the holes with the cutter.
- Use an LED rather than a bulb so nothing hot touches the cardboard.
- Keep the resistor in series with the LED and switch off when not presenting.
- Let the black paint dry fully before closing the box.
Troubleshooting
If something does not work
The usual problems with this model and how to fix them. Open a problem to see the fix.
Every hole shows almost the same phase
Light is bouncing around inside the box or the lamp is too spread out. Use matt black paint, cover any shiny tape, and make sure the light points straight at the ball.
The ball keeps turning on its thread
Hang it from two threads a little apart, or fix it on a thin black stick from the floor of the box.
The crescent is lit on the wrong side
Check which way you move round the box. Seen from the northern hemisphere, a waxing Moon is lit on the right, so label the holes in the order that matches.
The LED does not light
Check its long leg goes to the battery positive through the resistor, the switch is on and the battery is fresh.
Exhibition day
How to present it
A running order for the exhibition table or the practical, step by step.
Name the eight phases in order and point out where the Sun, the Earth and the Moon are for each one.
Recreate a phase live with a ball and a torch in a dim corner if the hall lighting allows.
Clear up the common mistake that the phases are caused by the Earth's shadow.
Link the phases to Amavasya, Purnima and festivals so the topic feels familiar to visitors.
Practice
Viva questions
Practice questions on this model, with short answers. Try each one aloud before you open the answer.
Why does the Moon show phases?
As it revolves around the Earth, we see different portions of its sunlit half.
How long does one cycle of phases take?
About 29.5 days, from one new moon to the next.
Why do we always see the same side of the Moon?
The Moon takes the same time to spin once on its axis as it takes to go around the Earth, so the same face always points towards us.
Why is there not a solar eclipse at every new moon?
The Moon's orbit is tilted by about 5° to the Earth's orbit, so its shadow usually passes above or below the Earth.
Project file
Project file outline
The headings of the project file, in order. Give each heading its own section and write it in your own words.
Free ebook: Writing a Science Project FileContents
- Aim: to explain why the Moon appears to change shape through the month
- Why the Moon shines: reflected sunlight
- Revolution of the Moon around the Earth
- The eight phases of the Moon, with diagrams
- Waxing and waning
- Positions of the Sun, Earth and Moon at new moon (Amavasya) and full moon (Purnima)
- Construction of the viewing-box model
- Observations: sketches of the Moon seen through each hole
- Conclusion and references
Buying checklist
Before you buy
What to check before you order the model, and what to do when it arrives.
1Before you order
- Check that the Moon's phases are in your class syllabus and suit the model your teacher wants.
- Read the listing to see what is mentioned with the model and whether batteries are needed.
- Find out whether your display table will be in a bright spot, and plan to shade the model if it is.
- Keep the box for safe transport.
- Check the delivery date for your PIN code on the marketplace, and order well before the exhibition or practical.
- Practise explaining it. Judges ask what the model shows and why; knowing the science matters as much as the model. The viva questions above are a good place to start.
2When it arrives
- Try the light as soon as it arrives and again a few days before the exhibition.
Next steps
Take it further
Ways to turn this model into a bigger investigation or a stronger exhibition entry.
Observe the real Moon every clear evening for a month, sketch it with the date, and compare with your model.
Explain why there is not an eclipse every month, using the tilt of about 5° between the Moon's orbit and the Earth's orbit.
Show why we always see the same face of the Moon, by walking round a chair while always facing it.
Compare the 29.5-day cycle of phases with the roughly 27.3 days the Moon takes to go once round the Earth relative to the stars.
Audience
Who it suits
Suits Class 5 to 8 science and geography exhibitions and lessons on the Moon and the solar system.
- ClassClass 1 to 9
- SubjectScience
- TypeReady-made model
Free to read
Free ebooks for this topic
Free PDF ebooks from Gurukul Technicals Institute on the science, the making and the presenting of projects like this one.
- Free PDF ebook
Earth, Space and Geography Models
Solar system, seasons, eclipses, volcanoes and the water cycle explained
- Free PDF ebook
Your Science Exhibition Guide
Choose a project, build it, present it and answer the judges with confidence
- Free PDF ebook
Writing a Science Project File
How to write the report, from the cover page to the bibliography
- Free PDF ebook
Viva Questions for Science Projects
How to answer examiner questions, with sample questions for popular projects