- Physics
- Ready-made model
Wheatstone Bridge Using Big Ring Bulbs
Code B0G2TBXD6V
- Paid for and delivered by Amazon. The current price and the delivery date for your PIN code are shown there.
- Sold by Gurukul Technicals Institute, Delhi.
- Need a different topic, a custom version or a school order? Ask on WhatsApp.
In this project guide
Ready-made model
About this model
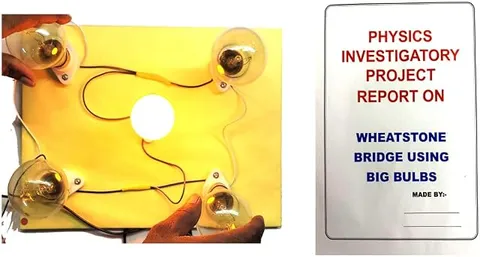
This physics project builds a Wheatstone bridge with bulbs (the listing calls them big ring bulbs) to explore resistance and the balance condition of a bridge circuit. Bulbs glow brighter or dimmer with the current through them, so they help make an otherwise invisible balance easier to show to an audience.
What the listing says
- Resistance & Balance Experiment ProjectPhysics Project
How it works
The science behind it
The idea the model demonstrates, in words you can use in your report and when you explain it.
A Wheatstone bridge has four resistances, P, Q, R and S, joined in a loop, with a cell across one diagonal and a galvanometer across the other. When P ÷ Q = R ÷ S, the two ends of the galvanometer arm are at the same potential, so no current flows through it and the bridge is balanced. If three resistances are known, the fourth can be found: S = R × Q ÷ P. The balance condition follows from Kirchhoff's laws and depends only on the ratio of resistances, not on the emf of the cell. A bulb is not an ideal resistor: the resistance of its tungsten filament rises as it heats up, so it depends on the current. With identical bulbs the bridge balances by symmetry, but with mismatched bulbs the balance can shift when the supply voltage changes. The meter bridge in the school lab is a practical form of this circuit.
Make it yourself
Make a Wheatstone bridge with bulbs yourself
Build your own version from scratch, or use the steps to understand how the ready-made model is put together before you present it.
What you need 7
Step by step 9 steps
Fix the four bulb holders on the board in a diamond shape and label them P, Q, R and S.
- Wire them in a loop
P from the top corner to the left corner, Q from the left to the bottom, R from the top to the right, and S from the right to the bottom.
Connect the cells and the switch across the top and bottom corners.
Connect the multimeter or galvanometer across the left and right corners.
- Switch on
With four identical bulbs, all glow equally and the detector reads close to zero, so the bridge is balanced.
Replace S with the different bulb. The detector now shows a reading, and the bulbs on the two sides glow differently.
Put the potentiometer in series with whichever arm restores the balance, and adjust it until the detector reads zero again.
Switch off, take out the potentiometer without turning it, and measure the resistance you set with the multimeter on ohms.
Switch off between readings to save the cells and stop the bulbs overheating.
Read this first
Safety first
Go through these points before you build or switch anything on. Younger students should do this with an adult.
- Bulbs get hot within seconds; let them cool before unscrewing them.
- Handle bulbs gently, as the glass can break, and let an adult clear up any broken pieces.
- Use only the cell pack and never short it, as the wires heat up quickly.
- Ask an adult to help with any soldering.
Troubleshooting
If something does not work
The usual problems with this model and how to fix them. Open a problem to see the fix.
The detector never reads exactly zero with four bulbs
Bulbs of the same rating still differ a little, and loose holders add resistance. Tighten every holder and use the potentiometer to trim the balance.
The reading drifts for a while after switching on
The filaments are heating up and their resistance is rising. Wait until the reading settles before recording it.
All the bulbs glow very dimly
The cells are weak, or the bulbs are rated too high. Each bulb shares the pack's voltage with the bulb in series with it, so with a 6 V pack use bulbs rated about 3 V, and fit fresh cells.
One bulb stays dark
Its holder is loose or its filament is broken. Check it with the multimeter's continuity setting.
Exhibition day
How to present it
A running order for the exhibition table or the practical, step by step.
Draw the diamond-shaped bridge on a chart, label the arms P, Q, R and S, and write the balance condition beside it.
If your model has a bulb or meter in the middle arm, show that it stays off or reads zero at balance and responds when one arm is changed.
Explain why bulbs are not perfect resistors, because examiners often ask what happens when a filament heats up.
Connect the project to the meter bridge experiment, where the same balance condition is used to find an unknown resistance.
Practice
Viva questions
Practice questions on this model, with short answers. Try each one aloud before you open the answer.
Write the condition for a balanced Wheatstone bridge.
The bridge is balanced when P ÷ Q = R ÷ S, and then no current flows through the galvanometer.
Why does the galvanometer show no current at balance?
At balance both ends of the galvanometer arm are at the same potential, and current flows only when there is a potential difference.
Does the balance point depend on the emf of the cell?
No. Changing the emf changes all the currents in the same proportion, so the condition P ÷ Q = R ÷ S stays the same.
Why does the resistance of a bulb change while it is working?
The resistance of a metal like tungsten increases with temperature, and the filament becomes very hot when current flows.
Project file
Project file outline
The headings of the project file, in order. Give each heading its own section and write it in your own words.
Free ebook: Writing a Science Project FileContents
- Aim: to study the balance condition of a Wheatstone bridge using bulbs in its four arms
- Apparatus
- Theory: the balance condition and how it is derived
- Circuit diagram
- Procedure
- Observation table: bulbs used, detector reading and potentiometer setting
- Why a bulb's resistance changes as it heats up
- Result and precautions
- Applications: the metre bridge, strain gauges and sensors
Buying checklist
Before you buy
What to check before you order the model.
1Check these first
- The Wheatstone bridge belongs to senior secondary current electricity and the metre bridge practical; check that a bulb-based model suits your teacher.
- Check in the listing what supply the bulbs need and whether batteries or spare bulbs are included.
- Test it a few days before the exhibition and keep a spare bulb of the same rating.
- Keep the box, and wrap the bulbs separately when carrying the model.
- Check the delivery date for your PIN code on the marketplace, and order well before the exhibition or practical.
- Practise explaining it. Judges ask what the model shows and why; knowing the science matters as much as the model. The viva questions above are a good place to start.
Next steps
Take it further
Ways to turn this model into a bigger investigation or a stronger exhibition entry.
Replace the bulbs with resistors and compare how steadily and exactly each version balances.
Measure a bulb's resistance cold with the multimeter and hot using the bridge, and explain the difference.
Put an LDR or a thermistor in one arm to turn the bridge into a light or temperature sensor.
Audience
Who it suits
Suits Class 12 physics students for investigatory projects on current electricity and Kirchhoff's laws, and Class 10 exhibitions on resistance.
- SubjectPhysics
- TypeReady-made model
Free to read
Free ebooks for this topic
Free PDF ebooks from Gurukul Technicals Institute on the science, the making and the presenting of projects like this one.
- Free PDF ebook
Electricity and Magnetism Experiments
Hands-on experiments with cells, wires, bulbs and magnets
- Free PDF ebook
Physics Working Models Explained
Twenty classic models, how each works and how to make it
- Free PDF ebook
Your Science Exhibition Guide
Choose a project, build it, present it and answer the judges with confidence
- Free PDF ebook
Writing a Science Project File
How to write the report, from the cover page to the bibliography