- Biology
- Ready-made model
- Class 1 to 9
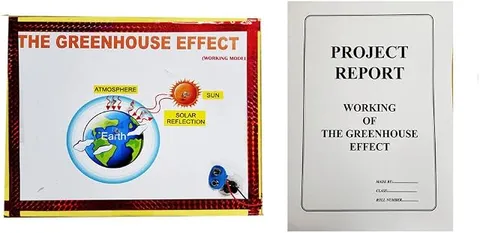
The Green House Effect Biology Working Model Educational Science Project
Code B0BN2KC1QP
- Paid for and delivered by Amazon. The current price and the delivery date for your PIN code are shown there.
- Sold by Gurukul Technicals Institute, Delhi.
- Need a different topic, a custom version or a school order? Ask on WhatsApp.
In this project guide
Ready-made model
About this model
This model explains the greenhouse effect, the natural process that keeps the Earth warm enough for life, and how human activity is making it stronger. It helps students talk clearly about global warming, its causes and what can be done to reduce it.
How it works
The science behind it
The idea the model demonstrates, in words you can use in your report and when you explain it.
Sunlight reaches the Earth mostly as visible light and passes through the atmosphere easily. The ground and oceans absorb it, warm up and then give out energy as infrared radiation. Greenhouse gases in the air, mainly water vapour, carbon dioxide, methane and nitrous oxide, absorb much of this outgoing infrared and send part of it back towards the surface, keeping the planet warm. Without this natural greenhouse effect, the Earth's average temperature would be about −18 °C instead of about 15 °C. Burning coal, petrol and diesel, cutting forests and some farming practices add extra greenhouse gases, so more heat is held back and the average temperature rises. This is global warming, linked to melting glaciers, rising sea levels and more extreme weather. The name comes from glass greenhouses, like the polyhouses Indian farmers use to grow capsicum and flowers, which also stay warmer inside than outside.
Make it yourself
Make a greenhouse effect model yourself
Build your own version from scratch, or use the steps to understand how the ready-made model is put together before you present it.
What you need 9
Step by step 8 steps
Put the same amount of dark soil in both jars and stand a thermometer in each, with the bulbs at the same height and shaded by a small card so the sun does not shine on them directly.
Cover one jar tightly with cling film and a rubber band, and leave the other open.
Note both starting temperatures, then place the jars side by side in sunlight, or the same distance under the lamp.
Read both thermometers every 2 minutes for 20 to 30 minutes and record the readings in a table.
Plot both sets of readings on one graph; the covered jar should warm faster and stay warmer.
On the display, draw yellow arrows for sunlight coming in and red arrows for heat going out, with some red arrows turning back at the gas layer.
Label the main greenhouse gases and their human sources, such as vehicles, power plants and cleared forests.
Stand the jars in front of the display so visitors can read the live temperatures.
Read this first
Safety first
Go through these points before you build or switch anything on. Younger students should do this with an adult.
- If you use a lamp, an adult should set it up; bulbs get very hot, so keep paper and cling film away from it.
- Handle glass jars carefully, and tape over any cut plastic edge.
- Never look straight at the sun while setting up the jars.
- If a glass thermometer breaks, do not touch it; ask an adult to clear it up.
Troubleshooting
If something does not work
The usual problems with this model and how to fix them. Open a problem to see the fix.
Both thermometers show the same temperature
The jars may be in shade or the cling film is loose. Use strong sunlight, seal the film with the rubber band and wait longer.
The readings jump up and down
Sunlight is falling on the thermometer bulbs or clouds are passing. Shade the bulbs and take every reading at a fixed time.
The open jar ends up hotter
The jars are probably not equally lit or do not have the same soil. Swap their positions and repeat, keeping everything the same except the cover.
Exhibition day
How to present it
A running order for the exhibition table or the practical, step by step.
Use arrows of two colours on the model or chart: one for incoming sunlight and one for outgoing heat.
Explain that the greenhouse effect itself is natural and needed; the problem is the extra gases.
List three human activities that add greenhouse gases and three ways to reduce them.
Mention a local example, such as stopping stubble burning or using public transport.
Practice
Viva questions
Practice questions on this model, with short answers. Try each one aloud before you open the answer.
What is the greenhouse effect?
It is the warming of the Earth's surface because gases in the atmosphere absorb the infrared radiation given out by the Earth and send part of it back.
Name four greenhouse gases.
Carbon dioxide, methane, nitrous oxide and water vapour.
What would happen without the greenhouse effect?
The Earth would be far too cold for most life, with an average temperature of about −18 °C.
What is global warming?
It is the rise in the Earth's average temperature caused by extra greenhouse gases from human activities.
Project file
Project file outline
The headings of the project file, in order. Give each heading its own section and write it in your own words.
Free ebook: Writing a Science Project FileContents
- Aim: to show how a covering layer keeps the air beneath it warmer, as greenhouse gases keep the Earth warm
- The natural greenhouse effect and why life needs it
- Greenhouse gases and their main sources in India
- Experiment: setup, observation table and temperature-time graph
- Limitations of the jar model compared with the real atmosphere
- Effects of global warming: melting glaciers, rising sea levels and changing monsoons
- What each of us can do: saving electricity, using public transport and planting trees
- Conclusion on the greenhouse effect, and sources of the data used
Buying checklist
Before you buy
What to check before you order the model.
1Check these first
- Check the class level and whether the listing describes a working or a display model, so it matches what your teacher asked for.
- See whether the listing mentions a lamp, batteries or a report, and arrange anything extra in advance.
- Set it up at home a few days before the exhibition and check that every light or moving part works.
- Keep the box, and pack loose parts like the sun and labels separately so they are not crushed.
- Check the delivery date for your PIN code on the marketplace, and order well before the exhibition or practical.
- Practise explaining it. Judges ask what the model shows and why; knowing the science matters as much as the model. The viva questions above are a good place to start.
Next steps
Take it further
Ways to turn this model into a bigger investigation or a stronger exhibition entry.
Explain that the jar warms mainly because the lid stops warm air escaping, while real greenhouse gases absorb and send back infrared, and say why the model is still useful.
With an adult, fill one jar with extra carbon dioxide from baking soda and vinegar and compare it with a jar of plain air; the difference is small, so repeat several times.
Collect yearly average temperatures for your city from a weather service and graph the trend over several decades.
Audience
Who it suits
Suits Class 6 to 10 science and geography exhibitions on the environment, pollution and climate change.
- ClassClass 1 to 9
- SubjectBiology
- TypeReady-made model
Free to read
Free ebooks for this topic
Free PDF ebooks from Gurukul Technicals Institute on the science, the making and the presenting of projects like this one.
- Free PDF ebook
Biology Models Guide
Make the heart, lungs, kidney, eye, cell and more, and explain them well
- Free PDF ebook
Your Science Exhibition Guide
Choose a project, build it, present it and answer the judges with confidence
- Free PDF ebook
Writing a Science Project File
How to write the report, from the cover page to the bibliography
- Free PDF ebook
Viva Questions for Science Projects
How to answer examiner questions, with sample questions for popular projects