- Biology
- Ready-made model
- Class 1 to 9
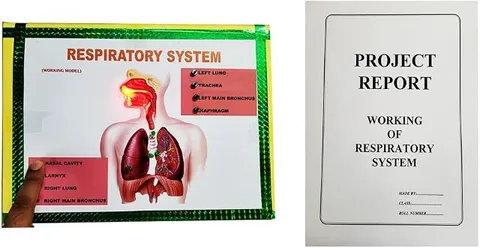
Respiratory System Biology Working Model Educational Science Project
Code B0BN2GZH4T
- Paid for and delivered by Amazon. The current price and the delivery date for your PIN code are shown there.
- Sold by Gurukul Technicals Institute, Delhi.
- Need a different topic, a custom version or a school order? Ask on WhatsApp.
In this project guide
Ready-made model
About this model
A biology working model of the human respiratory system that follows the path air takes from the nose to the lungs and shows how breathing happens. It helps students explain inhalation, exhalation and the exchange of gases in the lungs at an exhibition or practical exam.
How it works
The science behind it
The idea the model demonstrates, in words you can use in your report and when you explain it.
Air enters through the nostrils, where hairs and mucus trap dust, and passes through the pharynx, larynx and trachea. The trachea divides into two bronchi, one for each lung, which branch into thinner bronchioles ending in millions of tiny air sacs called alveoli. Alveoli have very thin walls wrapped in blood capillaries, so oxygen diffuses into the blood and carbon dioxide diffuses out. Breathing is driven by pressure difference. During inhalation the diaphragm contracts and flattens and the ribs move up and out, so the chest cavity enlarges, pressure in the lungs falls, and air rushes in. During exhalation the diaphragm relaxes and domes upward, the chest becomes smaller and air is pushed out. Breathing is only the movement of air; respiration is the release of energy from food inside cells. On smoggy winter days in Delhi, fine dust can reach deep into the alveoli, which is why doctors advise masks.
Make it yourself
Make a breathing lungs model with a working diaphragm yourself
Build your own version from scratch, or use the steps to understand how the ready-made model is put together before you present it.
What you need 9
Step by step 8 steps
Tie a small balloon onto each arm of the Y connector with a rubber band, tight enough to be airtight.
Push the Y into the bottle from below so the balloons hang inside and the single stem comes out through the mouth, then seal the mouth around the stem with clay so no air leaks.
Stretch the half of the large balloon that has the neck over the open bottom of the bottle, and fix it with rubber bands and tape.
Pull the balloon's neck gently downwards: the space inside the bottle grows, the pressure falls, and air rushes in through the stem and inflates the lungs. This is inhalation.
- Push the neck upwards
The space shrinks, the pressure rises, and air is pushed out of the balloons. This is exhalation.
Label the bottle as the chest cavity, the stem as the trachea, the Y arms as bronchi, the balloons as lungs and the rubber sheet as the diaphragm.
Build the display board beside it, tracing the path of air from the nostrils to the alveoli, with the grapes showing how millions of tiny air sacs give a huge surface for exchanging gases.
With an adult, blow gently through a straw into a glass of clear lime water for about a minute: it turns milky, showing that breathed-out air contains carbon dioxide.
Read this first
Safety first
Go through these points before you build or switch anything on. Younger students should do this with an adult.
- Let an adult cut the bottle, and tape over the cut edge so it is not sharp.
- Only blow out through the straw into lime water, never suck in; lime water irritates the skin and eyes, so wash off any splash at once.
- Give every person who tries the lime water test a fresh straw.
- Keep balloon pieces away from young children, who can choke on them.
Troubleshooting
If something does not work
The usual problems with this model and how to fix them. Open a problem to see the fix.
The lungs do not inflate when the diaphragm is pulled
Air is leaking in at the bottle's mouth or around the rubber sheet. Reseal the mouth with clay and tighten the rubber bands.
The balloons fill only a little
The balloons are too stiff. Stretch them by blowing them up a few times first, or use smaller, thinner balloons.
The rubber sheet tears
It was stretched too tight or the bottle edge is sharp. Tape the edge and use a fresh, thicker balloon.
The lime water does not turn milky
It may be old or too weak, or you blew for too short a time. Use fresh, clear lime water and blow gently for a full minute.
Exhibition day
How to present it
A running order for the exhibition table or the practical, step by step.
Show inhalation and exhalation slowly and describe what the diaphragm and ribs do in each.
Trace the path of air on the model from the nostrils to the alveoli without skipping any part.
Keep a one-line difference between breathing and respiration ready, because examiners often ask it.
Add a small chart on how smoking and air pollution damage the alveoli.
Practice
Viva questions
Practice questions on this model, with short answers. Try each one aloud before you open the answer.
What is the role of the diaphragm in breathing?
It contracts and flattens during inhalation to enlarge the chest cavity, and relaxes and domes upward during exhalation to push air out.
Where does exchange of gases take place?
In the alveoli of the lungs, where oxygen diffuses into the blood and carbon dioxide diffuses out.
What is the difference between breathing and respiration?
Breathing is the physical movement of air into and out of the lungs, while respiration is the chemical breakdown of food in cells to release energy.
Why does the trachea have rings of cartilage?
The cartilage rings keep the trachea open so that it does not collapse when the air pressure inside it falls.
Project file
Project file outline
The headings of the project file, in order. Give each heading its own section and write it in your own words.
Free ebook: Writing a Science Project FileContents
- Aim: to show how breathing happens using a model of the lungs and diaphragm
- Introduction: respiration and breathing
- The path of air from the nose to the alveoli
- Mechanism of breathing: the diaphragm and the ribs, with diagrams
- Exchange of gases in the alveoli
- Construction of the bell jar model
- Observations: diaphragm movement, lung inflation and the lime water test
- Limits of the model: the bottle cannot move like the ribs, and real lungs fill the chest cavity
- Conclusion, care of the lungs and bibliography
Buying checklist
Before you buy
What to check before you order the model, and what to do when it arrives.
1Before you order
- Check that breathing and the respiratory system match your syllabus (Class 7 or Class 10 science) and how much detail your teacher expects.
- Compare the parts in the listing photos with your textbook diagram, and plan any labels you need to add.
- Practise explaining what happens to the pressure inside the chest during inhalation and exhalation.
- Keep the box for transport.
- Check the delivery date for your PIN code on the marketplace, and order well before the exhibition or practical.
2When it arrives
- Test any moving part as soon as it arrives and fix leaks or loose joints early.
Next steps
Take it further
Ways to turn this model into a bigger investigation or a stronger exhibition entry.
Count the breathing rate of five classmates at rest and after a minute of exercise, and explain the difference in your report.
Add a panel on how smoking damages the alveoli, using information from a reliable health source.
Make the diaphragm move by itself with a slow geared motor and a crank, so the model breathes continuously.
Audience
Who it suits
Suits Class 7 to 11 biology exhibitions and practical work on life processes.
- ClassClass 1 to 9
- SubjectBiology
- TypeReady-made model
Free to read
Free ebooks for this topic
Free PDF ebooks from Gurukul Technicals Institute on the science, the making and the presenting of projects like this one.
- Free PDF ebook
Biology Models Guide
Make the heart, lungs, kidney, eye, cell and more, and explain them well
- Free PDF ebook
Your Science Exhibition Guide
Choose a project, build it, present it and answer the judges with confidence
- Free PDF ebook
Writing a Science Project File
How to write the report, from the cover page to the bibliography
- Free PDF ebook
Viva Questions for Science Projects
How to answer examiner questions, with sample questions for popular projects