- Biology
- Ready-made model
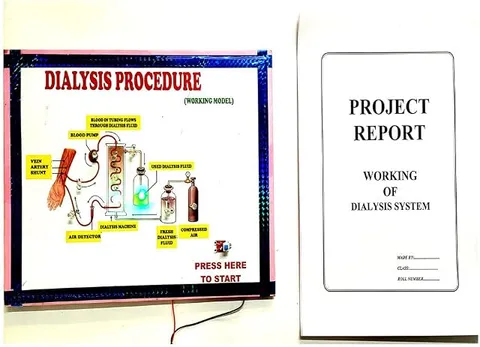
Dialysis System Biology Handmade Working Model and Educational Science Project
Code B0C3H7RTXC
- Paid for and delivered by Amazon. The current price and the delivery date for your PIN code are shown there.
- Sold by Gurukul Technicals Institute, Delhi.
- Need a different topic, a custom version or a school order? Ask on WhatsApp.
In this project guide
Ready-made model
About this model
This handmade biology working model explains how dialysis works, the process that cleans the blood of people whose kidneys have stopped working properly. It helps a student compare an artificial kidney with a real one and explain diffusion through a semi-permeable membrane.
How it works
The science behind it
The idea the model demonstrates, in words you can use in your report and when you explain it.
Each kidney filters blood through about a million tiny units called nephrons, removing urea, extra salts and water as urine. When the kidneys fail, waste builds up in the blood, and a patient may need haemodialysis. Blood is taken from a blood vessel, usually in the arm, and pumped through a dialyser, also called an artificial kidney. Inside, the blood flows through thin tubes made of a semi-permeable membrane, surrounded by dialysing fluid. This fluid has the same concentration of useful substances like glucose and salts as normal blood, but no urea. So urea and other wastes diffuse from the blood into the fluid, down a concentration gradient, while blood cells and proteins are too large to pass through. A chemical such as heparin is added to stop the blood from clotting, and the cleaned blood is returned to the body. Unlike a real kidney, a dialyser cannot reabsorb useful substances.
Make it yourself
Make a dialysis machine model with a salt test yourself
Build your own version from scratch, or use the steps to understand how the ready-made model is put together before you present it.
What you need 10
Step by step 8 steps
Run the membrane tube through the dialyser case from one end to the other, and seal each end around a short piece of aquarium tube with tape or glue.
Put the first pump in the blood container, connect it to one end of the membrane tube, and lead the other end back into the same container, so the blood circulates through the dialyser and returns to the patient.
Put the second pump in the fresh-fluid container and connect it to the hole at the far end of the case; lead the hole at the near end to the used-fluid container. The fluid now flows the opposite way to the blood, as in a real machine.
Make the blood from water, a few drops of red colour and two spoons of salt stirred until dissolved, and fill the fresh-fluid container with distilled water.
- Build the tester
Battery positive through the 1 kΩ resistor to the LED's long leg, the short leg to one probe, and the other probe to battery negative. Check it: the LED stays dark or very dim in distilled water and glows in the salty blood.
Run both pumps for a few minutes, then test the used fluid: the LED now glows, showing that salt has crossed the membrane from the blood into the fluid.
Explain that a real dialysing fluid already contains glucose and salts at normal blood levels, so only the excess and the urea leave the blood; here salt plays the part of urea.
Label each part, and add a card comparing the dialyser with the nephrons of a natural kidney.
Read this first
Safety first
Go through these points before you build or switch anything on. Younger students should do this with an adult.
- Keep the cell holders, switches and tester on the dry side of the board, and switch off before lifting a pump out of the water.
- Never drink any liquid from the model, and wash the containers and tubes after use.
- Use only the 9 V battery for the tester; never test liquids with a charger or anything connected to a socket.
- Use the glue gun and any cutter only with an adult.
Troubleshooting
If something does not work
The usual problems with this model and how to fix them. Open a problem to see the fix.
The membrane tube leaks into the case
The end seals are loose or the tubing has a pinhole. Re-tape the ends tightly, soak dialysis tubing in water before use so it is soft, and handle it gently.
The tester glows in the fresh fluid too
Tap water contains dissolved salts. Use distilled or RO water for the fresh fluid, and rinse the probes between tests.
The pumps run but nothing flows
Both pumps must be fully under water, and the tubes must not be kinked or lifted too high. Shorten the tubes and keep the containers level with the dialyser.
The red colour also appears in the used fluid
Food colour molecules are small, so like urea they can pass through the membrane. Use this to explain that the membrane sorts by size: real blood cells and proteins are far too large to cross.
Exhibition day
How to present it
A running order for the exhibition table or the practical, step by step.
Trace the flow of blood on the model from the patient to the dialyser and back.
Explain diffusion with a simple example, such as a drop of ink spreading in water, before showing the dialyser.
Compare the dialyser with a nephron in a two-column table: what each removes, and what only the kidney can reabsorb.
Close with kidney health tips, such as drinking enough water and keeping blood pressure and blood sugar under control.
Practice
Viva questions
Practice questions on this model, with short answers. Try each one aloud before you open the answer.
What job does a dialysis machine do for a patient?
Dialysis is an artificial way of removing waste, mainly urea, and excess water from the blood when the kidneys do not work properly.
Why does the dialysing fluid contain glucose and salts?
So that these useful substances do not diffuse out of the blood, because their concentration is the same on both sides of the membrane.
Which waste is mainly removed during dialysis?
Urea, along with other nitrogenous wastes, extra salts and water.
What is the structural and functional unit of the kidney?
The nephron; each kidney has about a million of them.
Project file
Project file outline
The headings of the project file, in order. Give each heading its own section and write it in your own words.
Free ebook: Writing a Science Project FileContents
- Aim: to show how a dialysis machine removes waste from blood by diffusion through a semi-permeable membrane
- Introduction: the kidneys, nephrons and kidney failure
- Diffusion and semi-permeable membranes
- Parts of a haemodialysis machine, and why blood and fluid flow in opposite directions
- Construction of the model and the conductivity tester
- Observations: tester results for fresh fluid, used fluid and blood
- Comparison of the dialyser with a natural kidney
- Kidney health: water, diet and check-ups
- Conclusion and bibliography
Buying checklist
Before you buy
What to check before you order the model, and what to do when it arrives.
1Before you order
- Check that excretion and the artificial kidney are in your syllabus (Class 10 life processes covers them) and how much detail your teacher wants.
- Look at the listing photos to see which parts of the machine are shown, so you can add labels for anything your textbook mentions.
- Empty and dry it before packing, and keep the box for transport.
- Check the delivery date for your PIN code on the marketplace, and order well before the exhibition or practical.
- Practise explaining it. Judges ask what the model shows and why; knowing the science matters as much as the model. The viva questions above are a good place to start.
2When it arrives
- As the model is handmade, check every part and joint when it arrives, and if it runs with water, test it on a tray a few days before the exhibition.
Next steps
Take it further
Ways to turn this model into a bigger investigation or a stronger exhibition entry.
Add starch to the blood as a stand-in for large protein molecules and show with an iodine test, done with an adult, that it does not reach the used fluid.
Compare opposite-direction flow with same-direction flow by timing how soon salt appears in the used fluid each way.
Find out from a reliable health source how often dialysis patients need treatment, and why organ donation matters.
Audience
Who it suits
Suits Class 10 to 12 biology exhibitions and lessons on excretion in humans.
- SubjectBiology
- TypeReady-made model
Free to read
Free ebooks for this topic
Free PDF ebooks from Gurukul Technicals Institute on the science, the making and the presenting of projects like this one.
- Free PDF ebook
Biology Models Guide
Make the heart, lungs, kidney, eye, cell and more, and explain them well
- Free PDF ebook
Your Science Exhibition Guide
Choose a project, build it, present it and answer the judges with confidence
- Free PDF ebook
Writing a Science Project File
How to write the report, from the cover page to the bibliography
- Free PDF ebook
Viva Questions for Science Projects
How to answer examiner questions, with sample questions for popular projects