- Physics
- Ready-made model
- Class 10 to 12
- Printed report included
Representation of Ohm’s Law Physics Investigatory Project with Report
Code B0G2T8FYMG
- Paid for and delivered by Amazon. The current price and the delivery date for your PIN code are shown there.
- Sold by Gurukul Technicals Institute, Delhi.
- Need a different topic, a custom version or a school order? Ask on WhatsApp.
In this project guide
Ready-made model
About this model
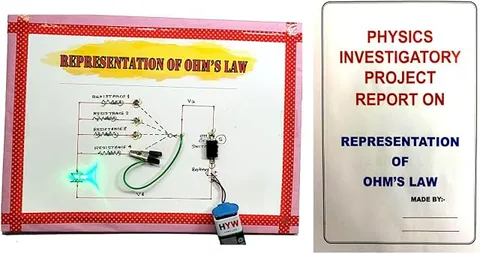
This investigatory project represents Ohm's law, the relation between voltage, current and resistance in a conductor. The listing says it comes with a report, and the model helps students show that current rises in step with voltage when the resistance stays the same.
How it works
The science behind it
The idea the model demonstrates, in words you can use in your report and when you explain it.
Ohm's law states that the current I through a conductor is directly proportional to the potential difference V across its ends, provided the temperature and other physical conditions stay the same. So V = IR, where R is the resistance, measured in ohms (Ω). One ohm is the resistance of a conductor through which 1 A flows when 1 V is applied across it. A graph of V against I for such a conductor is a straight line through the origin, and its slope gives R. The formula can be rearranged as I = V/R and R = V/I; for example, a 230 V room heater with a 46 Ω element draws 230 ÷ 46 = 5 A. Resistance itself depends on the material, length and cross-sectional area of the conductor: R = ρL/A. Devices that do not give a straight-line graph, such as a diode, or a filament bulb as it heats up, are called non-ohmic.
Make it yourself
Make an Ohm's law board yourself
Build your own version from scratch, or use the steps to understand how the ready-made model is put together before you present it.
What you need 9
Step by step 8 steps
Fix the four cell holders in a row on the base and add a screw terminal at each joint between cells, labelled 0 V, 1.5 V, 3 V, 4.5 V and 6 V.
Fix the resistor, switch and test terminals on the base.
Connect a crocodile lead from the 1.5 V terminal to the switch, then through the ammeter on its milliampere range, then through the resistor and back to the 0 V terminal.
Connect the voltmeter across the resistor alone, on its DC volts range.
Press the switch briefly, read the voltage and current, and release it. Write both readings in your table.
Move the lead to 3 V, 4.5 V and 6 V in turn, taking a reading at each, and work out V ÷ I every time; it should stay nearly constant.
- Plot voltage against current
The points should lie on a straight line through the origin, and its slope is the resistance.
Repeat with the 220 Ω resistor and draw its line on the same graph to show a steeper slope.
Read this first
Safety first
Go through these points before you build or switch anything on. Younger students should do this with an adult.
- Press the switch only while taking a reading, so the resistor does not warm up and change its resistance.
- Always connect the ammeter in series, never directly across the cells.
- Do not let a bare lead touch two terminals at once, as this short-circuits the cells and makes them hot.
- If you solder wires to the cell holders, do it with an adult.
Troubleshooting
If something does not work
The usual problems with this model and how to fix them. Open a problem to see the fix.
V ÷ I is not the same every time
The resistor may be warming up, the meter may be on an unsuitable range, or the crocodile clips may be making poor contact. Take quick readings, use the same range each time and clean the contacts.
The graph does not pass exactly through the origin
Small zero errors in the meters cause this. Note it under sources of error and draw the best straight line through your points.
The ammeter shows zero
The red probe may be in the wrong socket, the meter's fuse may be blown, or the circuit may be open. Check the probe is in the milliampere socket and every clip is closed.
The voltage is lower than the cells' total
Cells lose voltage when used and when current flows. That is why the voltmeter reads the voltage across the resistor itself rather than trusting the label.
Exhibition day
How to present it
A running order for the exhibition table or the practical, step by step.
Plot the V-I graph on graph paper and calculate the resistance from its slope.
Use the V = IR triangle to answer quick rearrangement questions.
Mention the condition of constant temperature, which many students forget in the viva.
Give one example of a non-ohmic device so the examiner sees you know the law's limits.
Practice
Viva questions
Practice questions on this model, with short answers. Try each one aloud before you open the answer.
State Ohm's law.
At constant temperature, the current through a conductor is directly proportional to the potential difference across it.
What is the SI unit of resistance?
The ohm (Ω), which equals one volt per ampere.
What does the slope of a V-I graph represent?
With V on the y-axis and I on the x-axis, the slope equals the resistance of the conductor.
Name a device that does not obey Ohm's law.
A semiconductor diode, whose current does not increase in proportion to the voltage.
Project file
Project file outline
The headings of the project file, in order. Give each heading its own section and write it in your own words.
The listing includes a printed project report: use this outline to check that your own file covers every part.
Free ebook: Writing a Science Project FileContents
- Aim: to verify Ohm's law and find the resistance of a resistor
- Theory: potential difference, current and resistance
- Statement of Ohm's law and the conditions under which it holds
- Circuit diagram and apparatus
- Procedure and precautions
- Observation table of V, I and V ÷ I
- V-I graph and resistance from its slope
- Sources of error
- Result and conclusion
Buying checklist
Before you buy
What to check before you order the model, and what to do when it arrives.
1Before you order
- Check that Ohm's law is in your syllabus and that your teacher accepts a working model for it.
- Read the listing to see what is mentioned with the model, such as the report, and note that you will usually need your own multimeter for readings.
- Carry spare cells to the exhibition, as weak cells change the readings.
- Keep the box to protect the board and meters.
- Check the delivery date for your PIN code on the marketplace, and order well before the exhibition or practical.
- Practise explaining it. Judges ask what the model shows and why; knowing the science matters as much as the model. The viva questions above are a good place to start.
2When it arrives
- Take a full set of readings at home soon after it arrives, so you know what results to expect.
Next steps
Take it further
Ways to turn this model into a bigger investigation or a stronger exhibition entry.
Plot V-I graphs for a filament bulb and a diode as well, and explain why they are not straight lines.
Measure the resistance of different lengths of nichrome wire, plot R against length, and work out the wire's resistivity.
Check the series and parallel resistance formulas using two resistors on the same board.
Audience
Who it suits
Suits Class 10 and 12 physics investigatory projects and practical revision on electricity.
- ClassClass 10 to 12
- SubjectPhysics
- TypeReady-made model
- Project reportPrinted report included
Free to read
Free ebooks for this topic
Free PDF ebooks from Gurukul Technicals Institute on the science, the making and the presenting of projects like this one.
- Free PDF ebook
Physics Working Models Explained
Twenty classic models, how each works and how to make it
- Free PDF ebook
Investigatory Projects for Class 11 and 12
Topics, method and report structure for physics, chemistry and biology
- Free PDF ebook
Your Science Exhibition Guide
Choose a project, build it, present it and answer the judges with confidence
- Free PDF ebook
Writing a Science Project File
How to write the report, from the cover page to the bibliography