61% off
- Physics
- Ready-made model
- Class 10 to 12
- Report shown in the photo
PN Junction Diode Science Class 12 Physics Investigatory Project Model
Code B0HLY733T7
- Paid for and delivered by Amazon. The current price and the delivery date for your PIN code are shown there.
- Sold by Gurukul Technicals Institute, Delhi.
- Need a different topic, a custom version or a school order? Ask on WhatsApp.
In this project guide
Ready-made model
About this model
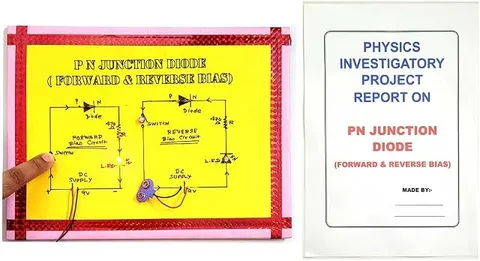
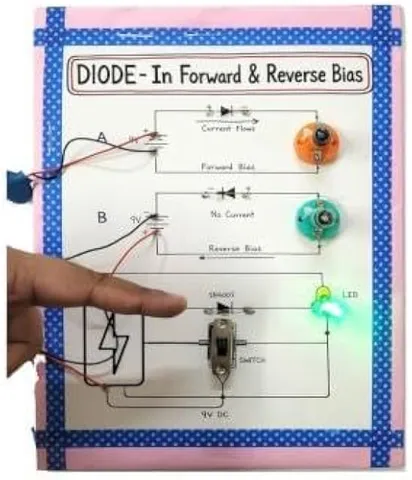
This Class 12 physics investigatory model shows that a PN junction diode lets current flow one way only. As shown in the photo, the chart titled PN Junction Diode Project has two circuits, each with a switch, a diode, a resistor, an LED and a DC supply. In the forward bias circuit the LED glows; in the reverse bias circuit, with the diode turned round, it stays dark. A note under each explains why. A 9 V type battery with a snap connector is visible, and a printed report cover is shown.
How it works
The science behind it
The idea the model demonstrates, in words you can use in your report and when you explain it.
A PN junction is formed when p-type and n-type regions are made in one crystal of silicon or germanium. In the p-type region holes are the majority carriers, and in the n-type region free electrons are. Near the junction, electrons and holes diffuse across and recombine, leaving a thin depletion layer of fixed ions with no free carriers and a barrier potential across it, about 0.7 V for silicon and 0.2 to 0.3 V for germanium. In forward bias the p-side goes to the positive terminal and the n-side to the negative. The applied voltage opposes the barrier, the depletion layer narrows, and once the voltage passes the barrier the current rises sharply, so the LED glows. In reverse bias the connections are swapped, the depletion layer widens and only a tiny current of minority carriers flows, so the LED stays off. A large enough reverse voltage causes breakdown. Because a diode conducts one way, it is used as a rectifier to change AC into DC, as in a mobile phone charger.
Make it yourself
Make a forward and reverse bias diode board yourself
Build your own version from scratch, or use the steps to understand how the ready-made model is put together before you present it.
What you need 9
Step by step 8 steps
Divide the chart into two halves headed Forward Bias and Reverse Bias, and draw the battery, switch, diode, resistor and LED symbols in each.
- Identify each diode's ends
The band printed on its body marks the cathode, the n-side, and the other end is the anode, the p-side.
- Wire the forward bias circuit
Battery positive to the switch, the switch to the diode's anode, the cathode to the resistor, the resistor to the LED's long leg, and the LED's short leg back to battery negative.
Wire the reverse bias circuit in the same way, but turn the diode round so that its band faces the switch.
Mount the parts on the board along the drawn lines, with the joints and wires at the back.
- Press each switch
The LED in the forward circuit should glow and the one in the reverse circuit should stay off.
Measure the voltage across the conducting diode with the multimeter and record it for your report.
Write a short explanation under each circuit and mark the p-side and n-side of each diode.
Read this first
Safety first
Go through these points before you build or switch anything on. Younger students should do this with an adult.
- Never connect a diode straight across the battery without a resistor; the forward current would be very large and could heat the diode and drain the battery.
- Never short the battery terminals, and unclip the batteries when the board is not on show.
- Solder only with an adult, rest the iron in its stand and let joints cool before touching them.
- Keep each LED's resistor in place, or the LED can burn out at once.
Troubleshooting
If something does not work
The usual problems with this model and how to fix them. Open a problem to see the fix.
The LED does not glow in the forward bias circuit
Check that the diode's band faces away from the battery positive, that the LED's long leg points towards the positive side, and that the battery is fresh.
The LED glows in the reverse bias circuit too
The diode has been fitted the same way round as in the forward circuit, or it is damaged. Turn it round or replace it.
The multimeter shows a negative voltage across the diode
The probes are reversed. Put the red probe on the anode side and the black probe on the banded side.
The LED is very dim
The battery is weak or the resistor is much larger than 470 Ω. Fit a fresh battery and check the resistor's colour bands.
Exhibition day
How to present it
A running order for the exhibition table or the practical, step by step.
Press the switch in each circuit and show the LED glowing only in the forward bias circuit.
Point to the plus and minus marks beside each diode and explain which side is p-type and which is n-type.
Draw the V-I characteristic of a diode on a chart and mark the knee voltage and the small reverse current.
Measure the voltage across the conducting diode with a multimeter and compare it with the barrier potential of silicon.
Practice
Viva questions
Practice questions on this model, with short answers. Try each one aloud before you open the answer.
What is the depletion layer?
It is a thin region at the junction that has no free charge carriers, only fixed positive and negative ions.
What is the barrier potential of a silicon diode?
About 0.7 V; for a germanium diode it is about 0.2 to 0.3 V.
Why does a reverse-biased diode allow almost no current?
The depletion layer widens and the barrier rises, so only a very small current of minority carriers can flow.
What is a diode mainly used for?
As a rectifier, to change alternating current into direct current, because it conducts in one direction only.
Project file
Project file outline
The headings of the project file, in order. Give each heading its own section and write it in your own words.
The listing photo shows a printed project report: if it comes with your order, use this outline to check that your own file covers every part.
Free ebook: Writing a Science Project FileContents
- Aim: to study the forward and reverse bias of a PN junction diode
- Introduction: conductors, insulators and semiconductors
- Intrinsic and extrinsic semiconductors: p-type and n-type
- Formation of the PN junction, the depletion layer and the barrier potential
- Forward bias and reverse bias
- V-I characteristics of a diode and the knee voltage
- Circuit diagrams, materials and procedure
- Observations and result
- Applications: rectifiers, LEDs, solar cells and photodiodes
- Conclusion and bibliography
Buying checklist
Before you buy
What to check before you order the model, and what to do when it arrives.
1Before you order
- Check with your teacher that a diode bias project suits your board's investigatory project guidelines.
- The photo shows a 9 V type battery powering the circuit, so keep a spare one ready for the practical exam.
- Practise explaining the depletion layer with a quick sketch, as examiners often ask about it.
- Keep the box and carry the board flat so the components are not bent.
- Check the delivery date for your PIN code on the marketplace, and order well before the exhibition or practical.
2When it arrives
- Check what arrives against the photo: both circuits, the switches and the LEDs. The photo also shows a printed report cover, so confirm it comes with your order if you need one.
- Press both switches as soon as it arrives and confirm that one LED glows and the other stays off.
Next steps
Take it further
Ways to turn this model into a bigger investigation or a stronger exhibition entry.
With your teacher, plot the forward V-I characteristic using a variable resistor, a voltmeter and a milliammeter.
Build a half wave rectifier with one diode and a low-voltage AC supply set up by your teacher, and view the output on a CRO in the school lab.
Using a resistor in series and two 1.5 V cells, show that an LED alone also conducts in one direction only, since an LED is itself a PN junction diode.
Audience
Who it suits
Suits Class 12 physics investigatory projects on semiconductor devices, and first-year diploma or engineering students revising the basics of diodes.
- ClassClass 10 to 12
- SubjectPhysics
- TypeReady-made model
- Project reportShown in the listing photo
Free to read
Free ebooks for this topic
Free PDF ebooks from Gurukul Technicals Institute on the science, the making and the presenting of projects like this one.
- Free PDF ebook
Electricity and Magnetism Experiments
Hands-on experiments with cells, wires, bulbs and magnets
- Free PDF ebook
Physics Working Models Explained
Twenty classic models, how each works and how to make it
- Free PDF ebook
Investigatory Projects for Class 11 and 12
Topics, method and report structure for physics, chemistry and biology
- Free PDF ebook
Your Science Exhibition Guide
Choose a project, build it, present it and answer the judges with confidence