- Physics
- Ready-made model
- Class 1 to 9
Multi Uses Puzzle Quiz for Any Subject Educational Working Project Model for All Classes
Code B0DK2628KR
- Paid for and delivered by Amazon. The current price and the delivery date for your PIN code are shown there.
- Sold by Gurukul Technicals Institute, Delhi.
- Need a different topic, a custom version or a school order? Ask on WhatsApp.
In this project guide
Ready-made model
About this model
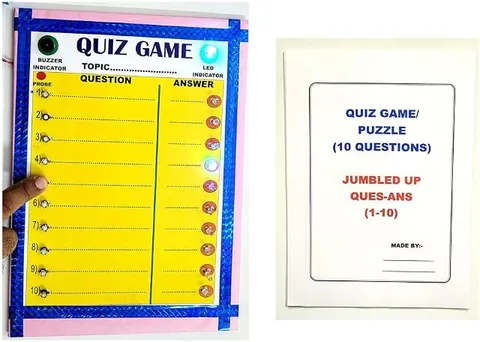
This puzzle and quiz model is meant, as its title says, for use with any subject, so the same model can test questions from science, maths, social science, English or general knowledge. It turns revision or an exhibition stall into an activity where visitors answer for themselves.
How it works
The science behind it
The idea the model demonstrates, in words you can use in your report and when you explain it.
Working quiz boards are usually built on a simple electric circuit. A circuit needs a complete, unbroken path from one terminal of the cell, through a bulb or buzzer, back to the other terminal; this is a closed circuit, and any gap makes it an open circuit with no current. In a typical quiz board, each question point is joined by a hidden wire at the back to the point for its correct answer. Two probe wires act like a switch: touching a question and its correct answer completes the circuit, so the bulb glows or the buzzer sounds, while a wrong answer leaves the circuit open. Metal wires are conductors, and the board and wire coverings are insulators that keep each path separate. The game also uses a learning principle: recalling an answer yourself, called retrieval practice, fixes it in memory better than simply rereading notes.
Make it yourself
Make a reusable quiz board for any subject yourself
Build your own version from scratch, or use the steps to understand how the ready-made model is put together before you present it.
What you need 10
Step by step 8 steps
Mark two columns on the board, eight question points on the left and eight answer points on the right, about 4 cm apart, and push a fastener through at each mark.
Decide a fixed, scrambled wiring pattern, such as question 1 to answer 5 and question 2 to answer 3, and write it on a secret answer-key card. Never join a question to the answer directly opposite it, or visitors will guess.
At the back, join each question fastener to its paired answer fastener with insulated wire, stripping only the ends and pressing them firmly under the fastener legs.
- Build the tester
Join the cell holder's positive lead to probe A. Join probe B to the buzzer's positive lead and, through the 220 Ω resistor, to the LED's long leg; join the buzzer's negative lead and the LED's short leg to the cell holder's negative lead.
- Touch the two probes together
The buzzer should sound and the LED glow. Then try every question with every answer and tick off on the key that only the correct pairs work.
Glue the clear pockets over both columns so a question sheet and an answer sheet can slide in beside the fasteners, with a small hole punched for each fastener head.
Write sheets for several subjects, placing each answer on the point the key says is wired to its question: for example an organ and its function, a sum and its result, a state and its capital, or a word and its opposite.
Cover the back with the second sheet, label the board with the subject in use, and keep the key card and spare sheets in an envelope stuck to the back.
Read this first
Safety first
Go through these points before you build or switch anything on. Younger students should do this with an adult.
- Power the board only from cells (3 to 6 V); never use a cut-open charger lead or anything connected to a socket.
- Bend the fastener legs flat and cover them with tape so no sharp points scratch hands at the back.
- Use the cutter for the board and the clear sheets only with an adult nearby, on a cutting mat.
- Take one cell out when the board is stored, because probes left touching each other drain the cells and can make them leak.
Troubleshooting
If something does not work
The usual problems with this model and how to fix them. Open a problem to see the fix.
The buzzer sounds for every answer
A bare wire end at the back is touching another fastener, or two fastener legs are touching. Separate them, wrap each joint with tape, and test all pairs again against the key.
The correct answer gives no sound
Touch the probes together first. If the tester works, the wire for that pair is loose under its fastener or broken inside its insulation, so press it back or replace it. If the tester does not work, check the cells and the buzzer's polarity.
The LED glows but the buzzer is silent
The buzzer may be connected the wrong way round (most active buzzers have a + mark or a longer red lead), or it may need more voltage than two cells give. Reverse it, or use four cells.
Visitors learn the answer positions after a while
Make a second sheet for the same subject with the questions in a different order, keeping each answer on the point wired to its question, or rewire the board with a new key for each exhibition day.
Exhibition day
How to present it
A running order for the exhibition table or the practical, step by step.
Prepare question cards for two or three subjects, so you can show the judges that the same model works for any topic.
Invite visitors to try a question themselves instead of only explaining it; if your model lights a bulb or sounds a buzzer for a right answer, let it give the feedback.
Be ready to explain in one minute how your model reveals the correct answer.
Keep a spare set of questions so that repeat visitors get new ones.
Practice
Viva questions
Practice questions on this model, with short answers. Try each one aloud before you open the answer.
When is a circuit called closed, and when is it called open?
A closed circuit is a complete, unbroken path that lets current flow; an open circuit has a gap in it, so no current flows.
In an electric quiz board, why does nothing happen when a wrong answer is touched?
The wrong answer point is not wired to that question, so the circuit stays open and no current flows.
Name two conductors and two insulators.
Copper and aluminium are conductors; plastic and rubber are insulators.
Why should the wires at the back of a quiz board be insulated?
Insulation stops wires that cross each other from touching, which would complete the wrong circuits and give false answers.
Project file
Project file outline
The headings of the project file, in order. Give each heading its own section and write it in your own words.
Free ebook: Writing a Science Project FileContents
- Aim: to make a quiz board that checks answers in any subject using a simple electric circuit
- Introduction: closed and open circuits, and why the buzzer sounds only for a complete path
- Materials used for the board and the tester
- Circuit diagram of the tester and the hidden question-to-answer wiring
- Construction: fixing the contacts, wiring the answer key and making swappable sheets
- Sample question sheets for science, maths, social science and English
- Observations: table of pairs tested, expected result and actual result
- Uses: revision games, classroom quizzes and exhibition stalls
- Conclusion, precautions and bibliography
Buying checklist
Before you buy
What to check before you order the model, and what to do when it arrives.
1Before you order
- Check with your teacher that a working quiz model is accepted for your class and subject; a board meant for all classes still needs your own subject questions to score well.
- Read the listing to see what is mentioned with it, such as cells or question cards, so you know what you still need to prepare.
- Prepare your own question sheets a few days before the exhibition and try them out on a friend.
- Keep spare cells, and keep the box to carry the board without bending its contacts.
- Check the delivery date for your PIN code on the marketplace, and order well before the exhibition or practical.
- Practise explaining it. Judges ask what the model shows and why; knowing the science matters as much as the model. The viva questions above are a good place to start.
2When it arrives
- When it arrives, test every question point with its answer and with two or three wrong answers, and note any that misbehave.
Next steps
Take it further
Ways to turn this model into a bigger investigation or a stronger exhibition entry.
Give each visitor 60 seconds, record how many correct pairs they find, and present the scores as a bar graph in your report.
Replace the fixed wiring with a microcontroller board that reads each question and answer contact, so the answer key can be changed in the program instead of by rewiring.
Make a picture-matching version for younger classes, such as an animal and its home or a shape and its name.
Audience
Who it suits
Suits students of all classes, especially Class 3 to 8, and teachers who want an interactive revision activity for any subject.
- ClassClass 1 to 9
- SubjectPhysics
- TypeReady-made model
Free to read
Free ebooks for this topic
Free PDF ebooks from Gurukul Technicals Institute on the science, the making and the presenting of projects like this one.
- Free PDF ebook
Physics Working Models Explained
Twenty classic models, how each works and how to make it
- Free PDF ebook
Your Science Exhibition Guide
Choose a project, build it, present it and answer the judges with confidence
- Free PDF ebook
Writing a Science Project File
How to write the report, from the cover page to the bibliography
- Free PDF ebook
Viva Questions for Science Projects
How to answer examiner questions, with sample questions for popular projects