- Physics
- Ready-made model
- Class 10 to 12
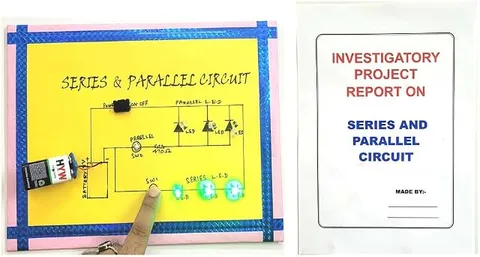
LED In Series & Parallel & Circuit Physics Working Model Educational Investigatory Project, Multicolor
Code B0BN2KBQ51
- Paid for and delivered by Amazon. The current price and the delivery date for your PIN code are shown there.
- Sold by Gurukul Technicals Institute, Delhi.
- Need a different topic, a custom version or a school order? Ask on WhatsApp.
In this project guide
Ready-made model
About this model
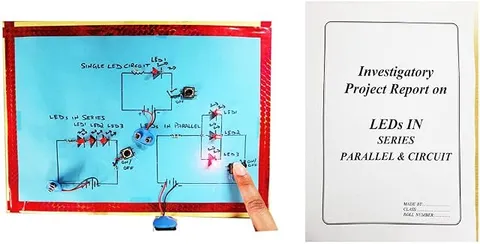
This working model shows LEDs connected in series and in parallel, so students can compare their brightness and see what happens when one LED fails. Because LEDs respond so visibly, the difference between the two circuits is easy for everyone to see. It suits middle and secondary school projects on electricity and circuits.
How it works
The science behind it
The idea the model demonstrates, in words you can use in your report and when you explain it.
An LED (light emitting diode) glows only when forward biased and needs a minimum forward voltage before it conducts, roughly 1.8 to 2.2 V for a red LED and about 3 V for a white or blue one. In series, the same current flows through every LED and their forward voltages add up, so three red LEDs need about 6 V before they glow at all; if one LED fails open, all go out. In parallel, each LED gets the same voltage, and one failure does not affect the others. Ohm's law gives the series resistor: R = (Vs − Vf)/I. For one red LED on a 9 V battery at 20 mA, R = (9 − 2)/0.02 = 350 Ω, so the next standard value, 390 Ω, is used. In parallel each LED should have its own resistor, because LEDs never share current exactly equally. Diwali LED strings use such series and parallel groups.
Make it yourself
Make an LED series and parallel circuit model yourself
Build your own version from scratch, or use the steps to understand how the ready-made model is put together before you present it.
What you need 8
Step by step 7 steps
Divide the board into two sections marked 'Series' and 'Parallel'.
On the series side, join three LEDs in a chain, the short leg of each to the long leg of the next, then add the 150 Ω resistor and a switch.
On the parallel side, connect three LEDs side by side, each with its own 390 Ω resistor, across the same two supply lines, through the second switch.
Connect the battery and switch on each circuit in turn, comparing how bright the LEDs are.
Remove one LED from the series string: all three go dark. Remove one from the parallel side: the other two stay lit.
Measure the voltage across each LED and the current in each circuit, and record them.
Show that the three LED voltages in the series string add up to the battery voltage minus the voltage across the resistor.
Read this first
Safety first
Go through these points before you build or switch anything on. Younger students should do this with an adult.
- Never connect an LED to the battery without its resistor; it can burn out at once.
- Do not let the parallel LEDs share one resistor; each needs its own.
- Use only the 9 V battery, and disconnect it after the demonstration.
- Solder only with an adult, and keep each joint quick, as LEDs are easily damaged by heat.
Troubleshooting
If something does not work
The usual problems with this model and how to fix them. Open a problem to see the fix.
The series LEDs do not light at all
One LED may be reversed or faulty, which breaks the chain. Check every LED's direction, and fit a fresh battery, since a weak one may not reach the total forward voltage.
One parallel LED is much brighter than the others
It may be sharing a resistor or have a smaller one. Give each LED its own resistor of the same value.
All six LEDs are dim
The battery is weak or the resistors are larger than intended. Fit a fresh battery and check the resistor colour bands.
An LED glows faintly when its switch is off
Wires are crossing between the two circuits. Check that each switch breaks only its own circuit.
Exhibition day
How to present it
A running order for the exhibition table or the practical, step by step.
Ask the audience to predict what happens to the other LEDs when one fails in each circuit, then explain using the current paths.
Measure the voltage across each LED in the series group and show how they add up.
Explain why each LED in the parallel group needs its own resistor.
Use the Diwali light string example to connect the model to everyday life.
Practice
Viva questions
Practice questions on this model, with short answers. Try each one aloud before you open the answer.
Why does an LED need a series resistor?
To limit the current to a safe value; without it the LED would draw too much current and burn out.
What happens when one LED in a series string fails open?
The circuit breaks, so no current flows and all the LEDs go off.
What is the forward voltage of a red LED?
Roughly 1.8 to 2.2 V, depending on the LED.
In which connection does each LED branch get the full supply voltage?
The parallel connection, since every branch, an LED with its own resistor, is connected directly across the supply.
Project file
Project file outline
The headings of the project file, in order. Give each heading its own section and write it in your own words.
Free ebook: Writing a Science Project FileContents
- Aim: to compare LEDs connected in series and in parallel
- How an LED works and why it needs a minimum forward voltage
- Choosing a series resistor using Ohm's law
- Circuit diagrams of both sections
- Observation table: voltage across each LED and the current in each circuit
- What happens when one LED fails in each circuit
- Uses: decorative LED strings, torches and LED bulbs
- Precautions with LED polarity and resistors, and conclusion
Buying checklist
Before you buy
What to check before you order the model, and what to do when it arrives.
1Before you order
- Check the class level in the listing and confirm with your teacher whether it is for the electricity chapter or a higher-class project.
- See whether the listing mentions a battery; keep a fresh 9 V battery for the demonstration.
- Keep the box, and protect the LEDs from being bent or knocked off.
- Check the delivery date for your PIN code on the marketplace, and order well before the exhibition or practical.
- Practise explaining it. Judges ask what the model shows and why; knowing the science matters as much as the model. The viva questions above are a good place to start.
2When it arrives
- When it arrives, switch on each circuit and check that every LED lights.
Next steps
Take it further
Ways to turn this model into a bigger investigation or a stronger exhibition entry.
Put LEDs of different colours in series and measure their different forward voltages.
Plot an I-V curve for one LED using a potentiometer and the multimeter, and find the voltage at which it switches on.
Calculate the power wasted in the resistors on each side and explain why the series string wastes less.
Audience
Who it suits
Class 6 to 10 science exhibitions and projects on electricity, circuits and LEDs.
- ClassClass 10 to 12
- SubjectPhysics
- TypeReady-made model
Free to read
Free ebooks for this topic
Free PDF ebooks from Gurukul Technicals Institute on the science, the making and the presenting of projects like this one.
- Free PDF ebook
Electricity and Magnetism Experiments
Hands-on experiments with cells, wires, bulbs and magnets
- Free PDF ebook
Physics Working Models Explained
Twenty classic models, how each works and how to make it
- Free PDF ebook
Investigatory Projects for Class 11 and 12
Topics, method and report structure for physics, chemistry and biology
- Free PDF ebook
Your Science Exhibition Guide
Choose a project, build it, present it and answer the judges with confidence