- Biology
- Ready-made model
- Class 1 to 9
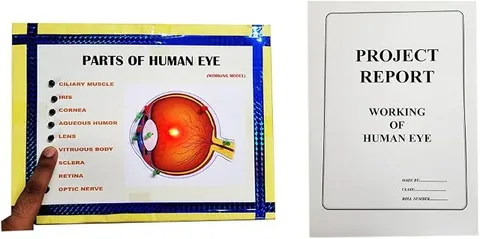
Human Eye Biology Working Model Educational Science Project
Code B0BN2G47J4
- Paid for and delivered by Amazon. The current price and the delivery date for your PIN code are shown there.
- Sold by Gurukul Technicals Institute, Delhi.
- Need a different topic, a custom version or a school order? Ask on WhatsApp.
In this project guide
Ready-made model
About this model
This model shows the main parts of the human eye and how they work together to form an image on the retina. It helps students explain how we see, how the eye focuses on near and far objects, and what goes wrong in common defects of vision.
How it works
The science behind it
The idea the model demonstrates, in words you can use in your report and when you explain it.
Light enters the eye through the cornea, a clear dome that does most of the bending (refraction) of light. The iris, the coloured part, controls the size of the pupil, letting in less light in bright sunlight and more in dim light. Behind it, the convex eye lens focuses the light to form a real, inverted image on the retina. The retina has rods, which work in dim light, and cones, which sense colour. The optic nerve carries signals to the brain, which interprets the image the right way up. Ciliary muscles change the thickness of the lens so we can focus on objects from about 25 cm (the near point) to infinity; this is called accommodation. In myopia the image forms in front of the retina and a concave lens corrects it, while in hypermetropia it forms behind the retina and a convex lens corrects it.
Make it yourself
Make a working model of the human eye yourself
Build your own version from scratch, or use the steps to understand how the ready-made model is put together before you present it.
What you need 9
Step by step 8 steps
Find the lens's focal length first: focus the image of a distant window onto a sheet of paper and measure from the lens to the paper.
Cut a round window at the front of the outer box, slightly smaller than the lens, and fix the lens over it. This is the eye lens, and the opening is the pupil.
Fix a coloured card ring with a central hole just in front of the lens as the iris, and the clear dome in front of that as the cornea.
Cut a large viewing window in the closed end of the inner box, fix tracing paper across its open end as the retina, and slide the inner box, paper end first, into the outer one so the retina is about one focal length behind the lens.
Light the F object with the torch and place it a metre or two in front of the eye. Slide the inner box until a sharp, upside-down image appears on the retina.
Bring the object closer and the image blurs. Explain that in a real eye the retina cannot move, so the ciliary muscles change the lens's thickness instead.
- Show myopia
Slide the retina further back so the far object blurs, then hold the concave lens in front to make it sharp again. Show hypermetropia by sliding the retina forward and correcting with the convex lens.
Add the optic nerve in wool at the back, label all the parts, and draw the ray diagram on a chart beside the model.
Read this first
Safety first
Go through these points before you build or switch anything on. Younger students should do this with an adult.
- Never point the lens at the sun or look at the sun through it; a lens can burn paper and harm eyes.
- Use a torch or LED as the object, not a candle, so nothing near the paper can catch fire.
- Cutting the boxes and plastic needs an adult; use a cutting mat.
- Hold glass lenses by their edges and keep them away from small children.
Troubleshooting
If something does not work
The usual problems with this model and how to fix them. Open a problem to see the fix.
No image appears on the screen
The screen may be at the wrong distance or the object too dim. Darken the room, make the object brighter, and slide the screen slowly through its whole range.
The image is blurred everywhere
The lens may be scratched or too weak, or the tracing paper is not flat. Check the focal length again and stretch the paper tight.
The correcting lenses make no difference
They may be too strong or too weak for the shift you made. Try other powers and hold them close to the eye lens.
The image is hard to see at the exhibition
Hall lights wash it out. Paint the inside of the box black, keep the object bright, and let visitors look from the back, slightly to one side.
Exhibition day
How to present it
A running order for the exhibition table or the practical, step by step.
Trace a ray of light from the cornea to the retina and name each part as you go.
Use a convex lens and a white screen to show a real, inverted image, just like the one on the retina.
Explain myopia and hypermetropia with a simple diagram and the lens that corrects each.
Explain why the image on the retina is inverted but we still see things upright.
Practice
Viva questions
Practice questions on this model, with short answers. Try each one aloud before you open the answer.
What kind of image is formed on the retina?
A real, inverted and diminished image is formed on the retina.
What is accommodation?
It is the ability of the eye lens to change its focal length, using the ciliary muscles, so that both near and distant objects are seen clearly.
What is the function of the iris and the pupil?
The iris adjusts the size of the pupil to control the amount of light entering the eye.
How is myopia corrected?
Myopia, or short-sightedness, is corrected using a concave lens of suitable power.
Project file
Project file outline
The headings of the project file, in order. Give each heading its own section and write it in your own words.
Free ebook: Writing a Science Project FileContents
- Aim: to show how the human eye forms an image and how defects of vision are corrected
- Introduction: the eye as a natural optical instrument
- Parts of the eye and their functions (table)
- Materials and construction of the model
- Image formation: a real, inverted image on the retina, with a ray diagram
- Power of accommodation, near point and far point
- Myopia, hypermetropia and presbyopia, and how each is corrected
- Observations from the model
- Care of the eyes, conclusion and bibliography
Buying checklist
Before you buy
What to check before you order the model, and what to do when it arrives.
1Before you order
- Check whether your teacher wants a working model that forms an image or a labelled display model.
- Match it to your class and to the chapters on light and the human eye.
- Test any lens or light parts a few days before the exhibition.
- Keep the box and pack the model with paper so nothing cracks.
- Check the delivery date for your PIN code on the marketplace, and order well before the exhibition or practical.
- Practise explaining it. Judges ask what the model shows and why; knowing the science matters as much as the model. The viva questions above are a good place to start.
2When it arrives
- On arrival, compare the labelled parts with your textbook diagram and add any missing labels yourself.
Next steps
Take it further
Ways to turn this model into a bigger investigation or a stronger exhibition entry.
Show the blind spot with a simple card test and explain it on your chart.
Compare a strong and a weak convex lens as a 'young' flexible lens and an 'old' stiff one to explain presbyopia.
Make an iris from overlapping card leaves that open and close, to show how the pupil changes size in bright and dim light.
Audience
Who it suits
Best for Class 8 to 10 biology and physics projects on the human eye, and as a teaching aid in primary and middle school.
- ClassClass 1 to 9
- SubjectBiology
- TypeReady-made model
Free to read
Free ebooks for this topic
Free PDF ebooks from Gurukul Technicals Institute on the science, the making and the presenting of projects like this one.
- Free PDF ebook
Biology Models Guide
Make the heart, lungs, kidney, eye, cell and more, and explain them well
- Free PDF ebook
Your Science Exhibition Guide
Choose a project, build it, present it and answer the judges with confidence
- Free PDF ebook
Writing a Science Project File
How to write the report, from the cover page to the bibliography
- Free PDF ebook
Viva Questions for Science Projects
How to answer examiner questions, with sample questions for popular projects