- Physics
- Ready-made model
- Class 10 to 12
Electronic Organ Piano Harmonium Physics Investigatory Minor Project and Model
Code B0C3H5KS3J
- Paid for and delivered by Amazon. The current price and the delivery date for your PIN code are shown there.
- Sold by Gurukul Technicals Institute, Delhi.
- Need a different topic, a custom version or a school order? Ask on WhatsApp.
In this project guide
Ready-made model
About this model
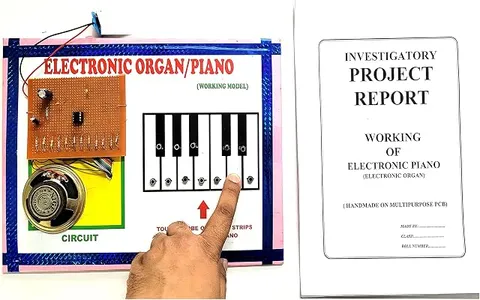
This electronic organ is a small musical keyboard circuit that plays a different note for each key, like a mini piano or harmonium. It demonstrates how an electronic oscillator produces sound and how changing its frequency changes the pitch of the note.
How it works
The science behind it
The idea the model demonstrates, in words you can use in your report and when you explain it.
Sound is produced by vibrations, and the number of vibrations per second is the frequency, measured in hertz (Hz). A higher frequency gives a higher pitch, while a larger amplitude gives a louder sound. In a typical electronic organ, an oscillator circuit, often built around a 555 timer IC, produces an electrical signal that rises and falls hundreds of times a second. Each key connects a different resistor into the oscillator, and because the frequency depends on the resistance and capacitance in the circuit, each key gives a different note. A speaker or buzzer turns this electrical signal into vibrations, which push the air to make sound waves. In music, going up one octave doubles the frequency: if a note is at 440 Hz, the same note an octave higher is at 880 Hz. A harmonium at a bhajan uses vibrating metal reeds instead, but the link between frequency and pitch is the same.
Make it yourself
Make an electronic organ (mini harmonium) yourself
Build your own version from scratch, or use the steps to understand how the ready-made model is put together before you present it.
What you need 9
Step by step 8 steps
Fit the 555 in its socket, connect pins 4 and 8 to positive and pin 1 to negative, and fit the 10 nF capacitor from pin 5 to negative.
Connect the 1 kΩ resistor from positive to pin 7, join pins 2 and 6, and connect the 100 nF timing capacitor from pins 2 and 6 to negative.
For each key, connect a push button in series with its own preset between pin 7 and the joined pins 2 and 6, so pressing a key completes the timing circuit through that preset.
Connect pin 3 through the 47 µF capacitor (positive leg towards pin 3) and the 47 Ω resistor to the speaker, and the speaker's other wire to negative.
Mount the buttons under the key tops in the case, and fix the speaker behind a few small holes.
Switch on and press each key: each should give a tone, and with no key pressed the speaker should be silent.
Tune the keys one by one with a small screwdriver while watching the tuner app: Sa about 262 Hz, Re 294, Ga 330, Ma 349, Pa 392, Dha 440, Ni 494 and the upper Sa about 523 Hz, twice the first.
Play a simple tune, and write each key's measured frequency in a table beside its note name.
Read this first
Safety first
Go through these points before you build or switch anything on. Younger students should do this with an adult.
- Use only the 9 V battery; the organ never needs a mains adapter.
- Keep the speaker away from your ear while testing, as the tone can be loud and harsh close up.
- Keep the 47 Ω resistor in series with the speaker so the 555 output is not overloaded.
- Solder only with an adult and let the joints cool before handling.
Troubleshooting
If something does not work
The usual problems with this model and how to fix them. Open a problem to see the fix.
No key gives any sound
Check the coupling capacitor and speaker wiring, that pins 2 and 6 are joined and that pin 4 is connected to positive. Touch the speaker's wires briefly across a 1.5 V cell: a click means the speaker is fine.
One key is silent
That key's button or preset is not connected between pin 7 and pins 2 and 6. Check its solder joints and that you used the correct pair of button legs.
A note is out of tune
Turn its preset slowly while watching the tuner: less resistance raises the pitch and more resistance lowers it.
The speaker sounds with no key pressed
A button is stuck, or a solder bridge is completing a key circuit permanently. Check each key and look for blobs of solder between tracks.
Exhibition day
How to present it
A running order for the exhibition table or the practical, step by step.
Play a simple sequence such as sa re ga ma to show that each key gives a different pitch.
Explain that pitch depends on frequency, while loudness depends on amplitude.
If you are allowed to open it, point to the part of the circuit that sets each note.
Compare it with a harmonium or keyboard to make the idea familiar to the audience.
Practice
Viva questions
Practice questions on this model, with short answers. Try each one aloud before you open the answer.
What is the unit of frequency?
The hertz (Hz), which means one vibration or cycle per second.
What decides the pitch of a note?
Its frequency; a higher frequency gives a higher pitch.
What does the speaker or buzzer do in an electronic organ?
It converts the electrical signal from the oscillator into sound vibrations in the air.
What happens to the frequency when you go up one octave?
It doubles, for example from 440 Hz to 880 Hz.
Project file
Project file outline
The headings of the project file, in order. Give each heading its own section and write it in your own words.
Free ebook: Writing a Science Project FileContents
- Aim: to make an electronic organ that plays a musical scale
- Sound: frequency and pitch, amplitude and loudness
- Musical notes, the sargam, and the octave as a doubling of frequency
- The 555 timer as an astable oscillator, and the formula for its frequency
- Circuit diagram: how each key selects a different resistance
- Construction of the keyboard case
- Tuning table: note, target frequency and measured frequency
- Conclusion and possible improvements
Buying checklist
Before you buy
What to check before you order the model, and what to do when it arrives.
1Before you order
- The title calls it a minor project; check with your teacher that it suits your class and syllabus.
- Read the listing for the battery it needs; do not assume one is included.
- Practise a simple tune to play for visitors and the examiner.
- Keep the box so the keys and speaker are protected in transport.
- Check the delivery date for your PIN code on the marketplace, and order well before the exhibition or practical.
2When it arrives
- When it arrives, play every key and check the notes with a tuner app, because transport can loosen joints.
Next steps
Take it further
Ways to turn this model into a bigger investigation or a stronger exhibition entry.
Add a switch that puts a second 100 nF capacitor in parallel and moves the whole scale down an octave, and explain why doubling C halves the frequency.
Add a simple transistor amplifier stage for a louder sound.
Feed a slow oscillation from a second 555 into the control pin through a resistor to add a wavering vibrato to every note.
Audience
Who it suits
Class 8 to 12 students making a project on sound or electronics, and anyone who wants a music-and-science exhibition piece.
- ClassClass 10 to 12
- SubjectPhysics
- TypeReady-made model
Free to read
Free ebooks for this topic
Free PDF ebooks from Gurukul Technicals Institute on the science, the making and the presenting of projects like this one.
- Free PDF ebook
Physics Working Models Explained
Twenty classic models, how each works and how to make it
- Free PDF ebook
Investigatory Projects for Class 11 and 12
Topics, method and report structure for physics, chemistry and biology
- Free PDF ebook
Your Science Exhibition Guide
Choose a project, build it, present it and answer the judges with confidence
- Free PDF ebook
Writing a Science Project File
How to write the report, from the cover page to the bibliography