- Physics
- Ready-made model
- Class 10 to 12
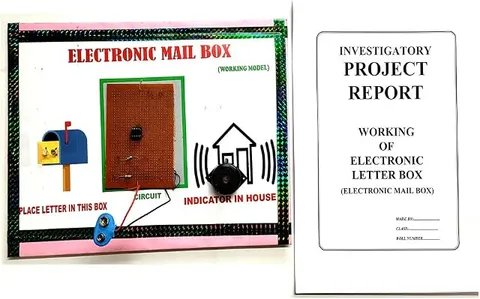
Electronic Letter Box or Mail Box Physics Working Model and Educational Investigatory Minor Project
Code B0C3H82SHJ
- Paid for and delivered by Amazon. The current price and the delivery date for your PIN code are shown there.
- Sold by Gurukul Technicals Institute, Delhi.
- Need a different topic, a custom version or a school order? Ask on WhatsApp.
In this project guide
Ready-made model
About this model
This electronic letter box is a working model that signals when a letter is dropped into the box. Most designs use a light beam and a sensor to detect the passing letter, and many keep the signal on until someone checks the box.
How it works
The science behind it
The idea the model demonstrates, in words you can use in your report and when you explain it.
Most electronic letter box projects work by detecting an interrupted beam of light. A light source, such as an LED or an infrared LED, shines across the slot onto a light sensor, such as an LDR, photodiode or phototransistor. Light travels in straight lines and a letter is opaque, so a letter passing through the slot blocks the beam for a moment. The sensor's resistance or current changes suddenly, and the circuit uses that change to trigger an indicator or buzzer. Because the letter blocks the beam only for a split second, many designs add a latch, a circuit with memory such as a flip-flop or an SCR, which keeps the indicator on until a reset button is pressed. Using infrared instead of visible light makes the beam invisible and less affected by room lighting. The same beam-break idea is used to count people at entry gates and to stop lift doors closing on someone.
Make it yourself
Make an electronic letter box alarm yourself
Build your own version from scratch, or use the steps to understand how the ready-made model is put together before you present it.
What you need 10
Step by step 8 steps
Cut a letter slot in the lid and fix a short card chute under it, so every letter falls through the same narrow path.
Fix the LED inside one wall of the chute with its 470 Ω resistor and the LDR exactly opposite, each inside a short black tube so the LDR sees only the LED's beam.
Wire the LDR from the positive line to pin 2 of the 555, and the 47 kΩ preset from pin 2 to negative. While the beam reaches the LDR, pin 2 stays high.
- Make the 555 a latch
Pins 1 and 6 to negative, pin 8 to positive, pin 4 to positive through the 10 kΩ resistor, the 10 µF capacitor from pin 4 to negative (long leg to pin 4), and the reset button from pin 4 to negative.
Connect pin 3 to the buzzer's positive lead and to the yellow LED through its 1 kΩ resistor; the other side of both goes to negative.
Switch on with the lid closed and press reset; the buzzer should be silent. Adjust the preset until a letter passing through the chute sets off the buzzer while the steady beam does not.
Drop envelopes of different thickness through the slot, and adjust the preset again if thin ones are missed.
Fix the circuit and battery inside the box away from the chute, bring the yellow LED and reset button out through the side, and label them.
Read this first
Safety first
Go through these points before you build or switch anything on. Younger students should do this with an adult.
- Use the hot glue gun and the soldering iron only with an adult; both can burn skin.
- Cut the slot with a craft knife only with an adult, on a cutting board.
- Fit the 555's notch and the 10 µF capacitor the right way round.
- Fix the battery and wiring to the box wall, away from the slot, so no letter or finger can catch on a bare joint.
Troubleshooting
If something does not work
The usual problems with this model and how to fix them. Open a problem to see the fix.
The buzzer sounds as soon as the circuit is switched on
Press reset first. If it sounds again at once, the LED's beam is not reaching the LDR: check that the LED glows and that the two tubes line up.
Thin envelopes pass without setting it off
Light is shining through the thin paper. Turn the preset a little, narrow the tubes so the letter covers the whole beam, or use a less bright LED.
The buzzer will not stop when reset is pressed
A letter may be stuck in the chute, still blocking the beam, or the button may be on the wrong pin. Clear the chute, and check the button goes from pin 4 to negative and that pin 6 is at negative.
It sometimes goes off with no letter
A loose LED or LDR wire is breaking the beam circuit for a moment, or the battery is weak. Resolder the sensor wires, fix them firmly and fit a fresh battery.
Exhibition day
How to present it
A running order for the exhibition table or the practical, step by step.
Drop a postcard or folded paper through the slot and show the indicator responding.
Explain the beam-break idea using the fact that light travels in straight lines.
If the model has a reset, show how it is cleared after the letter is collected.
Connect it to the red India Post letter boxes and to mail alerts for homes and offices.
Practice
Viva questions
Practice questions on this model, with short answers. Try each one aloud before you open the answer.
How does a beam-break letter box detect a letter?
The letter blocks a light beam falling on a sensor, and the circuit responds to the sudden change in the sensor's output.
Why is a latch useful in this project?
The letter blocks the beam only briefly, so a latch keeps the indicator on until it is reset.
Why might infrared light be used for the beam?
Infrared is invisible and is less affected by ordinary room light.
Which property of light makes beam-break detection possible?
Light travels in straight lines, so an opaque object in its path casts a shadow on the sensor.
Project file
Project file outline
The headings of the project file, in order. Give each heading its own section and write it in your own words.
Free ebook: Writing a Science Project FileContents
- Aim: to make a letter box that signals when a letter has been dropped in
- Introduction: automatic detection in daily life, from letter boxes to counters on conveyor belts
- Principle: light travels in straight lines and an opaque letter blocks the beam
- How the LDR and preset form a voltage divider at the trigger pin
- The 555 timer as a latch that remembers the event until reset
- Circuit diagram and construction of the box
- Observations: which envelopes and papers were detected
- Applications: object counters, door sensors and mail alerts
- Precautions and conclusion
Buying checklist
Before you buy
What to check before you order the model, and what to do when it arrives.
1Before you order
- Check that a sensor or digital electronics project fits your class and your teacher's brief.
- Read the listing to see which sensor it uses, what powers it and how the signal is reset.
- Practise explaining why the alarm stays on after the letter has already passed.
- Keep the box and packing so the sensor stays lined up in transport.
- Check the delivery date for your PIN code on the marketplace, and order well before the exhibition or practical.
2When it arrives
- Test it with real envelopes, including thin ones, as soon as it arrives.
Next steps
Take it further
Ways to turn this model into a bigger investigation or a stronger exhibition entry.
Add a counter IC and a seven-segment display to count how many letters have arrived.
Replace the visible LED with an infrared LED and receiver and compare how well each detects thin paper.
Test which materials block the beam, such as paper, card, a plastic sleeve and glossy paper, and explain the results with the transmission of light.
Audience
Who it suits
Class 8 to 12 students looking for a practical sensor and automation project with an everyday use.
- ClassClass 10 to 12
- SubjectPhysics
- TypeReady-made model
Free to read
Free ebooks for this topic
Free PDF ebooks from Gurukul Technicals Institute on the science, the making and the presenting of projects like this one.
- Free PDF ebook
Physics Working Models Explained
Twenty classic models, how each works and how to make it
- Free PDF ebook
Investigatory Projects for Class 11 and 12
Topics, method and report structure for physics, chemistry and biology
- Free PDF ebook
Your Science Exhibition Guide
Choose a project, build it, present it and answer the judges with confidence
- Free PDF ebook
Writing a Science Project File
How to write the report, from the cover page to the bibliography