- Physics
- Ready-made model
- Class 1 to 9
Constellation of Stars Physics Handmade Working Model and Educational Science Project
Code B0C3H33NQK
- Paid for and delivered by Amazon. The current price and the delivery date for your PIN code are shown there.
- Sold by Gurukul Technicals Institute, Delhi.
- Need a different topic, a custom version or a school order? Ask on WhatsApp.
In this project guide
Ready-made model
About this model
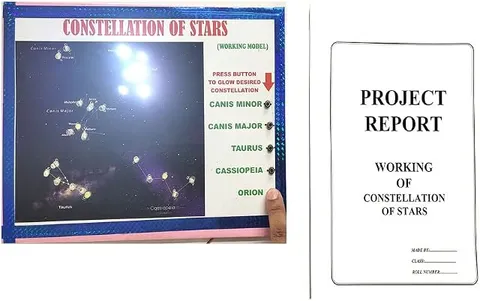
A handmade working model of constellations, the recognisable patterns of stars that people have used for thousands of years to find directions and mark the seasons. It turns a night-sky lesson into something students can show and explain inside a brightly lit exhibition hall.
How it works
The science behind it
The idea the model demonstrates, in words you can use in your report and when you explain it.
A constellation is a group of stars that appears to form a pattern when seen from Earth. The stars in a constellation only look close together; they are often at very different distances from us, measured in light years. A light year is the distance light travels in one year, about 9.46 × 10¹² km, so it is a unit of distance, not time. Stars appear to move across the sky from east to west during the night because the Earth rotates from west to east. The Pole Star, Polaris, seems almost fixed because it lies nearly in line with the Earth's axis, above the North Pole, so travellers used it to find north. The Saptarishi, known as the Big Dipper and part of Ursa Major, is easy to spot, and the two stars at the end of its bowl point towards the Pole Star. Stars twinkle because their light is refracted by layers of air of changing density.
Make it yourself
Make a light-up constellation board yourself
Build your own version from scratch, or use the steps to understand how the ready-made model is put together before you present it.
What you need 10
Step by step 8 steps
Copy the star positions from the chart onto the FRONT of the board with the white pen: the seven stars of Ursa Major (Saptarishi), the seven main stars of Orion and the five stars of Cassiopeia's W, plus Polaris.
Pierce a hole at each star from the front, then push the LEDs through from the back. Use the red or orange LED for Betelgeuse, Orion's red giant star.
Wire each constellation as one group: every LED with its own 1 kΩ resistor, all the group's LEDs in parallel, and the group connected to the battery through its own switch.
Give Polaris its own LED and switch, and draw a dotted line from the two pointer stars of Ursa Major, Dubhe and Merak, to Polaris.
Draw faint lines joining the stars of each constellation and write its name beside it.
Cover the back of each LED with black tape so light does not leak round it.
Fix the switches along the bottom edge with labels, and put the battery behind the board.
Make a card hood round the board, or ask to place it in a shaded corner, so the stars stand out in a bright hall.
Read this first
Safety first
Go through these points before you build or switch anything on. Younger students should do this with an adult.
- Pierce the holes only with an adult, pushing into a thick board or block, never towards your hand.
- Solder only with an adult present, and keep the iron in its stand.
- Keep a resistor in series with every LED.
- Unclip the battery when the board is not on show.
Troubleshooting
If something does not work
The usual problems with this model and how to fix them. Open a problem to see the fix.
One star in a constellation does not light
Because the LEDs are in parallel, one dark LED means that LED is reversed or has a loose joint. Turn it round or redo the joint; the others are not affected.
A whole constellation stays dark
Check that group's switch and its connection to the battery, and test the battery.
A constellation looks back to front
The pattern was probably drawn on the back of the board, which flips it. Always mark the stars on the front, as seen in the sky.
The board looks grey and the stars are hard to see
Light is leaking round the LEDs or the hall is too bright. Tape the back of each LED and add a hood or a dark cloth round the board.
Exhibition day
How to present it
A running order for the exhibition table or the practical, step by step.
Show how to find the Pole Star using the two pointer stars of the Saptarishi.
Explain why the stars seem to move across the sky while the Pole Star stays nearly fixed.
Correct a common mistake: the stars of a constellation are not actually close to one another in space.
Darken the area around the model if you can, so the star pattern stands out for the audience.
Practice
Viva questions
Practice questions on this model, with short answers. Try each one aloud before you open the answer.
What is a constellation?
A constellation is a group of stars that forms a recognisable pattern in the night sky as seen from Earth.
Why does the Pole Star appear stationary?
It lies almost directly above the Earth's axis of rotation, so it hardly changes position as the Earth rotates.
What is a light year?
It is the distance travelled by light in one year, about 9.46 × 10¹² km, so it is a unit of distance.
Why do stars twinkle?
Starlight is refracted by layers of air whose temperature and density keep changing, so the star's apparent position and brightness keep flickering.
Project file
Project file outline
The headings of the project file, in order. Give each heading its own section and write it in your own words.
Free ebook: Writing a Science Project FileContents
- Aim: to show some well-known constellations and how the Pole Star is found
- Introduction: what a constellation is, and why stars that look close together may be very far apart
- The light year as a unit of distance
- The constellations shown: Ursa Major (Saptarishi), Orion and Cassiopeia
- Finding the Pole Star using the pointer stars of Ursa Major
- Why stars appear to move from east to west during the night
- Construction and the LED circuit
- Observing the night sky: when and where to look for each constellation
- Conclusion and bibliography
Buying checklist
Before you buy
What to check before you order the model.
1Check these first
- Check that stars and constellations are in your class syllabus and what your teacher has asked for.
- Read the listing to see which constellations the model shows, so you can prepare to explain each one.
- Test the lights in a dim room and in bright light, and plan a dark cover if the exhibition hall is brightly lit.
- Check how it is powered and keep spare batteries ready.
- Keep the box for carrying it to school.
- Check the delivery date for your PIN code on the marketplace, and order well before the exhibition or practical.
Next steps
Take it further
Ways to turn this model into a bigger investigation or a stronger exhibition entry.
Add a slowly rotating star disc around Polaris, turned by a low-speed motor, to show the apparent motion of the stars through the night.
Make a card listing the distances of Orion's main stars from a star catalogue, to show they are not all at the same distance from us.
Observe one constellation on a clear night, sketch or photograph it, and compare it with your model.
Audience
Who it suits
Suits Class 6 to 9 science and geography exhibitions and school astronomy clubs.
- ClassClass 1 to 9
- SubjectPhysics
- TypeReady-made model
Free to read
Free ebooks for this topic
Free PDF ebooks from Gurukul Technicals Institute on the science, the making and the presenting of projects like this one.
- Free PDF ebook
Physics Working Models Explained
Twenty classic models, how each works and how to make it
- Free PDF ebook
Your Science Exhibition Guide
Choose a project, build it, present it and answer the judges with confidence
- Free PDF ebook
Writing a Science Project File
How to write the report, from the cover page to the bibliography
- Free PDF ebook
Viva Questions for Science Projects
How to answer examiner questions, with sample questions for popular projects