- Physics
- Ready-made model
Blast Furnace Working Model
Code B0G2TBFVJH
- Paid for and delivered by Amazon. The current price and the delivery date for your PIN code are shown there.
- Sold by Gurukul Technicals Institute, Delhi.
- Need a different topic, a custom version or a school order? Ask on WhatsApp.
In this project guide
Ready-made model
About this model
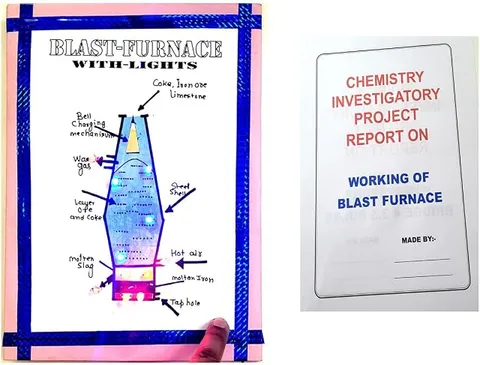
This working model shows a blast furnace, the giant furnace in which iron is extracted from its ore. It helps students explain the chemistry of smelting, the role of coke and limestone, and how molten iron and slag are separated at the bottom of the furnace.
What the listing says
- Iron Extraction & Smelting Science Project
How it works
The science behind it
The idea the model demonstrates, in words you can use in your report and when you explain it.
Iron is extracted mainly from haematite (Fe₂O₃). The ore, coke (nearly pure carbon) and limestone are fed in at the top, and hot air is blasted in near the bottom. Coke burns to form carbon dioxide (C + O₂ → CO₂), which reacts with more hot coke to form carbon monoxide (CO₂ + C → 2CO). Carbon monoxide is the main reducing agent: Fe₂O₃ + 3CO → 2Fe + 3CO₂. The lower part of the furnace is hot enough to melt the iron, which trickles down and collects at the bottom. Limestone decomposes into lime (CaCO₃ → CaO + CO₂), and the lime combines with sandy impurities to form slag (CaO + SiO₂ → CaSiO₃). Slag is less dense, so it floats on the molten iron, and both are tapped off separately. The iron produced, called pig iron, has about 4 percent carbon. Steel plants at Bhilai, Jamshedpur and Rourkela use blast furnaces.
Make it yourself
Make a blast furnace model yourself
Build your own version from scratch, or use the steps to understand how the ready-made model is put together before you present it.
What you need 9
Step by step 8 steps
- Shape the furnace
Make a tall tower that is narrow at the top, widest in the middle and narrower again near the bottom, and fix it on the base.
Cover the outside with clay or paint it like firebrick, leaving a window cut in the front so the inside can be seen.
Inside the window, colour three zones: the upper zone where carbon monoxide reduces the ore, the middle zone where limestone breaks down and slag forms, and the hottest zone at the bottom where coke burns in the hot air. Fix yellow, orange and red LEDs from top to bottom.
Fill a small cup at the top with the brown, black and white grains to show ore, coke and limestone being fed in.
Push the straw air inlets in near the bottom and draw arrows for the blast of hot air.
Fix two spouts at the bottom: the upper one for slag, which floats on the iron, and the lower one for molten iron, which is denser. Show them flowing out with grey paint and foil.
Fix a pipe at the top for the waste gases, with an arrow.
Wire the LEDs to the battery through a switch hidden in the base, and place the chart of reactions beside the model.
Read this first
Safety first
Go through these points before you build or switch anything on. Younger students should do this with an adult.
- Never burn coke or heat anything in the model; the heat is shown only with LEDs.
- Cutting the tin or bottle needs an adult, and tin edges are sharp, so cover them with tape.
- Plaster of Paris warms as it sets and can irritate skin; mix it wearing gloves, with an adult.
- Use only the 9 V battery for the lights, and keep wires away from wet clay or plaster.
Troubleshooting
If something does not work
The usual problems with this model and how to fix them. Open a problem to see the fix.
The clay cracks as it dries
It was too thick or dried too fast. Apply thin layers, dry each in the shade, and fill cracks with a little wet clay.
The LEDs look weak through the window
Cover them with tracing paper or red cellophane for a glowing effect, and use a fresh battery.
The model falls over
It is top-heavy. Use a wider base and put sand or stones in the bottom of the tower.
Visitors cannot follow the process
Number the parts in order (charge, hot air, reduction, slag, iron, waste gases) and point to each as you explain.
Exhibition day
How to present it
A running order for the exhibition table or the practical, step by step.
Label the inputs at the top (ore, coke, limestone) and the outputs at the bottom (molten iron and slag).
Write the main reactions on a chart in the order they happen as you move down the furnace.
Explain why slag floats on molten iron and how this helps separate them.
Mention an Indian steel plant and how pig iron is later turned into steel.
Practice
Viva questions
Practice questions on this model, with short answers. Try each one aloud before you open the answer.
What is the main ore of iron used in a blast furnace?
Haematite, which is iron(III) oxide, Fe₂O₃.
Which substance acts as the reducing agent in the blast furnace?
Carbon monoxide, formed from coke, reduces iron oxide to iron.
Why is limestone added to the blast furnace?
It decomposes to lime, which combines with sandy impurities (silica) to form slag that can be removed.
What is pig iron?
It is the impure iron that comes out of the blast furnace, containing about 4 percent carbon, which makes it hard and brittle.
Project file
Project file outline
The headings of the project file, in order. Give each heading its own section and write it in your own words.
Free ebook: Writing a Science Project FileContents
- Aim: to show how iron is extracted from haematite in a blast furnace
- Introduction: metals, ores and why iron is so important
- Raw materials: haematite, coke, limestone and hot air
- Structure of the blast furnace (labelled diagram)
- Chemical reactions in each zone, with balanced equations
- How slag forms and is removed
- Pig iron, cast iron and steel
- How the model was made
- Effects on the environment, conclusion and bibliography
Buying checklist
Before you buy
What to check before you order the model, and what to do when it arrives.
1Before you order
- Check your syllabus Extraction of metals is part of chemistry, so make sure your teacher wants a model of this process.
- Read the listing to see whether the model has lights and what power they need.
- Test any lights a few days before the exhibition.
- Keep the box, since a tall model needs padding in transport.
- Check the delivery date for your PIN code on the marketplace, and order well before the exhibition or practical.
- Practise explaining it. Judges ask what the model shows and why; knowing the science matters as much as the model. The viva questions above are a good place to start.
2When it arrives
- On arrival, check that the labels match the reactions in your textbook, and add an equations chart if needed.
Next steps
Take it further
Ways to turn this model into a bigger investigation or a stronger exhibition entry.
Add a section on how steel is made from pig iron and why its carbon content matters.
Compare the extraction of iron (reduction by carbon monoxide) with that of aluminium (electrolysis).
Calculate the mass of iron obtainable from a given mass of Fe₂O₃ using molar masses.
Audience
Who it suits
Suits Class 10 to 12 chemistry projects on metallurgy and the extraction of metals, and science exhibitions on industry.
- SubjectPhysics
- TypeReady-made model
Free to read
Free ebooks for this topic
Free PDF ebooks from Gurukul Technicals Institute on the science, the making and the presenting of projects like this one.
- Free PDF ebook
Physics Working Models Explained
Twenty classic models, how each works and how to make it
- Free PDF ebook
Your Science Exhibition Guide
Choose a project, build it, present it and answer the judges with confidence
- Free PDF ebook
Writing a Science Project File
How to write the report, from the cover page to the bibliography
- Free PDF ebook
Viva Questions for Science Projects
How to answer examiner questions, with sample questions for popular projects