- Physics
- DIY kit
- Class 1 to 9
60+ Science Experiment Kit
Code B0FGV3SNYJ
- Paid for and delivered by Amazon. The current price and the delivery date for your PIN code are shown there.
- Sold by Gurukul Technicals Institute, Delhi.
- Need a different topic, a custom version or a school order? Ask on WhatsApp.
In this project guide
DIY kit
About this kit
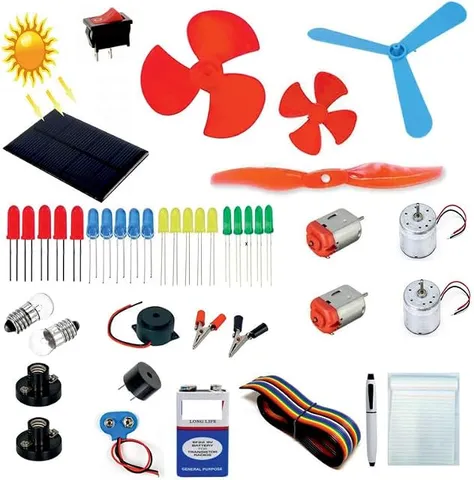
This is a mixed kit of basic electrical parts for doing many small experiments at home or in class. The listing mentions mini bulbs, fans in three sizes, a DVD/DC motor and LEDs, which are enough to explore circuits, light and motion. It suits a curious student who wants to try many things rather than buy one fixed model.
What the listing says
- Mini Bulb Ring Type
- 3 Size Fan
How it works
The science behind it
The idea the kit demonstrates, in words you can use in your report and when you explain it.
Two of the most useful lessons in a kit like this come from comparing a filament bulb with an LED. A bulb glows by incandescence: current heats a thin tungsten filament until it is hot enough to give out light, so most of the energy is lost as heat. An LED glows by electroluminescence: electrons crossing a semiconductor junction release energy directly as light, so far less is wasted. An LED also conducts in one direction only. Its longer leg is usually the anode (positive), and it needs a resistor in series to limit the current, or it can burn out. Motors with fans show a different conversion, electrical energy into motion, and the blade size changes how much air is pushed and how hard the motor works. India's switch from filament bulbs to LED bulbs, pushed by the UJALA scheme, saved a great deal of electricity for exactly this reason.
Make it yourself
Make a battery fan and light circuit board yourself
Everything you need and the order to do it in. Tick off the materials as you collect them.
What you need 9
Step by step 8 steps
Read the voltage marked on the bulb, if any, and use cells that match it.
Fix the battery holder at one edge of the base and run two long wires along the board as the positive and negative lines.
Connect a bulb in its holder with a switch between the two lines, and check that it lights.
Connect an LED with its resistor and a switch as a second branch, long leg towards positive. Turn the LED round once to see that it does not light, showing it conducts one way only.
Push the fan blade firmly on the motor shaft, fix the motor upright with tape or glue so the blade clears the base, and wire it with the third switch.
Swap the two motor wires and notice that the fan now spins the other way.
Leave the bulb and the LED on for a minute, then hold a fingertip near each: the bulb is warmer, showing it wastes more energy as heat.
Label each branch and draw the circuit diagram on the board.
Read this first
Safety first
Go through these points before you build or switch anything on. Younger students should do this with an adult.
- Keep fingers, hair and loose paper away from the spinning fan blade.
- Mini bulbs get warm; let them cool before handling, and never connect a low-voltage bulb to a bigger battery.
- Never join the two ends of a battery directly with a wire.
- Use cells only; no part of this kit should go near a charger socket or mains.
Troubleshooting
If something does not work
The usual problems with this kit and how to fix them. Open a problem to see the fix.
The bulb does not light
Screw it firmly into its holder, check the cells and wire contacts, and test the bulb with the multimeter's continuity mode; a broken filament shows no continuity.
The LED does not light but the bulb does
Turn the LED round so the long leg goes towards positive, and check that its resistor is in series with it, not across it.
The fan blade wobbles or flies off
Push the blade fully onto the shaft and use the blade size whose hole fits the motor tightly.
The motor only hums
The blade may be too big for the motor or rubbing on the base. Flick it gently to start it, or fit a smaller blade.
Exhibition day
How to present it
A running order for the exhibition table or the practical, step by step.
Set up a bulb circuit and an LED circuit side by side, and after a minute hold a finger near each to compare how warm they get.
Reverse the LED to show that it stops glowing, then reverse the motor leads to show it spins the other way.
Fit the three fan sizes on the same motor in turn and describe the change in speed and airflow.
Keep a simple record sheet for each experiment: aim, circuit, observation and result.
Practice
Viva questions
Practice questions on this kit, with short answers. Try each one aloud before you open the answer.
Why does an LED glow only when connected one way?
An LED is a diode, so it conducts only when forward biased, with the anode at a higher potential than the cathode.
Why is a resistor connected in series with an LED?
It limits the current through the LED so that it does not overheat and burn out.
How does a filament bulb produce light?
Current heats the tungsten filament until it becomes white hot and gives out light; this is called incandescence.
What energy change takes place in an electric motor?
Electrical energy is converted into mechanical (kinetic) energy.
Project file
Project file outline
The headings of the project file, in order. Give each heading its own section and write it in your own words.
Free ebook: Writing a Science Project FileContents
- Aim: to build a circuit board that shows electricity producing light and motion
- Introduction: simple circuits, conductors and switches
- Materials used and circuit diagram
- Bulb and LED compared: incandescence and electroluminescence
- How a DC motor turns electrical energy into motion
- Procedure: laying out the three branches on the board
- Observations: which branch works with each switch, fan direction, bulb and LED warmth (table)
- Conclusion and a list of other experiments done with the kit
Buying checklist
Before you buy
What to check before you order the kit, and what to do when it arrives.
1Before you order
- Read the listing for the list of parts and check whether cells are included.
- It suits basic circuit activities in the younger classes; check it fits your syllabus.
- Note the voltage marked on bulbs and motors so you use the right number of cells.
- Keep small parts away from very young children.
- Check the delivery date for your PIN code on the marketplace, and order well before the exhibition or practical.
- Building it yourself: younger students should build with an adult, especially with motors, batteries and small parts.
2When it arrives
- Sort the parts into small boxes on arrival and test each bulb, LED and motor with a cell.
Next steps
Take it further
Ways to turn this kit into a bigger investigation or a stronger exhibition entry.
Measure the current drawn by the bulb and by the LED and compare their power using P = V × I.
Make series and parallel versions with two bulbs and explain the difference in brightness.
Use the parts to build a working torch or a table fan model.
Audience
Who it suits
Suits Class 5 to 9 students for home experiments, science activity periods and small exhibition projects.
- ClassClass 1 to 9
- SubjectPhysics
- TypeDIY kit
Free to read
Free ebooks for this topic
Free PDF ebooks from Gurukul Technicals Institute on the science, the making and the presenting of projects like this one.
- Free PDF ebook
Electricity and Magnetism Experiments
Hands-on experiments with cells, wires, bulbs and magnets
- Free PDF ebook
Physics Working Models Explained
Twenty classic models, how each works and how to make it
- Free PDF ebook
Your Science Exhibition Guide
Choose a project, build it, present it and answer the judges with confidence
- Free PDF ebook
Writing a Science Project File
How to write the report, from the cover page to the bibliography