- Physics
- DIY kit
- Class 1 to 9
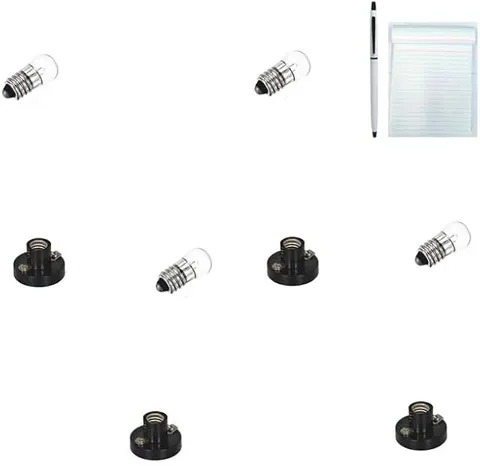
3V-9V 4 Pair Mini Bulb with Holder for Simple Electronic Circuit Board DIY Kit
Code B0FGV2GG6T
- Paid for and delivered by Amazon. The current price and the delivery date for your PIN code are shown there.
- Sold by Gurukul Technicals Institute, Delhi.
- Need a different topic, a custom version or a school order? Ask on WhatsApp.
DIY kit
About this kit
These are small bulbs with holders for building simple circuits; the listing describes them as a 4-pair set of 3V-9V mini bulbs with holders. Bulbs like these are the basic output part for school experiments on series and parallel circuits, conductors and insulators, and quiz boards.
How it works
The science behind it
The idea the kit demonstrates, in words you can use in your report and when you explain it.
Mini bulbs like these are usually small filament lamps. When current flows through the thin tungsten filament, its resistance turns electrical energy into heat (Joule's law, H = I²Rt), and the filament becomes hot enough to glow. Tungsten is used because its melting point is very high, about 3422 °C. Most of the energy comes out as heat rather than light, which is why LEDs are more efficient. A filament bulb has no polarity, so it lights whichever way the battery is connected, unlike an LED. Its resistance also rises as it heats up, so it does not follow Ohm's law exactly. Because its brightness shows how much current is flowing, it makes a simple indicator: in a conductor tester, the bulb lights when a steel spoon completes the circuit and stays off for a plastic scale. A holder gives firm contact and makes it easy to replace a fused bulb.
Using it in your projects
Using mini bulbs with holders in your projects
What this kit is good for, what else you need with it and how to connect it.
Projects you can build with it 8
- A board comparing series and parallel circuits
- A conductors and insulators tester
- An electric quiz board with a bulb that lights for correct answers
- A steady-hand buzz-wire game
- Room lighting for a model house, with switches
- A traffic light model with red, yellow and green cellophane over the bulbs
- A two-way staircase switch circuit
- A lighthouse model
What else you need 8
How to connect it 8 steps
Read the voltage marked on the bulb's metal base or glass, and choose a supply that does not go above it.
Screw the bulb fully into its holder and loosen the two terminal screws.
Strip about 1 cm of insulation from each wire end, twist the strands together, wrap the wire clockwise under each screw and tighten it.
Connect the holder to the cells through a switch and switch on; the bulb should light whichever way round the wires go.
If it does not light, take the bulb out and check it with the multimeter on the continuity or resistance range: a good filament gives a low reading and a broken one gives no reading.
Connect two or more holders in series and then in parallel, and compare how bright the bulbs glow each way.
Fix the holders to a board with small screws or glue for a neat exhibition model.
Switch off whenever you are not demonstrating, so the bulbs do not overheat and the cells last longer.
Read this first
Safety first
Go through these points before you build or switch anything on. Younger students should do this with an adult.
- Never run a bulb above the voltage marked on it; it will flash and burn out, and the glass can get very hot.
- Bulbs get hot when lit, so do not touch them and keep them away from paper and thermocol.
- Use only cells and batteries with these holders; never connect them to a mains socket.
- The glass breaks easily: if a bulb breaks, let an adult clear up the pieces.
Troubleshooting
If something does not work
The usual problems with this kit and how to fix them. Open a problem to see the fix.
The bulb does not light
It may not be screwed in fully, a wire may not be gripped under its screw, the filament may be broken, or the cells may be flat. Check each in turn, starting with the filament.
The bulb flashed brightly and went dark
It was given too high a voltage and the filament has burnt out. Replace it and use a supply that matches its rating.
The bulb is very dim
The voltage is too low for it, it is sharing the voltage with others in series, or the cells are weak. Check the supply with a multimeter.
The holder gets warm
A contact is loose. Tighten the terminal screws and make sure the bulb is screwed in firmly.
Exhibition day
How to present it
A running order for the exhibition table or the practical, step by step.
Check every bulb with a cell before the exhibition and keep a spare in case a filament breaks.
Use two bulbs to compare series and parallel brightness side by side.
Match the battery to the bulb rating, because too high a voltage can fuse the filament quickly.
Seat each bulb firmly in its holder, since a loose bulb is the commonest cause of a dead circuit.
Practice
Viva questions
Practice questions on this kit, with short answers. Try each one aloud before you open the answer.
Why is tungsten used for the filament?
Tungsten has a very high melting point, so it can glow white-hot without melting.
Does a filament bulb have positive and negative terminals?
No. Current can flow through the filament either way, so the bulb lights whichever way it is connected.
Why does a bulb get hot?
The filament's resistance converts electrical energy into heat, and only a small part of the energy comes out as light.
How can a bulb be used to test whether a material is a conductor?
Place the material across a gap in a circuit with a cell and the bulb; if the bulb glows, current is flowing and the material is a conductor.
Buying checklist
Before you buy
What to check before you order the kit, and what to do when it arrives.
1Before you order
- Check the voltage rating given in the listing and on the bulbs, and plan your battery to match it.
- Keep one or two spare bulbs, since filament bulbs can fail on exhibition day.
- Check that the holder style suits your board, for example whether it screws down or sits loose.
- Store spare bulbs in a small padded box so the glass does not crack.
- Check the delivery date for your PIN code on the marketplace, and order well before the exhibition or practical.
- Building it yourself: younger students should build with an adult, especially with motors, batteries and small parts.
2When it arrives
- Count the bulbs and holders when they arrive and test each bulb before you start building.
Next steps
Take it further
Ways to turn this kit into a bigger investigation or a stronger exhibition entry.
Measure the current through a bulb at 1.5 V, 3 V, 4.5 V and 6 V and plot a V-I graph; the curve shows a filament does not follow Ohm's law exactly.
Compare a bulb and an LED of similar brightness by measuring the current each draws.
Make a simple dimmer by sliding a contact along a pencil lead in series with the bulb.
Audience
Who it suits
Useful for Class 6 to 10 students building electric-circuit projects and for teachers setting up simple circuit demonstrations.
- ClassClass 1 to 9
- SubjectPhysics
- TypeDIY kit
Free to read
Free ebooks for this topic
Free PDF ebooks from Gurukul Technicals Institute on the science, the making and the presenting of projects like this one.
- Free PDF ebook
Electronic Components Handbook
Resistors, capacitors, LEDs, diodes, transistors and more, with how to use each
- Free PDF ebook
Electricity and Magnetism Experiments
Hands-on experiments with cells, wires, bulbs and magnets
- Free PDF ebook
Physics Working Models Explained
Twenty classic models, how each works and how to make it