 50% off
- Science
- Ready-made model
- Class 1 to 9
- Printed report included
Solar Room Heating Process Working Model Educational Science Project
Code B0BN2DPHDQ
- Paid for and delivered by Amazon or Flipkart. The current price and the delivery date for your PIN code are shown there.
- Sold by Gurukul Technicals Institute, Delhi.
- Need a different topic, a custom version or a school order? Ask on WhatsApp.
In this project guide
Ready-made model
About this model
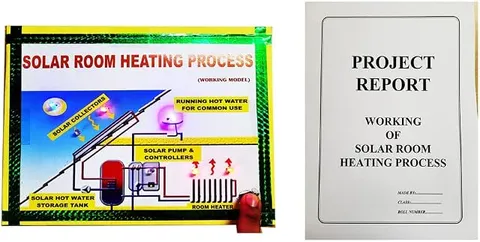
This working model is an illustrated board that shows how a solar water-heating system can warm a room. It shows solar collectors on a sloping roof, a solar pump and controllers, a solar hot water storage tank, a radiator labelled room heater, and a shower giving running hot water for common use. Coloured LEDs at the Sun, the collectors, the controller, the shower and above the radiator light up when you press the switch, powered by a 9 V battery. A printed project report comes with it.
How it works
The science behind it
The idea the model demonstrates, in words you can use in your report and when you explain it.
The board shows active solar heating, where a pump moves the Sun's heat from where it is collected to where it is used. A common solar collector is a dark absorber plate with pipes fixed to it, inside an insulated box with a glass cover. The dark surface absorbs sunlight and turns light energy into heat, which passes by conduction into the water in the pipes. The glass lets sunlight in but cuts the heat lost to the air. A controller compares the temperature of the collector with that of the tank, and runs the pump only when the collector is hotter, so heat always flows into the store. The storage tank of such a system is insulated, so the water stays hot for hours after sunset. Hot water then flows through the radiator. Its metal fins warm the air next to them, the warm air rises and spreads by convection, and the fins also radiate heat. The cooled water returns to be heated again.
Make it yourself
Make a solar room heating process board yourself
Build your own version from scratch, or use the steps to understand how the ready-made model is put together before you present it.
What you need 10
Step by step 8 steps
- Draw or paste the scene
The Sun in the sky, solar collectors on a sloping roof, and below the roof the storage tank, the pump and controller box, the radiator and the shower.
Draw the pipes in red from the top of the collectors to the tank and from the tank to the radiator and the shower, and in blue for the cooler water returning to the collectors and the tank.
- Label each part
Solar collectors, solar pump and controllers, solar hot water storage tank, room heater, and running hot water for common use.
With an adult, make holes and push an LED through at the Sun, the collectors, the controller, the shower and above the radiator.
On the back, connect each LED in series with its own 1 kΩ resistor, join all these LED and resistor pairs in parallel, and connect them to the battery through the push button.
Press the button and check that every LED lights; unclip the battery before correcting any joint.
Cover the wiring at the back and fix the button where you can reach it while you explain the path of the water.
For a real heating test, fill both bottles with the same amount of water, wrap one in black paper, leave both in the sun and record the water temperature in each every ten minutes.
Read this first
Safety first
Go through these points before you build or switch anything on. Younger students should do this with an adult.
- Keep a resistor in series with every LED; an LED connected straight across 9 V burns out.
- Do not short the 9 V battery terminals, and unclip the battery when the model is not on show.
- Make the LED holes, and solder or use a glue gun, only with an adult.
- Never look directly at the Sun during the bottle test, and use a digital or spirit thermometer rather than a mercury one.
Troubleshooting
If something does not work
The usual problems with this model and how to fix them. Open a problem to see the fix.
No LED lights when the button is pressed
Check the battery with a multimeter or try a fresh one, make sure the snap is pressed on firmly, and check the wires at the push button.
One LED does not light
It is probably the wrong way round or has a loose joint. Turn it so the longer leg goes to the positive side, and re-twist the connection, or have it re-soldered with an adult.
One LED is much dimmer than the rest
Check its resistor and its joints. LEDs of different colours glow with different brightness, so a slightly dimmer one may be normal.
Both bottles show almost the same temperature
The day may be hazy or the test too short. Use full sun for longer, keep both bottles side by side, and dip the thermometer in the water rather than holding it in the air.
Exhibition day
How to present it
A running order for the exhibition table or the practical, step by step.
Press the switch so the LEDs light up, then trace the path of the water from the collectors to the pump and controllers, the storage tank, the room heater and the shower.
Explain the job of each labelled part: the collectors absorb heat, the pump and controllers move the water, the tank stores it and the radiator warms the room.
Point to the red and blue pipes and explain that hot water flows out to be used while cooler water returns to be heated again.
Compare this active system, which uses a pump, with passive solar heating, which uses only sun-facing windows and thick walls, and link both to saving fuel in winter.
Practice
Viva questions
Practice questions on this model, with short answers. Try each one aloud before you open the answer.
What is active solar heating?
Solar heating that uses a pump or fan to move the collected heat, here as hot water, from the collectors to a store and then into the room.
Why is the absorber plate of a solar collector dark or black?
A black surface absorbs most of the sunlight falling on it and turns it into heat, while a light surface reflects more of it.
What does the controller do in a solar heating system?
It runs the pump only when the collector is hotter than the water in the tank, so heat is carried into the tank and not lost.
How does the radiator warm the room?
Hot water heats its metal fins, which warm the air around them; the warm air rises and circulates by convection, and the fins also radiate heat.
Project file
Project file outline
The headings of the project file, in order. Give each heading its own section and write it in your own words.
The listing includes a printed project report: use this outline to check that your own file covers every part.
Free ebook: Writing a Science Project FileContents
- Aim: to show how solar collectors heat water that is stored in a tank and pumped to a room heater
- Why room heating matters in cold regions, and the use of solar energy
- Active and passive solar heating compared
- Parts of the system: solar collectors, pump and controller, storage tank, radiator and hot water taps
- How a collector absorbs heat, and how the controller decides when to run the pump
- Conduction, convection and radiation in the system
- Circuit diagram of the LEDs, switch and battery on the board
- Observation table from the black and plain bottle test
- Advantages and limitations of solar heating
- Conclusion and sources used
Buying checklist
Before you buy
What to check before you order the model, and what to do when it arrives.
1Before you order
- Check that the model suits your class and the chapter on heat or sources of energy.
- It runs on a 9 V battery, which the listing says is not included, so buy one with it.
- A ready-to-submit printed report comes with the model; read it and add your own observations.
- The board shows the process with lights; it does not heat water, so do the bottle test if you want real readings.
- Carry it flat and protect the LEDs and the switch in transport.
- Check the delivery date for your PIN code on the marketplace, and order well before the exhibition or practical.
- Practise explaining it. Judges ask what the model shows and why; knowing the science matters as much as the model. The viva questions above are a good place to start.
2When it arrives
- When it arrives, fit the battery, press the switch and check that every LED lights.
Next steps
Take it further
Ways to turn this model into a bigger investigation or a stronger exhibition entry.
Make a small working collector: a coil of black tube in a box with a clear lid, and compare the water temperature before and after an hour in the sun.
Add a panel comparing a solar water heater with a solar panel: one turns sunlight into heat, the other into electricity.
Add a panel on passive solar heating, such as sun-facing windows and thick walls, and compare it with the active system on the board.
Audience
Who it suits
Class 6 to 9 students preparing an exhibition model on heat, solar energy or saving fuel at home, and anyone explaining how a solar water heater works.
- ClassClass 1 to 9
- SubjectScience
- TypeReady-made model
- Project reportPrinted report included
Free to read
Free ebooks for this topic
Free PDF ebooks from Gurukul Technicals Institute on the science, the making and the presenting of projects like this one.
- Free PDF ebook
Your Science Exhibition Guide
Choose a project, build it, present it and answer the judges with confidence
- Free PDF ebook
Writing a Science Project File
How to write the report, from the cover page to the bibliography
- Free PDF ebook
Viva Questions for Science Projects
How to answer examiner questions, with sample questions for popular projects