- Maths
- Ready-made model
Pair and Types of Angles Educational Maths Working Project Model for School and Colleges
Code B0DK24TZ2J
- Paid for and delivered by Amazon. The current price and the delivery date for your PIN code are shown there.
- Sold by Gurukul Technicals Institute, Delhi.
- Need a different topic, a custom version or a school order? Ask on WhatsApp.
In this project guide
Ready-made model
About this model
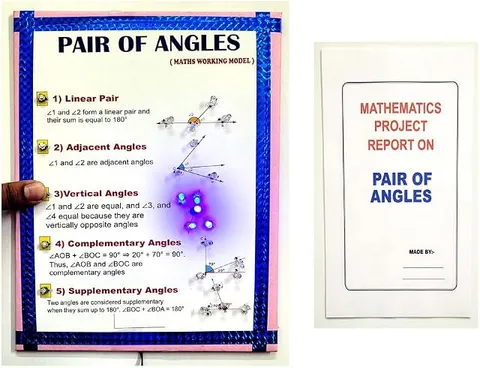
This maths working model explains the types of angles, from acute to reflex, and the common pairs of angles, such as complementary, supplementary, linear pairs and vertically opposite angles. It gives students a clear visual way to show how angles are named and how their measures are related.
How it works
The science behind it
The idea the model demonstrates, in words you can use in your report and when you explain it.
An angle is formed when two rays start from a common point called the vertex, and it is measured in degrees. An angle less than 90° is acute, exactly 90° is a right angle, between 90° and 180° is obtuse, exactly 180° is a straight angle, between 180° and 360° is reflex, and 360° is a complete angle. Two angles are complementary if they add up to 90° and supplementary if they add up to 180°. Adjacent angles share a vertex and a common arm. A linear pair is a pair of adjacent angles whose outer arms form a straight line, so they add up to 180°. When two lines cross, vertically opposite angles are equal. When a transversal cuts two parallel lines, corresponding angles and alternate interior angles are equal. The hands of a clock make a right angle at 3 o'clock and a straight angle at 6 o'clock.
Make it yourself
Make a types and pairs of angles model yourself
Build your own version from scratch, or use the steps to understand how the ready-made model is put together before you present it.
What you need 8
Step by step 8 steps
Glue the 360° circle on one side of the board and pin one strip at its centre as a fixed arm along 0°.
Pin a second strip at the same centre so it can rotate, and colour bands around the circle for acute, right, obtuse, straight and reflex angles.
Turn the moving arm through each band and label the angle type at each position, finishing with a complete angle at 360°.
On the other side of the board, pin two long strips crossing at their midpoints to show two intersecting lines.
Mark the four angles formed and colour each pair of vertically opposite angles to match.
Cut pairs of coloured angles that add up to 90°, such as 30° and 60°, and show that they fit together into a right angle.
Cut pairs that add up to 180° and show them making a straight line, then label a linear pair and adjacent angles.
Add a small table listing each angle type and pair with its measure.
Read this first
Safety first
Go through these points before you build or switch anything on. Younger students should do this with an adult.
- Take care with paper fastener points and the compass.
- Ask an adult to cut the foam board with a cutter.
- Keep small cut-outs and pins away from young children.
Troubleshooting
If something does not work
The usual problems with this model and how to fix them. Open a problem to see the fix.
The moving arm keeps slipping
Tighten the paper fastener, or put a card washer under it for more grip.
The angle readings are off
The pivot is not exactly at the circle's centre. Re-mark the centre with a compass and refix the pin.
My complementary cut-outs do not form a neat right angle
Measure each angle with the protractor before cutting, and cut along the arms with a ruler.
The crossing strips do not look like straight lines
Use stiffer card and pin the strips exactly at their midpoints.
Exhibition day
How to present it
A running order for the exhibition table or the practical, step by step.
Measure a few angles on the model with a protractor in front of the judges, so they see the definitions in action.
Show a clock face and ask visitors to name the angle at different times, such as 3, 4 and 6 o'clock.
Prove that vertically opposite angles are equal using linear pairs: each of them equals 180° minus the same angle.
Point out angles around the room, such as door corners and the hands of a wall clock, to connect the topic with daily life.
Practice
Viva questions
Practice questions on this model, with short answers. Try each one aloud before you open the answer.
What is the complement of 35°?
The complement is 90° − 35° = 55°.
Can two obtuse angles be supplementary?
No. Each obtuse angle is more than 90°, so two of them always add up to more than 180°.
What is the relation between vertically opposite angles?
Vertically opposite angles formed by two intersecting lines are always equal.
What do the angles of a linear pair add up to?
They add up to 180°, because their outer arms form a straight line.
Project file
Project file outline
The headings of the project file, in order. Give each heading its own section and write it in your own words.
Free ebook: Writing a Science Project FileContents
- Aim: to show the types of angles and the relations between pairs of angles
- Materials
- Types of angles by measure
- Pairs of angles: complementary, supplementary, adjacent, linear pair and vertically opposite
- Construction of the model
- Activity: showing that vertically opposite angles are equal
- Observation table of measured angles
- Angles in daily life, such as clock hands and scissors
- Conclusion
Buying checklist
Before you buy
What to check before you order the model.
1Check these first
- Lines and angles are taught in middle-school and Class 9 maths; check that the pairs your teacher wants, such as angles made by a transversal, are shown.
- Check in the listing whether the arms move or are fixed, and whether any lights need batteries.
- Practise demonstrating each pair a few days before the exhibition.
- Keep the box so the arms and pivots are not bent.
- Check the delivery date for your PIN code on the marketplace, and order well before the exhibition or practical.
Next steps
Take it further
Ways to turn this model into a bigger investigation or a stronger exhibition entry.
Add two parallel lines cut by a transversal to show corresponding, alternate and co-interior angles.
Tear the three corners off a paper triangle and place them along a straight line to show the angle sum property.
Work out the angle between the clock hands at different times and show it with the moving arm.
Audience
Who it suits
Suits Class 6 to 9 maths exhibitions and classroom lessons on lines and angles.
- SubjectMaths
- TypeReady-made model
Free to read
Free ebooks for this topic
Free PDF ebooks from Gurukul Technicals Institute on the science, the making and the presenting of projects like this one.
- Free PDF ebook
Maths Working Models and Activities
Make maths visible: models for number, geometry, algebra and data
- Free PDF ebook
Your Science Exhibition Guide
Choose a project, build it, present it and answer the judges with confidence
- Free PDF ebook
Writing a Science Project File
How to write the report, from the cover page to the bibliography
- Free PDF ebook
Viva Questions for Science Projects
How to answer examiner questions, with sample questions for popular projects