- Physics
- Ready-made model
- Class 1 to 9
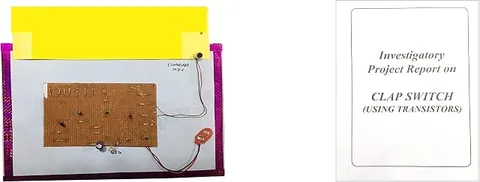
ONTEX ELECTRONICS Multicolor Educational Circuit Board - Clap Switch Using Transistors - Project for Child & Teen - 33cm(W) X 23cm(L) - No Batteries Required
Code B07P46K6S6
- Paid for and delivered by Amazon. The current price and the delivery date for your PIN code are shown there.
- Sold by Gurukul Technicals Institute, Delhi.
- Need a different topic, a custom version or a school order? Ask on WhatsApp.
In this project guide
Ready-made model
About this model
This educational circuit board is a clap switch built around transistors, so a clap of the hands toggles its output on and off. It helps students see how a sound signal is amplified and how transistors can be wired to remember an on or off state.
What the listing says
- ONTEX ELECTRONICS Multicolor Educational Circuit Board
- Clap Switch Using Transistors
- Project for Child & Teen
- 33cm(W) X 23cm(L)
- No Batteries Required
How it works
The science behind it
The idea the model demonstrates, in words you can use in your report and when you explain it.
In a typical transistor clap switch, the sound of a clap makes the diaphragm of a microphone vibrate and produce a tiny, rapidly changing voltage. The first transistor works as an amplifier: a small change in its base current produces a much larger change in collector current, so the weak signal becomes strong enough to act on the rest of the circuit. The amplified pulse is fed to a bistable multivibrator, also called a flip-flop, made of two transistors cross-connected so that when one is on, the other is held off. It has two stable states and stays in either one until a new pulse arrives, so each clap toggles it: one clap switches the output on and the next switches it off. This is the simplest form of electronic memory, because the circuit remembers its last state. Coupling capacitors between the stages pass the sudden clap signal while blocking steady DC.
Make it yourself
Make a transistor clap switch yourself
Build your own version from scratch, or use the steps to understand how the ready-made model is put together before you present it.
What you need 8
Step by step 7 steps
- Power the microphone
The lead joined to its case goes to negative, and the other lead goes to positive through the 4.7 kΩ resistor.
Build the amplifier with the first transistor (T1): the microphone's positive lead to T1's base through the 0.1 µF capacitor, the 1 MΩ resistor from positive to the base, a 10 kΩ load from positive to the collector, and the emitter to negative. A clap makes a sharp pulse at T1's collector.
Build the flip-flop with T2 and T3: each collector to the other's base through a 47 kΩ resistor, T2's collector to positive through 1 kΩ, T3's collector to positive through the LED and the 470 Ω resistor, and both emitters to negative.
- Add the steering
From T1's collector, run a 10 nF capacitor to each of two junction points. At each junction, fit a 1N4148 diode with its band towards the junction and its other end to the base of T2 (or T3), and a 10 kΩ resistor from the junction to the collector of that same transistor.
Fit the 100 µF capacitor across the supply near the flip-flop, long leg to positive, so a dip in the battery voltage cannot flip it by itself.
Switch on. The LED may start on or off. Clap once sharply and it should change; clap again and it should change back.
Test from 1, 2 and 3 m away, and with other sounds such as a whistle, a knock and speech, and record which ones switch it.
Read this first
Safety first
Go through these points before you build or switch anything on. Younger students should do this with an adult.
- Use the soldering iron only with an adult, rest it in its stand, and let the board cool before handling it.
- Use only the 9 V battery. To switch a bigger lamp, use a relay with its own low-voltage battery, and never connect a mains appliance.
- Fit the transistors, diodes and the 100 µF capacitor the right way round.
- Disconnect the battery while soldering or changing any part.
Troubleshooting
If something does not work
The usual problems with this model and how to fix them. Open a problem to see the fix.
Talking or any small noise switches the LED
The amplifier is too sensitive. Change the 1 MΩ base resistor to 680 kΩ, or move the microphone away from the noise.
One clap switches it on and straight off again
An echo or a long clap can make two pulses. Try 4.7 nF steering capacitors, demonstrate in a less echoing room, and clap once crisply.
Clapping does nothing
The microphone may be reversed or the diodes the wrong way round. In silence, T1's collector should read close to 0 V; if it reads near 9 V, check T1's base resistor and legs.
The LED glows faintly when it should be off
A small current to the other transistor's base flows through the LED. This is normal in this simple design; for a cleaner result, drive the LED through a separate transistor.
Exhibition day
How to present it
A running order for the exhibition table or the practical, step by step.
Clap once to switch on and once again to switch off, and explain the toggling action.
Point out the amplifier stage and the flip-flop stage on a block diagram.
Show that a soft sound may not trigger it while a sharp clap does, and explain why.
Compare it with clap switches that use a relay to control bigger loads.
Practice
Viva questions
Practice questions on this model, with short answers. Try each one aloud before you open the answer.
What is a bistable multivibrator?
A two-transistor circuit with two stable states, which changes state only when it receives a trigger pulse.
Why is the microphone signal amplified?
The voltage from the microphone is very small, so it must be made larger before it can trigger the flip-flop.
What does 'toggle' mean in this circuit?
Each clap changes the output to the opposite state, from off to on or from on to off.
What is the role of a coupling capacitor?
It passes the changing signal from one stage to the next while blocking steady DC.
Project file
Project file outline
The headings of the project file, in order. Give each heading its own section and write it in your own words.
Free ebook: Writing a Science Project FileContents
- Aim: to switch a light on and off with a clap, using transistors
- Introduction: sound-operated switches and their uses
- The microphone as a transducer
- The transistor as an amplifier
- The bistable multivibrator (flip-flop) and how it remembers its state
- Circuit diagram and construction
- Observations: distances and kinds of sound that switch it
- Applications and limitations, such as false switching by other noises
- Conclusion and bibliography
Buying checklist
Before you buy
What to check before you order the model, and what to do when it arrives.
1Before you order
- Check that a transistor project suits your class and your teacher's brief.
- The title says no batteries are required, so read the listing carefully to see how the board is powered and whether you need to arrange anything.
- Practise a clear demonstration with one sharp clap close to the board.
- Keep the box for transport.
- Check the delivery date for your PIN code on the marketplace, and order well before the exhibition or practical.
2When it arrives
- Test it in a quiet room as soon as it arrives, and then in a noisy room, since loud exhibition halls can set it off.
Next steps
Take it further
Ways to turn this model into a bigger investigation or a stronger exhibition entry.
Replace the LED with a relay that switches a separate 6 V lamp from its own battery, and explain how a relay keeps two circuits apart.
Make it respond only to two claps within a second, using a 555 timer or a counter IC.
Use a phone sound level app to find the quietest clap that works at different distances, and graph the results.
Audience
Who it suits
Class 8 to 12 students and young hobbyists who want an interactive electronics project on sound and transistors.
- ClassClass 1 to 9
- SubjectPhysics
- TypeReady-made model
Free to read
Free ebooks for this topic
Free PDF ebooks from Gurukul Technicals Institute on the science, the making and the presenting of projects like this one.
- Free PDF ebook
Electricity and Magnetism Experiments
Hands-on experiments with cells, wires, bulbs and magnets
- Free PDF ebook
Physics Working Models Explained
Twenty classic models, how each works and how to make it
- Free PDF ebook
Your Science Exhibition Guide
Choose a project, build it, present it and answer the judges with confidence
- Free PDF ebook
Writing a Science Project File
How to write the report, from the cover page to the bibliography