- Physics
- Ready-made model
- Class 10 to 12
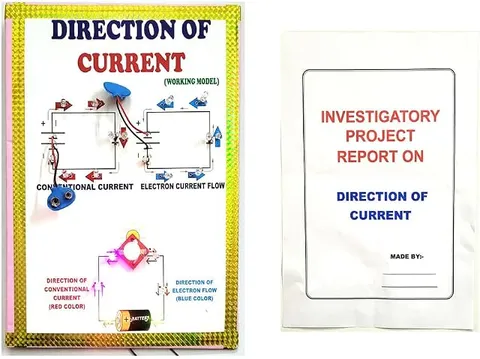
Direction Flow of Current Physics Investigatory Project Model Educational Electronic Hobby Kit
Code B0DTYDFMBR
- Paid for and delivered by Amazon. The current price and the delivery date for your PIN code are shown there.
- Sold by Gurukul Technicals Institute, Delhi.
- Need a different topic, a custom version or a school order? Ask on WhatsApp.
In this project guide
Ready-made model
About this model
This model is about the direction in which electric current flows in a circuit, a basic idea that often confuses students. It helps explain the difference between conventional current and the actual flow of electrons, and how the direction of current can be shown in practice.
How it works
The science behind it
The idea the model demonstrates, in words you can use in your report and when you explain it.
By convention, electric current flows from the positive terminal of a cell, through the outer circuit, to the negative terminal. This rule was fixed long before the electron was discovered. We now know that in metal wires the charge carriers are electrons, which are negatively charged and actually move the other way, from negative to positive. Both descriptions give the same results, and circuit diagrams and rules such as the right-hand thumb rule use conventional current. The direction of current can be shown in several ways: an LED glows only when current enters through its anode, a DC motor reverses its rotation when the current reverses, and a compass needle near a wire deflects one way or the other depending on the direction. Current is measured in amperes; one ampere is a flow of one coulomb of charge per second (I = Q/t).
Make it yourself
Make a direction of current flow model yourself
Build your own version from scratch, or use the steps to understand how the ready-made model is put together before you present it.
What you need 8
Step by step 8 steps
Wire the DPDT switch as a reversing switch: battery to the two middle pins, and the two outer pairs cross-connected so that flipping the lever swaps plus and minus at the output.
Join the red and green LEDs in reverse-parallel (the long leg of one to the short leg of the other) and connect the pair, with the resistor in series, across the switch output.
Connect the motor across the same output, but route one of its wires as a straight run over the compass position, so the motor's current also passes over the compass.
Place the compass under that straight wire and turn the base until the wire lies north-south along the needle.
- Flip the switch one way
One LED glows, the motor turns one way and the compass needle swings one way; mark these with arrows of one colour.
Flip it the other way and record that the other LED glows, the motor reverses and the needle swings the opposite way.
Draw conventional current arrows (positive to negative) along the wires in one colour and electron flow arrows (negative to positive) in another.
Before each flip, use the right-hand thumb rule to predict which way the needle will swing, then check your prediction.
Read this first
Safety first
Go through these points before you build or switch anything on. Younger students should do this with an adult.
- Never join a bare wire straight across the battery terminals; with no device in the path it is a short circuit and the wire and battery get hot.
- Always keep the resistor in series with the LED pair, or the LEDs will burn out.
- Keep fingers and hair away from the motor shaft and its flag while it spins.
- Use only the 9 V battery, and disconnect it when the model is not being shown.
Troubleshooting
If something does not work
The usual problems with this model and how to fix them. Open a problem to see the fix.
Only one LED ever glows
The two LEDs may be fitted the same way round; they must face opposite ways. If they are correct, the switch is not wired to reverse the output.
The compass needle hardly moves
The wire is too far from the needle or not lined up north-south, or the current is small. Lay the wire right on top of the compass along the needle and use a fresh battery.
Flipping the switch turns everything off instead of reversing it
The cross-connections on the DPDT switch are wrong. Each outer pin on one side must be joined to the opposite outer pin on the other side.
The motor turns but the LEDs stay dark
The LED branch is open. Check the resistor joint, and test whether the LEDs were burnt by an earlier test without the resistor.
Exhibition day
How to present it
A running order for the exhibition table or the practical, step by step.
Draw two arrows on your chart: conventional current from + to −, and electron flow from − to +.
Reverse the battery and show what changes in the model, such as which LED lights or which way a motor turns.
Explain why conventional current is still used even though electrons move the other way.
Use simple symbols and colours on the circuit so judges can follow the path.
Practice
Viva questions
Practice questions on this model, with short answers. Try each one aloud before you open the answer.
What is the direction of conventional current?
From the positive terminal of the source to the negative terminal, through the external circuit.
In which direction do electrons flow in a wire?
From the negative terminal to the positive terminal, opposite to conventional current.
What is the SI unit of electric current?
The ampere (A); one ampere is one coulomb of charge flowing per second.
How can you show the direction of current using an LED?
An LED glows only when current flows from its anode to its cathode, so it lights for one direction only.
Project file
Project file outline
The headings of the project file, in order. Give each heading its own section and write it in your own words.
Free ebook: Writing a Science Project FileContents
- Aim: to show the direction of electric current in a circuit and how it can be reversed
- Conventional current and electron flow: how the two ideas arose
- Circuit diagram with the reversing switch, LEDs, motor and compass
- Observation table: switch position, LED that glows, motor direction and compass swing
- Oersted's experiment and the right-hand thumb rule
- Why an LED shows direction: forward and reverse bias
- Precautions, and errors such as the Earth's field acting on the compass
- Result and conclusion
Buying checklist
Before you buy
What to check before you order the model, and what to do when it arrives.
1Before you order
- Check in the listing which indicators the model uses (LEDs, motor or compass) and match them to what your teacher expects.
- See whether the listing mentions a battery; plan to buy a fresh 9 V battery if it does not.
- Keep the box for transport and carry a spare battery on the exhibition day.
- Check the delivery date for your PIN code on the marketplace, and order well before the exhibition or practical.
- Practise explaining it. Judges ask what the model shows and why; knowing the science matters as much as the model. The viva questions above are a good place to start.
2When it arrives
- When it arrives, flip the switch both ways and confirm that every indicator reverses before you write your observations.
Next steps
Take it further
Ways to turn this model into a bigger investigation or a stronger exhibition entry.
Replace the LEDs with a centre-zero galvanometer and record the size of the deflection in each direction.
With an adult, add a small cell of dilute washing soda solution with two pencil leads and show that more gas forms at the negative lead, which flips when the current is reversed.
Explain the motor's change of direction with Fleming's left-hand rule and a labelled diagram.
Audience
Who it suits
Suits Class 6 to 10 science projects on electric current and circuits, and works as a simple teaching aid.
- ClassClass 10 to 12
- SubjectPhysics
- TypeReady-made model
Free to read
Free ebooks for this topic
Free PDF ebooks from Gurukul Technicals Institute on the science, the making and the presenting of projects like this one.
- Free PDF ebook
Electricity and Magnetism Experiments
Hands-on experiments with cells, wires, bulbs and magnets
- Free PDF ebook
Physics Working Models Explained
Twenty classic models, how each works and how to make it
- Free PDF ebook
Investigatory Projects for Class 11 and 12
Topics, method and report structure for physics, chemistry and biology
- Free PDF ebook
Your Science Exhibition Guide
Choose a project, build it, present it and answer the judges with confidence