- Physics
- Ready-made model
- Class 10 to 12
- Printed report included
Wheatstone Bridge Circuit Readymade Physics Working Investigatory Project & Model For School & College(1 Multimeter+Readymade Report Included), Kid
Code B099QZRH6C
- Paid for and delivered by Amazon. The current price and the delivery date for your PIN code are shown there.
- Sold by Gurukul Technicals Institute, Delhi.
- Need a different topic, a custom version or a school order? Ask on WhatsApp.
In this project guide
Ready-made model
About this model
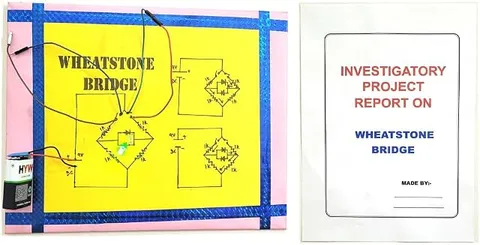
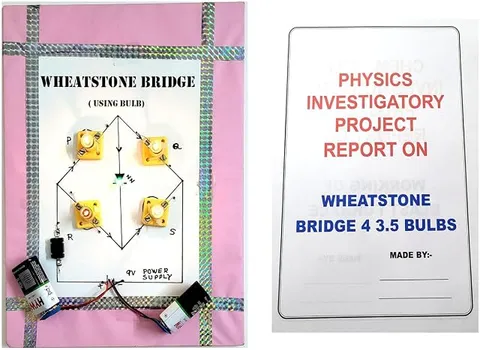
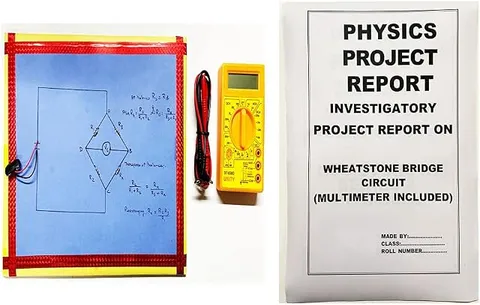
This ready-made model demonstrates the Wheatstone bridge, a circuit used to find an unknown resistance by balancing it against known ones. The listing says it includes a multimeter and a readymade report, so students can take readings and present the result together. It fits the current electricity chapter and practical work on resistance.
How it works
The science behind it
The idea the model demonstrates, in words you can use in your report and when you explain it.
A Wheatstone bridge has four resistors, P, Q, R and S, arranged in a diamond, with a battery across one diagonal and a galvanometer across the other. When the bridge is balanced, the two ends of the galvanometer are at the same potential, so no current flows through it. This happens when P/Q = R/S. If P, Q and R are known, the unknown resistance is S = R × Q / P. For example, if P = 100 Ω, Q = 100 Ω and R = 47 Ω at balance, S is also 47 Ω. Because the result depends on a null reading and not on the exact value of a current, the method is very accurate. The metre bridge in school labs is a practical form of the same circuit. Electronic weighing scales at kirana shops use strain gauges wired in a bridge, where a tiny change in resistance shows up as weight.
Make it yourself
Make a Wheatstone bridge model yourself
Build your own version from scratch, or use the steps to understand how the ready-made model is put together before you present it.
What you need 8
Step by step 8 steps
Draw a diamond on the base with corners A, B, C and D. P goes from A to B, Q from B to C, R from A to D, and the unknown S from D to C.
Fix P and Q, the potentiometer as R, and the clips for S.
Connect the cell through the push switch across A and C.
Connect the galvanometer, or the multimeter on millivolts, across B and D.
Fit an unknown resistor, press the switch, and turn the potentiometer until the detector reads zero. This is the balance point.
Without moving the knob, disconnect the potentiometer and measure its resistance with the multimeter. Calculate S = R × Q / P.
Check your answer by measuring the unknown directly, and work out the percentage difference.
Repeat with the other unknowns and record everything in a table.
Read this first
Safety first
Go through these points before you build or switch anything on. Younger students should do this with an adult.
- Press the switch only while taking a reading; a steady current warms the resistors and drains the cell.
- Use one cell only; a galvanometer is delicate and can be damaged by a large current.
- Never measure resistance with the multimeter while the cell is connected.
- Handle the meter gently and switch it off after use.
Troubleshooting
If something does not work
The usual problems with this model and how to fix them. Open a problem to see the fix.
The detector never reaches zero
The unknown may be outside the potentiometer's range. Change the ratio of P and Q (for example make Q ten times P) or use a different potentiometer.
The needle moves the same way whatever I do
One arm may be broken or joined to the wrong corner. Compare the diamond with your diagram, especially which corners the cell and detector are across.
My calculated value is far from the direct reading
P and Q may not be exactly equal. Measure them and use their real values in S = R × Q / P.
The reading drifts while I watch
The resistors are warming or the cell is weakening. Press the switch briefly and read quickly.
Exhibition day
How to present it
A running order for the exhibition table or the practical, step by step.
Show the balance condition: if your board has a variable arm, adjust it until the meter reads zero, and explain why zero means balance.
Work through the formula on a chart using the resistor values on your board.
Measure the unknown resistance directly with the multimeter and compare it with your calculated value.
Explain why a null method gives more accurate results than measuring a current directly.
Practice
Viva questions
Practice questions on this model, with short answers. Try each one aloud before you open the answer.
What is the balance condition of a Wheatstone bridge?
The bridge is balanced when P/Q = R/S, and then no current flows through the galvanometer.
Why is the Wheatstone bridge method accurate?
It is a null method, so the result does not depend on the galvanometer's calibration or on small changes in current.
Which lab instrument is based on the Wheatstone bridge?
The metre bridge, which is used in labs to find an unknown resistance.
Does the balance condition change if the battery and galvanometer are interchanged?
No, the balance condition P/Q = R/S stays the same.
Project file
Project file outline
The headings of the project file, in order. Give each heading its own section and write it in your own words.
The listing includes a printed project report: use this outline to check that your own file covers every part.
Free ebook: Writing a Science Project FileContents
- Aim: to find an unknown resistance using a Wheatstone bridge
- Introduction: why null methods give accurate results
- Apparatus, including the multimeter, and circuit diagram
- Theory: the balance condition P/Q = R/S
- Procedure: balancing the bridge for each unknown
- Observation table: P, Q, R at balance, calculated S and measured S
- Calculations and percentage error
- Result, precautions and sources of error
- Applications: the metre bridge, strain gauges and sensor circuits
Buying checklist
Before you buy
What to check before you order the model, and what to do when it arrives.
1Before you order
- Check that it matches your Class 12 current electricity syllabus and what your teacher wants.
- Test the balance with each unknown a few days before submission, and keep a fresh cell.
- Rewrite the report in your own words with your own readings.
- Keep the box, and pack the meter separately so its leads are not pulled.
- Check the delivery date for your PIN code on the marketplace, and order well before the exhibition or practical.
- Practise explaining it. Judges ask what the model shows and why; knowing the science matters as much as the model. The viva questions above are a good place to start.
2When it arrives
- The listing says a multimeter and a readymade report are included; check both when the parcel arrives, and learn to use the meter before the practical.
Next steps
Take it further
Ways to turn this model into a bigger investigation or a stronger exhibition entry.
Use a thermistor or an LDR as the unknown and show how its resistance changes with heat or light, the idea behind sensor bridges.
Compare your result with a metre bridge reading in the school lab.
Show that swapping the positions of the cell and the detector does not change the balance point.
Audience
Who it suits
Suits Class 12 physics investigatory projects and practical exams on current electricity, and diploma students revising bridge circuits.
- ClassClass 10 to 12
- SubjectPhysics
- TypeReady-made model
- Project reportPrinted report included
Free to read
Free ebooks for this topic
Free PDF ebooks from Gurukul Technicals Institute on the science, the making and the presenting of projects like this one.
- Free PDF ebook
Electricity and Magnetism Experiments
Hands-on experiments with cells, wires, bulbs and magnets
- Free PDF ebook
Physics Working Models Explained
Twenty classic models, how each works and how to make it
- Free PDF ebook
Investigatory Projects for Class 11 and 12
Topics, method and report structure for physics, chemistry and biology
- Free PDF ebook
Your Science Exhibition Guide
Choose a project, build it, present it and answer the judges with confidence