- Physics
- Ready-made model
- Class 1 to 9
Hydraulic Brake Syringe Based Science Project on Pascal’s Law Educational Electronic Hobby Kit
Code B0G2TCXSYK
- Paid for and delivered by Amazon. The current price and the delivery date for your PIN code are shown there.
- Sold by Gurukul Technicals Institute, Delhi.
- Need a different topic, a custom version or a school order? Ask on WhatsApp.
In this project guide
Ready-made model
About this model
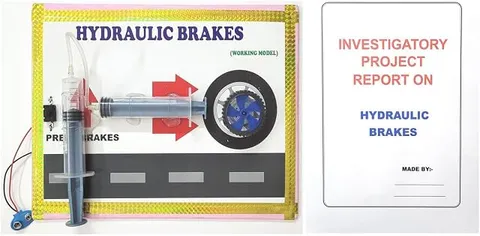
This syringe-based model shows the working of a hydraulic brake, where a push on one piston is passed through a liquid to move another piston some distance away. It is a hands-on way to demonstrate Pascal's law, because visitors can push one syringe themselves and see the other respond.
How it works
The science behind it
The idea the model demonstrates, in words you can use in your report and when you explain it.
Pascal's law states that pressure applied to a liquid enclosed in a container is transmitted equally and undiminished to every part of the liquid and to the walls of the container. Pressure is force per unit area, P = F ÷ A, measured in pascals (1 Pa = 1 N/m²). If a force F₁ acts on a small piston of area A₁, the same pressure reaches a larger piston of area A₂, so the output force is F₂ = F₁ × A₂ ÷ A₁. A bigger output piston gives a bigger force but moves a shorter distance, so no energy is created. Liquids are used because they are almost incompressible; air gets squeezed, which is why air bubbles in brake fluid make car brakes feel spongy. The hydraulic jack at a car service centre, which lifts a whole car with a few strokes of a handle, works on the same principle.
Make it yourself
Make a syringe hydraulic brake model yourself
Build your own version from scratch, or use the steps to understand how the ready-made model is put together before you present it.
What you need 9
Step by step 8 steps
Fill one syringe with coloured water, push the tube onto it and press water through until it comes out of the far end.
Fill the second syringe halfway, then hold both its nozzle and the tube's end under water in a bowl and join them there, so that no air bubbles are trapped.
Fix the first syringe under the pedal on the base, so that pressing the pedal pushes its plunger in.
Mount the wheel on its axle so it spins freely, and fix the second syringe beside it with the eraser pad just short of the wheel's rim.
Fit the rubber band so the pedal springs back up when you let go.
Spin the wheel by hand and press the pedal: the pad should push against the rim and stop it.
Leave an air bubble in the tube on purpose and feel how the pedal becomes spongy, then refill it.
Swap the output syringe for the larger one and compare how hard it presses and how far it moves.
Read this first
Safety first
Go through these points before you build or switch anything on. Younger students should do this with an adult.
- Use only needle-free syringes; never fit a needle.
- Do not press so hard that the tube pops off, and point the joints away from faces.
- Wipe up spilled water at once so nobody slips, and keep it away from electrical items.
- Ask an adult to use the glue gun and to make any holes in the base.
Troubleshooting
If something does not work
The usual problems with this model and how to fix them. Open a problem to see the fix.
The pedal feels spongy and the pad barely moves
There is air in the system. Refill it under water, tapping the tube to drive out the bubbles.
Water leaks at a nozzle
The tube is too loose. Use a narrower tube or tie a thread tightly around the joint.
The pad stays against the wheel after I let go
The plunger is sticking. Smear a little petroleum jelly on its rubber seal and use a stronger rubber band on the pedal.
The wheel keeps turning when the pad touches it
Move the output syringe closer so the pad presses squarely on the rim, and use a grippy eraser.
Exhibition day
How to present it
A running order for the exhibition table or the practical, step by step.
Before the event, make sure the syringes and tube are completely filled with liquid and free of air bubbles; even a small bubble makes the action feel soft.
Let the examiner push one syringe and watch the other move, then explain that the liquid passes on the pressure.
Write F₂ = F₁ × A₂ ÷ A₁ on a small chart with a worked example to show how the force is multiplied.
Link the model to a real vehicle: brake pedal, master cylinder, brake fluid line and the cylinder at each wheel.
Practice
Viva questions
Practice questions on this model, with short answers. Try each one aloud before you open the answer.
What does Pascal's law say about pressure in an enclosed liquid?
Pressure applied to an enclosed liquid is transmitted equally and undiminished in all directions throughout the liquid.
Why is a liquid used in hydraulic brakes instead of air?
A liquid is almost incompressible, so pressure is passed on at once; air would get compressed and the brakes would respond poorly.
In what unit is pressure measured, and what does it equal?
The pascal (Pa), which equals a force of 1 newton acting on an area of 1 square metre.
A force of 10 N acts on a piston of area 2 cm². What force acts on a connected piston of area 20 cm²?
The pressure is 10 ÷ 2 = 5 N/cm², so the force on the larger piston is 5 × 20 = 100 N.
Project file
Project file outline
The headings of the project file, in order. Give each heading its own section and write it in your own words.
Free ebook: Writing a Science Project FileContents
- Aim: to show how a hydraulic brake works using Pascal's law
- Materials
- Pascal's law and the meaning of pressure
- Parts of a vehicle's hydraulic brake: pedal, master cylinder, brake fluid, wheel cylinder and brake pad
- Construction of the syringe model
- Observations with equal syringes and with a larger output syringe
- Why air in the system makes brakes spongy
- Result and other uses of hydraulics, such as jacks and lifts
Buying checklist
Before you buy
What to check before you order the model.
1Check these first
- Pressure in liquids is introduced in middle school and Pascal's law is studied in Class 11; check what level of explanation your teacher expects.
- Check in the listing whether the syringes come filled or you need to add water, and whether any part needs batteries.
- Test the model a few days before the exhibition and refill it if bubbles have formed.
- Carry a small bottle of water and a spare tube on the exhibition day in case of a leak.
- Keep the box for transport, and empty the water if the model will be stored for long.
- Check the delivery date for your PIN code on the marketplace, and order well before the exhibition or practical.
- Practise explaining it. Judges ask what the model shows and why; knowing the science matters as much as the model. The viva questions above are a good place to start.
Next steps
Take it further
Ways to turn this model into a bigger investigation or a stronger exhibition entry.
Measure the force multiplication by putting weights on the output plunger and comparing syringes of different diameters.
Measure how far each plunger moves to show that the larger piston moves less.
Build a hydraulic arm or lift worked by several syringe pairs.
Audience
Who it suits
Suits Class 8 to 11 students studying force, pressure and fluids, for science exhibitions and physics demonstrations.
- ClassClass 1 to 9
- SubjectPhysics
- TypeReady-made model
Free to read
Free ebooks for this topic
Free PDF ebooks from Gurukul Technicals Institute on the science, the making and the presenting of projects like this one.
- Free PDF ebook
Physics Working Models Explained
Twenty classic models, how each works and how to make it
- Free PDF ebook
Your Science Exhibition Guide
Choose a project, build it, present it and answer the judges with confidence
- Free PDF ebook
Writing a Science Project File
How to write the report, from the cover page to the bibliography
- Free PDF ebook
Viva Questions for Science Projects
How to answer examiner questions, with sample questions for popular projects