- Physics
- Ready-made model
- Class 1 to 9
Green House Effect Project Model and Science Teaching Aid Educational Electronic Hobby Kit
Code B0DTY4YFQS
- Paid for and delivered by Amazon. The current price and the delivery date for your PIN code are shown there.
- Sold by Gurukul Technicals Institute, Delhi.
- Need a different topic, a custom version or a school order? Ask on WhatsApp.
In this project guide
Ready-made model
About this model
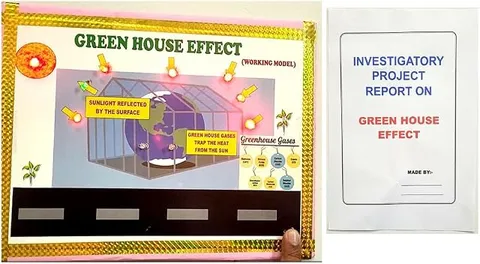
This project model explains the greenhouse effect, how certain gases in the atmosphere trap heat and keep the Earth warm, and how adding more of them leads to global warming. It is a strong topic for environment and climate change exhibitions.
How it works
The science behind it
The idea the model demonstrates, in words you can use in your report and when you explain it.
Sunlight passes through the atmosphere and warms the Earth's surface. The warm surface then gives off infrared radiation, which has a longer wavelength than the incoming sunlight. Greenhouse gases such as carbon dioxide, methane, water vapour and nitrous oxide absorb much of this infrared radiation and send part of it back towards the ground, keeping the lower atmosphere warm. This natural greenhouse effect keeps the Earth's average surface temperature at about 15 °C; without it, the average would be about −18 °C. Burning coal, petrol and diesel, cutting forests, and methane from livestock and flooded rice fields have raised the amount of these gases: carbon dioxide has risen from about 280 parts per million before industrialisation to more than 420 today. This enhanced greenhouse effect causes global warming, melting Himalayan glaciers, rising sea levels and more extreme weather. A car parked in the sun with closed windows is a familiar comparison: sunlight gets in, but heat cannot escape.
Make it yourself
Make a greenhouse effect model with a carbon dioxide test yourself
Build your own version from scratch, or use the steps to understand how the ready-made model is put together before you present it.
What you need 9
Step by step 8 steps
Make a small hole in each cap, push a thermometer probe through and seal round it with clay, so the probe hangs in the middle of the bottle without touching the sides.
Line the bottom of each bottle with a strip of black paper, and label one bottle 'air' and the other 'carbon dioxide'.
Put two spoons of baking soda in the carbon dioxide bottle and pour in about 50 mL of vinegar through the funnel. When the fizzing stops, screw on the cap; carbon dioxide is heavier than air and pushes most of the air out.
Pour 50 mL of plain water into the air bottle, so the only difference between the two bottles is the gas, and close it with its own cap and thermometer.
Place both bottles side by side in sunshine or at the same distance from the lamp, and note both temperatures at the start and then every 2 minutes for 20 to 30 minutes.
Move both bottles into shade and keep reading as they cool.
Plot both sets of readings on one graph. The carbon dioxide bottle usually warms a little faster and cools a little more slowly, although the difference may be only a degree or two.
- Build the display board
Sunlight passing through the atmosphere, the warm ground giving off infrared, and part of it sent back down by greenhouse gases, with a second panel comparing the natural and the enhanced greenhouse effect.
Read this first
Safety first
Go through these points before you build or switch anything on. Younger students should do this with an adult.
- Never look directly at the Sun while setting up, and do not leave plastic bottles in strong sun for hours, as they can soften.
- If you use a lamp, let an adult set it up and switch it on, keep it well away from the bottles and paper, and do not touch the bulb, which gets very hot.
- Vinegar stings the eyes, so pour it slowly through the funnel and wipe up spills; do not cap the bottle while it is still fizzing hard.
- If you use glass lab thermometers, handle them gently and tell an adult at once if one breaks; do not touch the contents.
Troubleshooting
If something does not work
The usual problems with this model and how to fix them. Open a problem to see the fix.
Both bottles show the same temperature
The difference is small, so first check that the two thermometers read the same side by side. Cap the carbon dioxide bottle soon after the fizzing stops, and run the test longer in stronger sunlight.
The readings jump up and down
Wind or shadows are reaching one bottle. Shield both from breeze, keep them the same distance from the light, and keep the probes off the plastic.
The air bottle gets hotter than the carbon dioxide bottle
One bottle may be getting more light. Swap their positions and repeat; scientists repeat a test to check that a result is not chance.
A teacher asks whether this proves global warming
Explain that a closed bottle also warms because it traps warm air, so this is a model, not proof. The real evidence comes from long-term measurements of carbon dioxide and temperature, which you can quote from a reliable source.
Exhibition day
How to present it
A running order for the exhibition table or the practical, step by step.
Explain the difference between the natural greenhouse effect, which life needs, and the enhanced effect caused by human activity.
Show a simple chart of how carbon dioxide levels have risen to make the change visible.
Name the main greenhouse gases and a human source of three of them: carbon dioxide from burning fuels, methane from livestock and rice fields, and nitrous oxide from fertilisers.
End with practical solutions such as solar power, public transport, planting trees and saving electricity.
Practice
Viva questions
Practice questions on this model, with short answers. Try each one aloud before you open the answer.
Name two greenhouse gases.
Carbon dioxide and methane; water vapour and nitrous oxide are also greenhouse gases.
What would the Earth's average temperature be without the greenhouse effect?
About −18 °C, instead of the present average of about 15 °C, which would be too cold for most life.
What is the difference between the greenhouse effect and global warming?
The greenhouse effect is the natural warming of the Earth by gases in the atmosphere; global warming is the rise in average temperature caused by humans adding more of these gases.
How can we reduce greenhouse gas emissions?
By using renewable energy, saving electricity, using public transport, and planting and protecting trees.
Project file
Project file outline
The headings of the project file, in order. Give each heading its own section and write it in your own words.
Free ebook: Writing a Science Project FileContents
- Aim: to show how carbon dioxide traps heat, using a two-bottle model of the greenhouse effect
- Introduction: sunlight, infrared radiation and greenhouse gases
- The natural greenhouse effect and why the Earth needs it
- The enhanced greenhouse effect: fossil fuels, deforestation and methane
- Materials and method of the two-bottle test
- Observations: temperature table and graph for air and carbon dioxide
- Limits of the model and how they were controlled
- Effects of global warming and ways to reduce it
- Conclusion and bibliography
Buying checklist
Before you buy
What to check before you order the model, and what to do when it arrives.
1Before you order
- Check that the greenhouse effect or climate change is part of your syllabus or exhibition theme, and decide whether a display model or an experiment suits your class.
- Read the listing to see what is described as working in the model, so you can plan any experiment you want to add beside it.
- Collect two or three current facts about carbon dioxide levels from a government or science website for your explanation.
- Keep the box, as display arrows and labels bend easily in a bag.
- Check the delivery date for your PIN code on the marketplace, and order well before the exhibition or practical.
- Practise explaining it. Judges ask what the model shows and why; knowing the science matters as much as the model. The viva questions above are a good place to start.
2When it arrives
- Unpack it on arrival, check any lights or moving parts, and try it again a few days before the exhibition.
Next steps
Take it further
Ways to turn this model into a bigger investigation or a stronger exhibition entry.
Repeat the test with a third bottle wrapped in thin white cloth to stand for clouds, and discuss how clouds both reflect sunlight and trap heat.
Work out your family's monthly carbon dioxide emissions from electricity and fuel use with published emission factors, and suggest three ways to cut them.
Compare the greenhouse effect with a real greenhouse or a car parked in the sun, and explain where the comparison works and where it does not.
Audience
Who it suits
Suits Class 7 to 10 science and geography exhibitions on climate change and the environment.
- ClassClass 1 to 9
- SubjectPhysics
- TypeReady-made model
Free to read
Free ebooks for this topic
Free PDF ebooks from Gurukul Technicals Institute on the science, the making and the presenting of projects like this one.
- Free PDF ebook
Physics Working Models Explained
Twenty classic models, how each works and how to make it
- Free PDF ebook
Your Science Exhibition Guide
Choose a project, build it, present it and answer the judges with confidence
- Free PDF ebook
Writing a Science Project File
How to write the report, from the cover page to the bibliography
- Free PDF ebook
Viva Questions for Science Projects
How to answer examiner questions, with sample questions for popular projects