- Physics
- Ready-made model
- Class 1 to 9
Formation Sources and Stages of River Working Model and Teaching Aid Educational Electronic Hobby Kit
Code B0DTYLD1FB
- Paid for and delivered by Amazon. The current price and the delivery date for your PIN code are shown there.
- Sold by Gurukul Technicals Institute, Delhi.
- Need a different topic, a custom version or a school order? Ask on WhatsApp.
In this project guide
Ready-made model
About this model
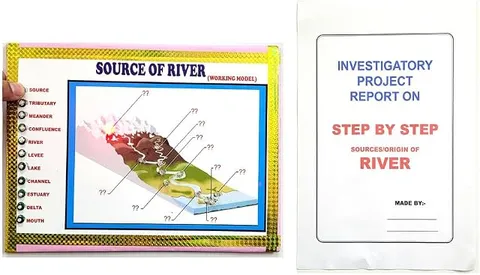
This working model explains how a river forms, where its water comes from and how it changes along its course from the mountains to the sea. It helps a student describe the landforms a river creates at each stage, such as waterfalls, meanders and deltas.
How it works
The science behind it
The idea the model demonstrates, in words you can use in your report and when you explain it.
A river begins at its source, which may be a melting glacier, a spring, a lake or rainwater collecting on hills. Gravity pulls the water downhill, and the water cycle keeps it supplied. In its upper course the slope is steep and the water flows fast, cutting downward to form V-shaped valleys, gorges, rapids and waterfalls. In the middle course the slope is gentler, the river widens and swings from side to side in loops called meanders; a meander that gets cut off becomes an ox-bow lake. In the lower course the river is slow and drops its load of silt, building wide floodplains and finally a delta where it meets the sea. Smaller rivers that join it are tributaries, and channels that split off near the mouth are distributaries. The Ganga's headstream, the Bhagirathi, rises from the Gangotri glacier; the Ganga and the Brahmaputra together form the Sundarbans delta, the largest in the world.
Make it yourself
Make a river stages model yourself
Build your own version from scratch, or use the steps to understand how the ready-made model is put together before you present it.
What you need 8
Step by step 8 steps
Build high mountains at one end of the base and slope the land gently down to a sea at the other end.
Put a glacier and a spring near the mountain top as the river's sources.
Shape the upper course with a narrow V-shaped valley, a gorge, and a waterfall where the river drops over a band of hard rock.
Shape the middle course with a wider valley and a meander, and show an ox-bow lake beside it.
Shape the lower course as a wide, flat floodplain where the river splits into channels and forms a delta at the sea.
Line the river bed with plastic sheet and paint it blue; an adult can coat it with clear varnish.
For flowing water, put the pump in the sea and run its tube to the top of the waterfall, keeping the battery high and dry.
Label the source, each course, every landform and the mouth.
Read this first
Safety first
Go through these points before you build or switch anything on. Younger students should do this with an adult.
- Keep the battery and switch above and away from the water, with joints taped.
- Varnish and some glues give off fumes, so an adult should use them in an airy place.
- Never run the pump dry, and never use a mains pump.
- Ask an adult to use any cutter.
Troubleshooting
If something does not work
The usual problems with this model and how to fix them. Open a problem to see the fix.
Water soaks into the papier-mache
The lining has a gap. Use one unbroken plastic sheet under the river and seal its edges with glue or tape.
The pump cannot lift water to the waterfall
The lift is too high for the pump. Lower the waterfall, or use a pump with a higher lift that still runs on a safe battery voltage.
The landforms are hard to tell apart
Use numbered flags and a key, and paint each course a slightly different shade.
The papier-mache will not dry
Use thinner layers and let each one dry before adding the next.
Exhibition day
How to present it
A running order for the exhibition table or the practical, step by step.
Follow the river from source to mouth on the model, naming one landform at each stage.
Explain why the river erodes in the mountains but deposits silt in the plains, using its speed as the key idea.
Show a map of the Ganga and mark its source, a few main tributaries and its delta.
Mention why river plains are fertile and densely populated, linking geography with daily life.
Practice
Viva questions
Practice questions on this model, with short answers. Try each one aloud before you open the answer.
What is the difference between a tributary and a distributary?
A tributary is a smaller river that joins the main river, while a distributary is a channel that branches off from the main river, usually near its mouth.
Why does a river form a V-shaped valley in its upper course?
The steep slope makes the water flow fast, so it cuts mainly downward into the rock.
How is an ox-bow lake formed?
When a river cuts across the narrow neck of a meander, the loop is left behind as a curved lake.
What is a delta?
A delta is a landform of deposited silt, often triangular, formed where a slow river meets the sea or a lake.
Project file
Project file outline
The headings of the project file, in order. Give each heading its own section and write it in your own words.
Free ebook: Writing a Science Project FileContents
- Aim: to show how a river forms and shapes the land along its upper, middle and lower course
- Materials
- Sources of river water and the role of the water cycle
- The three stages of a river and their landforms
- Erosion, transportation and deposition
- Construction of the model
- An example from India: the Ganga from the Gangotri glacier to its delta
- Keeping rivers clean
- Conclusion
Buying checklist
Before you buy
What to check before you order the model.
1Check these first
- Rivers and landforms are covered in middle-school geography; check which landforms your teacher wants shown.
- Check in the listing whether the model uses real water or a pump, and what power it needs.
- Test any water flow a few days before the exhibition, and keep a towel handy on the day.
- Keep the box for transport, and drain any water before packing.
- Check the delivery date for your PIN code on the marketplace, and order well before the exhibition or practical.
- Practise explaining it. Judges ask what the model shows and why; knowing the science matters as much as the model. The viva questions above are a good place to start.
Next steps
Take it further
Ways to turn this model into a bigger investigation or a stronger exhibition entry.
Make a sand slope in a tray and pour water from different heights to watch erosion and deposition happen.
Compare erosion on a bare sand slope with a slope covered in grass or cloth.
Add a panel on pollution in a river near you and the steps that could reduce it.
Audience
Who it suits
Suits Class 6 to 9 geography and social science exhibitions on rivers and landforms.
- ClassClass 1 to 9
- SubjectPhysics
- TypeReady-made model
Free to read
Free ebooks for this topic
Free PDF ebooks from Gurukul Technicals Institute on the science, the making and the presenting of projects like this one.
- Free PDF ebook
Physics Working Models Explained
Twenty classic models, how each works and how to make it
- Free PDF ebook
Your Science Exhibition Guide
Choose a project, build it, present it and answer the judges with confidence
- Free PDF ebook
Writing a Science Project File
How to write the report, from the cover page to the bibliography
- Free PDF ebook
Viva Questions for Science Projects
How to answer examiner questions, with sample questions for popular projects