- Physics
- Ready-made model
- Class 10 to 12
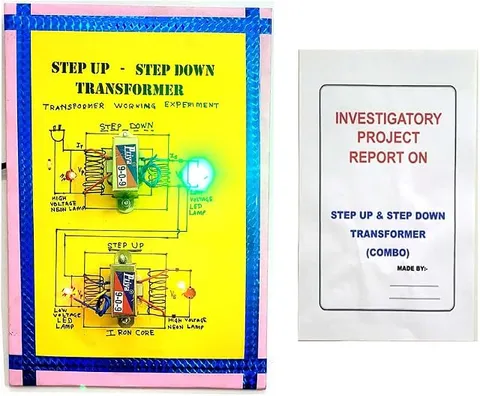
Step Up and Step Down Transformer Physics Investigatory Project Model Engineering College & Science Teaching Aid
Code B0DMKXZXS7
- Paid for and delivered by Amazon. The current price and the delivery date for your PIN code are shown there.
- Sold by Gurukul Technicals Institute, Delhi.
- Need a different topic, a custom version or a school order? Ask on WhatsApp.
In this project guide
Ready-made model
About this model
This physics model covers step-up and step-down transformers, showing how a transformer raises or lowers an AC voltage. It helps students explain how electricity is sent over long distances and then brought down to a safe level for homes.
How it works
The science behind it
The idea the model demonstrates, in words you can use in your report and when you explain it.
A transformer has two coils, the primary and the secondary, wound on a common soft-iron core. Alternating current in the primary produces a changing magnetic flux in the core, which induces an emf in the secondary by mutual induction. The voltages are in the ratio of the turns: Vs/Vp = Ns/Np. A step-up transformer has more secondary turns and raises the voltage; a step-down one has fewer and lowers it. In an ideal transformer, power in equals power out (VpIp = VsIs), so raising the voltage lowers the current. For example, with 1000 primary turns, 50 secondary turns and a 230 V input, the output is 230 × 50/1000 = 11.5 V. A transformer does not work on steady DC, because the flux must keep changing. Power stations step the voltage up for transmission to cut I²R losses, and the transformer near your colony steps it down for homes. A laminated core reduces eddy-current losses.
Make it yourself
Make a step-up and step-down transformer model yourself
Build your own version from scratch, or use the steps to understand how the ready-made model is put together before you present it.
What you need 9
Step by step 9 steps
Wrap the centre limb of the core with one layer of paper or tape so the sharp metal edges cannot scratch the enamel, and make three bobbins that slide onto it.
- Wind the primary coil
200 turns on the first bobbin, all in one direction, counting in tens and taping each layer. Leave 10 to 15 cm of wire free at both ends.
Wind the step-down secondary on the second bobbin with 100 turns and the step-up secondary on the third with 400 turns, and label each bobbin with its turns.
Rub about 1 cm of enamel off every wire end with fine sandpaper until the copper is bright, then fix the ends to labelled screw terminals on the base.
Slide the bobbins onto the core and close it with the I strips pressed tight and taped, because any air gap weakens the magnetic link between the coils.
With the adapter unplugged, connect its output leads to the primary terminals. Then ask an adult to plug it in and switch it on.
Set the multimeter to AC volts and measure across the primary and across each secondary. Write down every reading next to its number of turns.
Connect the 3 V bulb to the 100-turn coil and the 12 V bulb to the 400-turn coil to show visitors the lower and the higher output.
Ask the adult to switch off and unplug the adapter before you change any connection, and between demonstrations.
Read this first
Safety first
Go through these points before you build or switch anything on. Younger students should do this with an adult.
- Power the model only from a low-voltage AC adapter, plugged in and switched off by an adult. Students must never wire anything to a wall socket or open the adapter.
- Keep the step-up ratio small, as here, so the highest output stays at a safe low voltage of around 12 V.
- Switch off if the primary coil or the adapter gets warm; it usually means too few primary turns or turns shorted by scratched enamel.
- Ask an adult to separate the core strips, as their edges are sharp, and wash your hands after sanding the wire ends.
Troubleshooting
If something does not work
The usual problems with this model and how to fix them. Open a problem to see the fix.
Nothing happens when I connect a battery to the primary
A transformer works only with a changing current, so a battery gives no steady output, just a tiny flick at the moment you connect or disconnect it. Use the low-voltage AC adapter, connected by an adult.
There is no reading at all on the secondary coils
Check that the adapter's label says the output is AC; many adapters give DC, which will not work. Then check each coil for a break using the multimeter's continuity setting.
The outputs are much lower than the turns ratio predicts
Some loss is normal in a homemade transformer. Close any gaps in the core, press the strips tightly together, make sure every wire end is fully cleaned, and measure first with no bulb connected.
The adapter hums loudly or gets warm
The primary has too few turns for the core, or some turns are shorted. Ask an adult to unplug it, then add turns to the primary or rewind it carefully.
Exhibition day
How to present it
A running order for the exhibition table or the practical, step by step.
Show both types side by side and point out the difference in the number of turns.
Work out one turns-ratio example on a chart with real numbers.
Explain why a transformer will not work from a battery.
Use the transformer near your school or colony as a real-life example.
Practice
Viva questions
Practice questions on this model, with short answers. Try each one aloud before you open the answer.
Why does a transformer not work on DC?
Steady DC produces a constant magnetic flux, and only a changing flux can induce an emf in the secondary coil.
What is the turns-ratio formula for a transformer?
Vs/Vp = Ns/Np, so the voltage changes in the same ratio as the number of turns.
Why is the core of a transformer laminated?
Thin insulated sheets break up eddy currents in the core, which reduces the energy lost as heat.
Why is electricity transmitted at high voltage?
At high voltage the same power is carried by a smaller current, so less energy is lost as heat (I²R) in the transmission wires.
Project file
Project file outline
The headings of the project file, in order. Give each heading its own section and write it in your own words.
Free ebook: Writing a Science Project FileContents
- Aim: to show how a transformer raises and lowers an AC voltage
- Apparatus and materials used
- Theory: mutual induction and the turns ratio
- Construction of the core and the three coils
- Observation table: number of turns, measured voltage and voltage ratio for each coil
- Comparison of the measured voltage ratios with the turns ratios
- Energy losses in a real transformer: copper loss, eddy currents and flux leakage
- Use of step-up and step-down transformers between power stations and homes
- Result, precautions and sources of error
Buying checklist
Before you buy
What to check before you order the model.
1Check these first
- Transformers are part of the Class 12 alternating current chapter; check whether your teacher wants both step-up and step-down working shown.
- Read the listing to see what power source the model is meant to use and whether one is included; if an AC adapter is needed, an adult should buy and connect it.
- Check in the listing whether a report or circuit diagram is included; either way, take your own voltage readings for the project file.
- Test the model with an adult a few days before submission, so there is time to fix a loose wire.
- Keep the box and packing to carry the model to school, because the coils and wire ends are delicate.
- Check the delivery date for your PIN code on the marketplace, and order well before the exhibition or practical.
- Practise explaining it. Judges ask what the model shows and why; knowing the science matters as much as the model. The viva questions above are a good place to start.
Next steps
Take it further
Ways to turn this model into a bigger investigation or a stronger exhibition entry.
Measure the input and output currents as well as the voltages and work out the efficiency of your transformer.
Wind a secondary with a tapping every 50 turns and plot output voltage against number of turns to show a straight-line relationship.
Compare a laminated core with a solid iron bolt to show the effect of eddy current losses.
Build a model power line: a step-up transformer, a long thin wire and a step-down transformer, to show why high-voltage transmission wastes less energy.
Audience
Who it suits
Suits Class 12 physics investigatory projects on alternating current and polytechnic or engineering electrical labs.
- ClassClass 10 to 12
- SubjectPhysics
- TypeReady-made model
Free to read
Free ebooks for this topic
Free PDF ebooks from Gurukul Technicals Institute on the science, the making and the presenting of projects like this one.
- Free PDF ebook
Electricity and Magnetism Experiments
Hands-on experiments with cells, wires, bulbs and magnets
- Free PDF ebook
Physics Working Models Explained
Twenty classic models, how each works and how to make it
- Free PDF ebook
Investigatory Projects for Class 11 and 12
Topics, method and report structure for physics, chemistry and biology
- Free PDF ebook
Your Science Exhibition Guide
Choose a project, build it, present it and answer the judges with confidence