- Biology
- Ready-made model
- Class 1 to 9
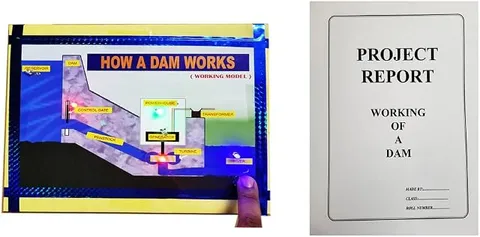
How a Dam Works Biology Working Model Educational Science Project
Code B0BN2S1MFS
- Paid for and delivered by Amazon. The current price and the delivery date for your PIN code are shown there.
- Sold by Gurukul Technicals Institute, Delhi.
- Need a different topic, a custom version or a school order? Ask on WhatsApp.
In this project guide
Ready-made model
About this model
This working model explains how a dam stores river water in a reservoir and uses it to generate hydroelectricity, while also supplying water for irrigation and drinking. It helps a student explain the energy changes in a hydropower station and weigh the benefits and problems of large dams.
How it works
The science behind it
The idea the model demonstrates, in words you can use in your report and when you explain it.
A dam blocks a river and stores water in a reservoir high above the power house. This raised water has gravitational potential energy, mgh. When the gates open, water rushes down a large pipe called a penstock, its potential energy changes into kinetic energy, and the fast-moving water strikes the blades of a turbine. The turbine turns a generator, which produces electricity by electromagnetic induction. The more water that flows, and the greater the height it falls, the more power is produced. The wall of a dam is made thicker at the base because liquid pressure increases with depth (P = hρg). Hydroelectricity is renewable, since the water cycle, driven by the Sun, refills the reservoir. India's Bhakra Nangal Dam on the Sutlej and Tehri Dam on the Bhagirathi provide both electricity and irrigation water.
Make it yourself
Make a working dam and hydropower model yourself
Build your own version from scratch, or use the steps to understand how the ready-made model is put together before you present it.
What you need 9
Step by step 8 steps
Place the reservoir at one end of the tray, raised on a block so the water stands well above the power house.
Build the dam wall across the reservoir's outlet from clay, much thicker at the base than at the top.
Push the straw through the lower part of the wall as the penstock and seal around it with putty.
Mount the spoon turbine on its axle just below the penstock's end so the jet strikes the spoons.
Join the turbine axle to the motor shaft with a short piece of tight tube, keeping the motor and wires high and dry.
Add a spillway near the top of the wall and channels leading to small fields for irrigation.
Fill the reservoir and let water run through the penstock, measuring the motor's output on the multimeter's lowest voltage range.
Repeat with the reservoir half full to show that a lower water level gives less output.
Read this first
Safety first
Go through these points before you build or switch anything on. Younger students should do this with an adult.
- Keep the motor, wires and multimeter above the water, and wipe up spills straight away.
- Never use a mains pump or any mains device near the water.
- Ask an adult to cut bottles and pipes, as cut plastic edges are sharp.
Troubleshooting
If something does not work
The usual problems with this model and how to fix them. Open a problem to see the fix.
The turbine does not turn
The jet is missing the spoons or the water level is too low. Line the penstock's end up with the spoons and raise the reservoir.
The LED does not light
A small drop of water may turn the motor too slowly to light an LED. Show the output on the multimeter instead, or raise the reservoir higher.
Water leaks around the wall
Press the clay firmly onto the container and seal the joints with putty.
The wall bulges or collapses
Make the base thicker and curve the wall towards the reservoir.
Exhibition day
How to present it
A running order for the exhibition table or the practical, step by step.
Trace the path of water from the reservoir to the turbine and back to the river, pointing to each part shown on the model.
Name each energy change aloud: potential to kinetic to mechanical to electrical.
Explain why the dam wall is wider at the bottom, a favourite examiner question.
Give a balanced view by listing benefits, such as power, irrigation and flood control, along with problems such as displacement of people and loss of forest land.
Practice
Viva questions
Practice questions on this model, with short answers. Try each one aloud before you open the answer.
Why is a dam wall thicker at the bottom than at the top?
Water pressure increases with depth, so the lower part of the wall must withstand a much greater force.
What energy changes take place in a hydroelectric power station?
The potential energy of stored water changes into kinetic energy, then into mechanical energy of the turbine, and finally into electrical energy in the generator.
Is hydroelectric power renewable?
Yes. Rain and snowfall, part of the water cycle driven by the Sun, keep refilling the reservoir.
Name one disadvantage of building large dams.
Large dams can submerge forests, farmland and villages, displacing people and disturbing river life such as fish.
Project file
Project file outline
The headings of the project file, in order. Give each heading its own section and write it in your own words.
Free ebook: Writing a Science Project FileContents
- Aim: to show how a dam stores water and uses it to generate electricity
- Materials
- Parts of a dam: reservoir, wall, gates, penstock, turbine, generator and spillway
- Energy changes in a hydroelectric power station
- Observations: effect of water level on turbine speed and output voltage
- Uses of dams: irrigation, drinking water and flood control
- Problems caused by large dams
- Conclusion
Buying checklist
Before you buy
What to check before you order the model.
1Check these first
- Dams appear in middle-school science and geography; check whether your teacher wants the energy side, the water-supply side or both.
- Check in the listing whether the model uses real water or is a display model, and what batteries any lights need.
- Test the model a few days before the exhibition, and if it uses water, check carefully for leaks.
- Keep the box for transport and empty out any water before packing.
- Check the delivery date for your PIN code on the marketplace, and order well before the exhibition or practical.
- Practise explaining it. Judges ask what the model shows and why; knowing the science matters as much as the model. The viva questions above are a good place to start.
Next steps
Take it further
Ways to turn this model into a bigger investigation or a stronger exhibition entry.
Make holes at three depths in a tall bottle of water to show why a dam wall is thicker at the base.
Plot output voltage against water height and link it to potential energy.
Add a second, lower reservoir to explain how pumped storage works.
Audience
Who it suits
Suits Class 6 to 10 science and geography exhibitions on sources of energy and water resources.
- ClassClass 1 to 9
- SubjectBiology
- TypeReady-made model
Free to read
Free ebooks for this topic
Free PDF ebooks from Gurukul Technicals Institute on the science, the making and the presenting of projects like this one.
- Free PDF ebook
Biology Models Guide
Make the heart, lungs, kidney, eye, cell and more, and explain them well
- Free PDF ebook
Your Science Exhibition Guide
Choose a project, build it, present it and answer the judges with confidence
- Free PDF ebook
Writing a Science Project File
How to write the report, from the cover page to the bibliography
- Free PDF ebook
Viva Questions for Science Projects
How to answer examiner questions, with sample questions for popular projects